Hole 17 at PGA WEST (Norman course)
- Par
- 3
- Yardage
- 180 yds
- Stroke index
- 14
- Hazards
- 3 bunkers · Water
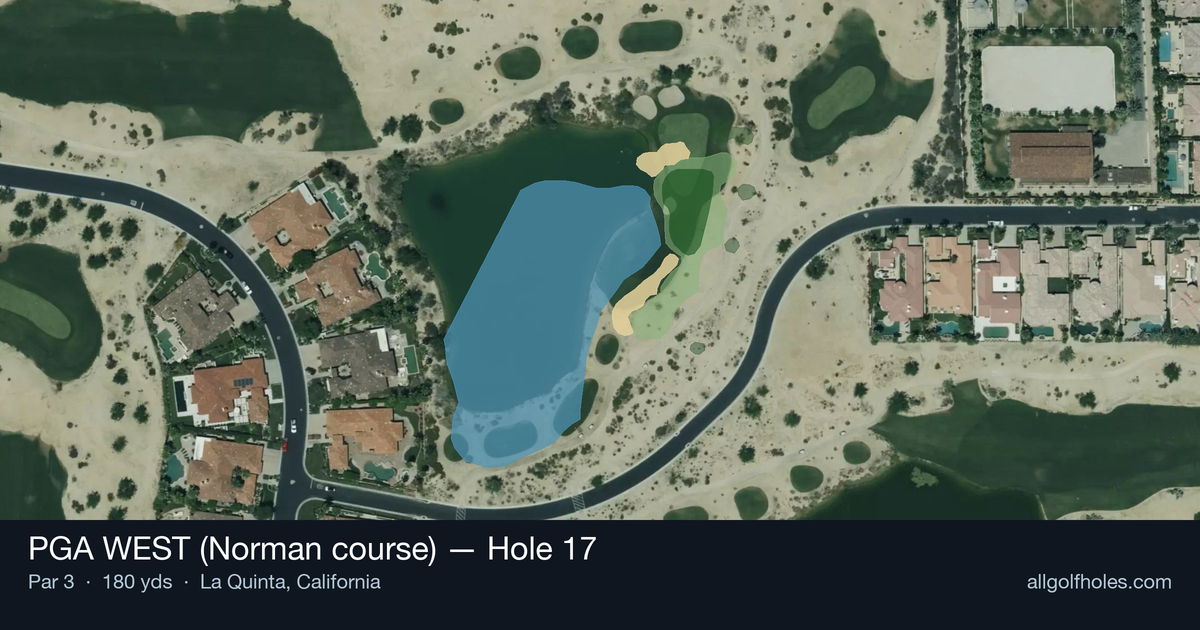
Aerial source not provided
Green size: 39 yds deep × 33 yds wide
Scorecard yardage is for Championship tees. The aerial shows its labeled reference position; distance rings measure to the green.
Championship tees · Par 3 · 180 yards
The plan for No. 17
The 17th hole at PGA WEST's Norman course presents a deceptively straightforward par 3 that demands precision over power. At 180 yards, this hole may appear benign compared to the course's more notorious challenges, but the small green creates an unforgiving target that punishes wayward shots. The straight layout offers no place to hide, making club selection and accuracy paramount. Without significant hazards to navigate, golfers must focus entirely on distance control and pin placement, as the compact green leaves little margin for error. This hole exemplifies Greg Norman's design philosophy of rewarding precise execution while exposing any weakness in a player's short iron game.
Off the tee
From the tee, focus on smooth tempo and solid contact rather than trying to overpower the shot. A confident mid-iron to long-iron swing (depending on conditions and your distances) should be the play here. Choose a club that gets you to the middle of the green with a comfortable swing - avoid being between clubs at all costs. Aim for the center of the green regardless of pin position, as the small target leaves little margin for error. Take one extra club if there's any doubt, as coming up short in the desert is far worse than being long.
Approach & recovery
Since this is a par-3, your tee shot IS your approach shot. The key is committing fully to your yardage and club selection. Check the wind carefully, as desert courses can have swirling conditions that affect ball flight. With no significant hazards mentioned, the primary concern is simply finding the putting surface. Focus on a target in the heart of the green and trust your swing. A smooth, balanced finish will help ensure solid contact and proper distance control.
On the green
With a small green, proximity to the hole becomes crucial for birdie opportunities. Expect the putting surface to have subtle breaks typical of desert courses, where grain direction and wind exposure can influence ball roll. Two-putt pars should be the primary goal, with any birdie chances being a bonus. Read putts carefully, as the compact surface means even slight misreads can leave you with challenging second putts. ## RISK VS REWARD This hole offers a moderate risk/reward scenario. The reward is a legitimate birdie opportunity on a relatively short par-3. The risk comes from the small target and potential for missing the green entirely in desert conditions. The smart play is conservative - aim for the center of the green and take your par. Aggressive pin-hunting should only be attempted when you're supremely confident in your distance control and the conditions are favorable. ## DIFFERENT SKILL LEVELS **High-Handicap Players:** Focus entirely on finding the green with a club you're confident with, even if it means taking an extra club. Aim for the absolute center of the green regardless of pin position. A bogey here isn't the end of the world, but missing the green can lead to bigger numbers. **Low-Handicap Players:** This hole offers a scoring opportunity if you can dial in your distances precisely. Consider pin position and use your yardage book to identify the best angle of attack. With good distance control, this should be a birdie hole that helps offset tougher holes on the course. The 17th at PGA WEST's Norman course rewards patience, precision, and smart course management - qualities that define successful desert golf.
Watch for
- Course conditioning and mapped hazards may affect line selection; confirm from the aerial.
Hole 17 Green Complex
Mapped green boundary
Green size: 5,520 sq ft
How did Hole 17 play?
How did this hole play today?
Frequently asked questions
Yardage reference: Championship tees · 180 yards.
What club should I use on this par 3?
↓
At 180 yards, most golfers will need a long iron or hybrid (5-iron to 6-iron) to reach this green. Adjust for elevation, wind, and pin position.
How difficult is hole 17?
↓
This hole is a moderate challenge for most golfers. Key challenges include: water in play.
What hazards should I watch out for on hole 17?
↓
Key hazards include: water at 104.8 yards. Plan your shots to avoid these trouble spots.
How big is the green on hole 17?
↓
The green is medium-sized with moderate targets. The green is deeper than wide, so club selection is crucial. Pay attention to pin placement when selecting your approach club.