Hole 4 at PGA WEST (Norman course)
- Par
- 3
- Yardage
- 140 yds
- Stroke index
- 17
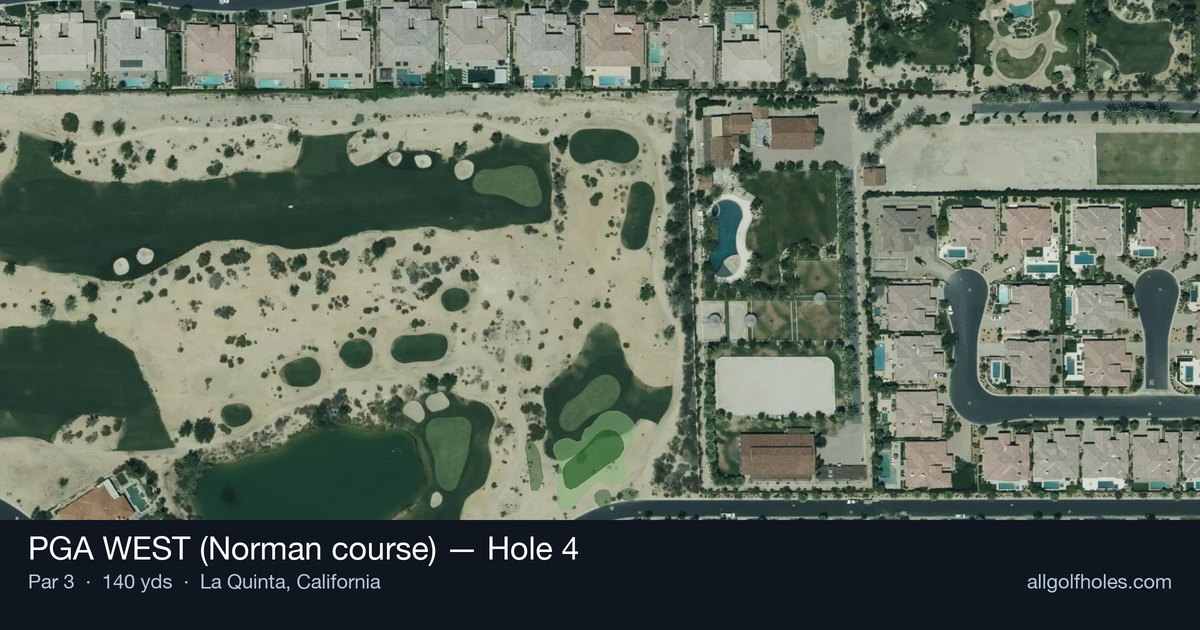
Aerial source not provided
Green size: 36 yds deep × 28 yds wide
Scorecard yardage is for Championship tees. The aerial shows its labeled reference position; distance rings measure to the green.
Championship tees · Par 3 · 140 yards
The plan for No. 4
The shortest hole on PGA WEST's Norman course, this 140-yard par 3 presents a deceptively challenging target despite its modest length. With no significant hazards guarding the approach, the primary challenge lies in the precision required to find the small green complex. The straight-forward layout demands accuracy over power, making club selection critical as golfers must account for desert conditions and potential wind factors. What appears straightforward from the tee requires careful attention to pin position and green conditions. This hole rewards conservative strategy and solid fundamentals, serving as a crucial scoring opportunity where par should never be taken for granted in the unforgiving desert landscape of La Quinta.
Off the tee
Club selection is critical on this short par 3. Most players will be choosing between a wedge and short iron, depending on pin position and wind conditions. The target line should favor the center of the green, as the small putting surface leaves little margin for error. Take one extra club if there's any doubt - coming up short on a par 3 with no front hazards is a cardinal sin. Pay attention to wind direction and green firmness, as these factors significantly impact how the ball reacts on landing.
Approach & recovery
Since this is a par 3, your tee shot IS your approach shot. Focus on a smooth, controlled swing rather than trying to dial in exact yardage. The small green demands a high, soft landing to ensure the ball stops quickly. Aim for the fat part of the green and let your short game handle any lengthy putts. If the pin is tucked near an edge, resist the temptation to fire directly at it - the center of the green is always your friend on small targets.
On the green
Small greens typically feature subtle breaks that can be deceptive. Spend time reading the overall slope and grain direction during your pre-round preparation. Lag putting becomes crucial here, as three-putts can quickly turn a scoring opportunity into a bogey. Focus on getting your first putt within a three-foot circle, regardless of pin position. The elevated handicap suggests this green may have some tricky slopes or speed variations. ## RISK VS REWARD The risk/reward calculation here is straightforward - there's minimal reward for aggressive play given the small target. The smart play is conservative: aim for the center of the green and rely on your putting to create birdie opportunities. The reward for a well-struck shot is substantial (easy birdie or par), while the risk of missing the green entirely can lead to difficult up-and-downs. ## DIFFERENT SKILL LEVELS **High-handicap players** should focus entirely on finding the green. Choose a club that ensures you won't come up short, aim for the center regardless of pin position, and make a smooth, confident swing. A bogey here isn't devastating, but a double bogey from poor execution can derail momentum. **Low-handicap players** can be slightly more aggressive with pin hunting, especially when the pin is accessible. However, even scratch golfers should respect the small target and prioritize green-in-regulation over getting close to tucked pins. Use this hole as a confidence builder and potential birdie opportunity to offset tougher holes elsewhere on the course. The key to mastering this hole lies in understanding that sometimes the most strategic play is also the most conservative one. Let the short yardage work in your favor by ensuring solid contact and green-finding accuracy.
Watch for
- Course conditioning and mapped hazards may affect line selection; confirm from the aerial.
Hole 4 Green Complex
Mapped green boundary
Green size: 3,867 sq ft
How did Hole 4 play?
How did this hole play today?
Frequently asked questions
Yardage reference: Championship tees · 140 yards.
What club should I use on this par 3?
↓
At 140 yards, most golfers will need a short iron (9-iron to PW) to reach this green. Adjust for elevation, wind, and pin position.
How difficult is hole 4?
↓
This hole is a good scoring opportunity for most golfers. Key challenges include: small green.
How big is the green on hole 4?
↓
The green is small and requires precision. Expect challenging pin positions with limited room for error.
What's a good score on hole 4?
↓
This hole is a legitimate birdie opportunity for accurate iron players. Most golfers should target par, with birdie chances if you hit the green in regulation.