Hole 6 at PGA WEST (Norman course)
- Par
- 4
- Yardage
- 481 yds
- Stroke index
- 1
- Hazards
- 7 bunkers
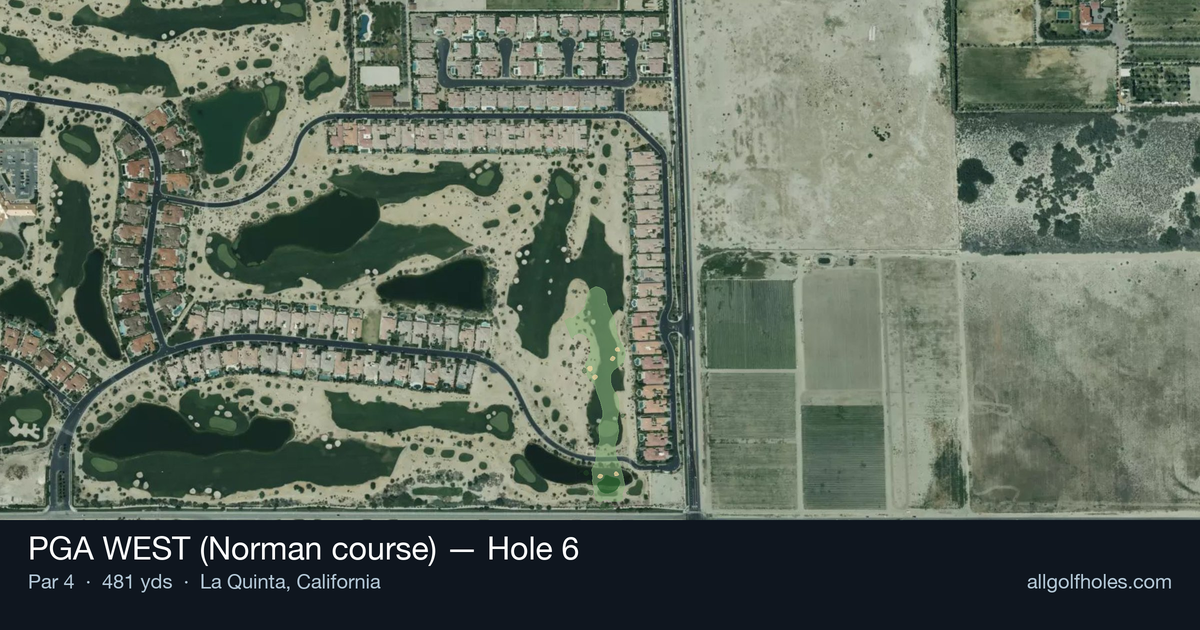
Aerial source not provided
Green size: 30 yds deep × 37 yds wide
Scorecard yardage is for Championship tees. The aerial shows its labeled reference position; distance rings measure to the green.
Championship tees · Par 4 · 481 yards
The plan for No. 6
The signature hole at PGA WEST's Norman course, this 481-yard par 4 stands as the course's most demanding test, earning its #1 handicap rating through sheer length and precision requirements. Designed by Greg Norman, this straight-away challenge offers no reprieve from its intimidating distance, demanding two perfectly struck shots to reach the small, well-protected green in regulation. The tee shot sets the tone immediately - players must navigate a generous but strategically positioned fairway that rewards aggressive driving while punishing wayward shots. With no significant hazards to distract from the pure golf challenge, success depends entirely on execution and course management. The approach shot to the compact green complex requires pinpoint accuracy, as the small target leaves little margin for error. What makes PGA WEST Norman course hole 6 truly memorable is its honest, no-nonsense design philosophy - a testament to Norman's belief that length and precision create the ultimate golf challenge without artificial difficulty.
Off the tee
The tee shot sets up everything on this hole - distance is king, but accuracy cannot be sacrificed. Aim for the center of the fairway and commit to your most reliable driver swing. The straight layout allows for an aggressive line, but resist the temptation to overswing. A smooth, controlled driver that finds the fairway is infinitely better than a wild bomb that finds trouble. Consider course conditions carefully: into the wind, you'll need every yard you can get, while downwind conditions might allow for a more conservative 3-wood if accuracy is your concern. The key is leaving yourself with the shortest possible approach shot while staying in the short grass.
Approach & recovery
With the small green as your target, precision becomes paramount on the approach shot. Most players will face a long iron or hybrid shot, making club selection critical. Take one extra club and make a smooth swing rather than forcing a shorter iron. The small green demands accuracy over aggression - aim for the center of the green regardless of pin position. Missing short is typically better than long, as recovery shots from behind small greens are notoriously difficult. Pay attention to wind conditions, as they'll significantly impact your longer approach club.
On the green
The small green creates subtle but important putting challenges. Speed control becomes crucial, as there's little room for error on longer putts. Focus on getting your first putt close rather than being aggressive with longer attempts. Read putts carefully from below the hole, as the compact surface can create deceptive breaks that aren't immediately apparent. Lag putting skills are essential here - two-putting from long range is a victory on this green. ## RISK VS REWARD This hole offers limited risk/reward opportunities - it's more about solid execution than gambling. The primary decision point comes with tee shot club selection: driver for maximum distance versus 3-wood for accuracy. Most players should favor the driver unless course conditions or personal confidence levels dictate otherwise. On the approach, the small green eliminates most pin-hunting opportunities. The reward for aggressive play rarely outweighs the risk of missing the green entirely. ## DIFFERENT SKILL LEVELS **Higher Handicap Players:** Focus on keeping the ball in play off the tee, even if it means using a 3-wood or hybrid. Accept that this will likely be a bogey hole and play for that score. On the approach, aim for the center of the green regardless of pin position, and take enough club to ensure you reach the putting surface. **Lower Handicap Players:** Use driver aggressively to minimize the approach distance, but maintain control. Attack pins only when they're in the center portion of the green. This hole rewards patience and precision over heroics - par here is an excellent score that keeps momentum building for easier scoring opportunities ahead. The key for all skill levels is accepting this hole's difficulty and playing within your capabilities rather than trying to overpower the challenge.
Watch for
- Course conditioning and mapped hazards may affect line selection; confirm from the aerial.
Hole 6 Green Complex
Mapped green boundary
Green size: 5,456 sq ft
How did Hole 6 play?
How did this hole play today?
Frequently asked questions
Yardage reference: Championship tees · 481 yards.
What's the best strategy off the tee?
↓
For this 481-yard par 4, most players will hit driver to set up a comfortable approach.
How difficult is hole 6?
↓
This hole is a moderate challenge for most golfers. Key challenges include: long par 4.
How big is the green on hole 6?
↓
The green is medium-sized with moderate targets. Pay attention to pin placement when selecting your approach club.
What's a good score on hole 6?
↓
This hole is one of the tougher holes where par feels like birdie. A challenging par 4. Accept that bogey happens and avoid big numbers.