Hole 12 at PGA West (Nicklaus Tournament course)
- Par
- 3
- Yardage
- 188 yds
- Stroke index
- 10
- Hazards
- 2 bunkers · Water
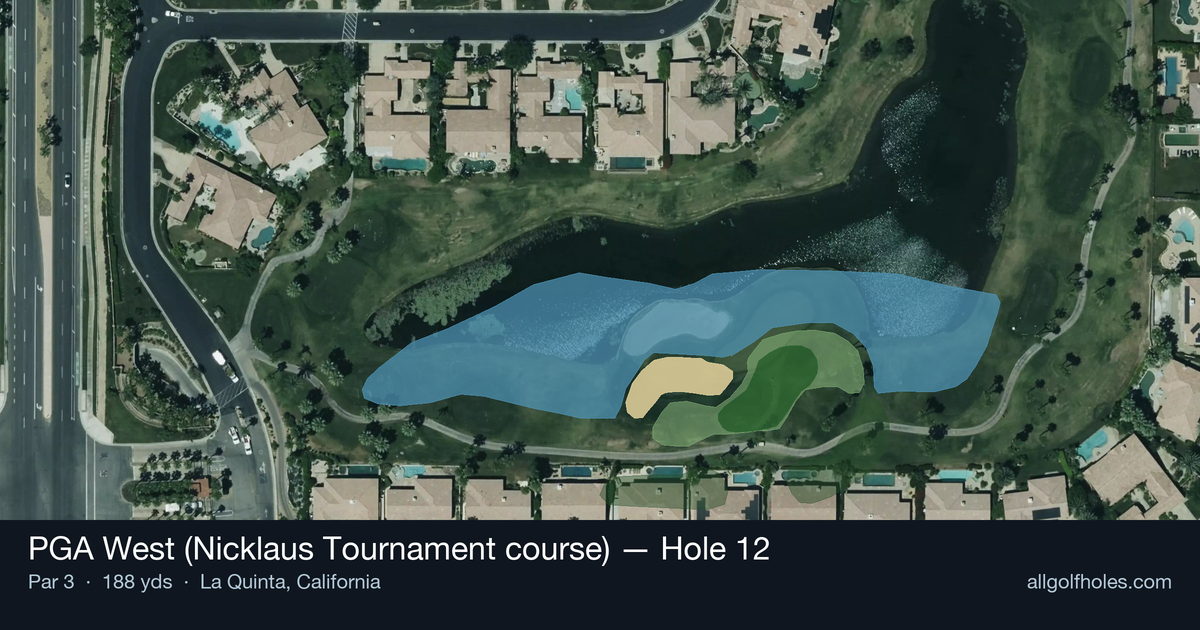
Aerial source not provided
Green size: 37 yds deep × 32 yds wide
Scorecard yardage is for Championship tees. The aerial shows its labeled reference position; distance rings measure to the green.
Championship tees · Par 3 · 188 yards
The plan for No. 12
The 12th hole at PGA West's Nicklaus Tournament course presents a deceptively challenging par 3 that demands precision over power. At 188 yards, this mid-iron test features a small green that places a premium on accuracy and club selection. The straightforward layout might appear simple, but the compact putting surface leaves little margin for error, requiring golfers to commit fully to their yardage and wind calculations. Without major hazards to intimidate, the hole's primary defense lies in its unforgiving green size, where approach shots must find their target or face difficult recovery shots. This classic Nicklaus design emphasizes strategic thinking and execution over raw distance.
Off the tee
Your club selection on this tee shot is critical and should be based on several factors: pin position, wind conditions, and your personal yardages. Generally, you'll be looking at anything from a 6-iron to a hybrid depending on conditions and your swing speed. The target line should favor the center of the green when the pin is tucked, giving yourself the largest possible target. When the pin is more centrally located, you can be slightly more aggressive and aim directly at the flag. Take one extra club if there's any doubt - being long on a small green is typically better than coming up short and facing a difficult uphill chip or pitch.
Approach & recovery
Since this is a par 3, your tee shot is your approach shot. Focus on making a smooth, controlled swing rather than trying to muscle the ball to the pin. The small green demands accuracy, so prioritize hitting the putting surface over getting close to every pin position. Pay attention to the firmness of the green - if conditions are firm, consider landing the ball slightly short and letting it bounce on, while softer conditions allow for a more direct aerial assault. Club up in windy conditions and trust your yardages rather than trying to force a shot.
On the green
With a small green, lag putting becomes even more important as you'll have less margin for error on longer putts. Study the general slope and grain of the green during your approach, as these factors become magnified on a smaller putting surface. Focus on getting your first putt close rather than being overly aggressive, as three-putts can be costly on scoring holes like this. Pay attention to how other players' putts break, especially if you're playing in a group, as the limited green size means you'll often face similar putts. ## RISK VS REWARD The primary risk/reward decision on this hole involves pin hunting versus playing to the center of the green. When the pin is tucked near an edge or in a difficult position, the smart play is targeting the middle of the green and taking your two-putt par. However, when the pin is accessible and you're feeling confident with your iron play, this hole presents a legitimate birdie opportunity. The lack of major hazards means the penalty for missing isn't severe, but the small green size means precision is still paramount. ## DIFFERENT SKILL LEVELS **High-handicap players** should focus on simply finding the green and two-putting for par. Club selection should err on the side of taking more club, and the target should always be the center of the green regardless of pin position. Don't get drawn into trying to attack difficult pins - a stress-free par is an excellent score on this hole. **Low-handicap players** can be more aggressive with pin hunting, especially when the flag is in an accessible position. These players should use their course management skills to identify when to attack and when to play safe. Consider factors like your current round momentum, the importance of the hole in your overall score, and your confidence level with the required club. This hole can be a momentum builder with a birdie or a momentum killer with a careless bogey. The beauty of this hole lies in its apparent simplicity masking a genuine test of precision and course management. Success here comes from making smart decisions and executing them with confidence.
Watch for
- Course conditioning and mapped hazards may affect line selection; confirm from the aerial.
Hole 12 Green Complex
Mapped green boundary
Green size: 4,915 sq ft
How did Hole 12 play?
How did this hole play today?
Frequently asked questions
Yardage reference: Championship tees · 188 yards.
What club should I use on this par 3?
↓
At 188 yards, most golfers will need a long iron or hybrid (5-iron to 6-iron) to reach this green. Adjust for elevation, wind, and pin position.
How difficult is hole 12?
↓
This hole is a moderate challenge for most golfers. Key challenges include: water in play.
What hazards should I watch out for on hole 12?
↓
Key hazards include: water at 154.0 yards. Plan your shots to avoid these trouble spots.
How big is the green on hole 12?
↓
The green is medium-sized with moderate targets. Pay attention to pin placement when selecting your approach club.