Hole 3 at Troon North Golf Club (Monument course)
- Par
- 5
- Yardage
- 564 yds
- Stroke index
- 3
- Hazards
- 4 bunkers
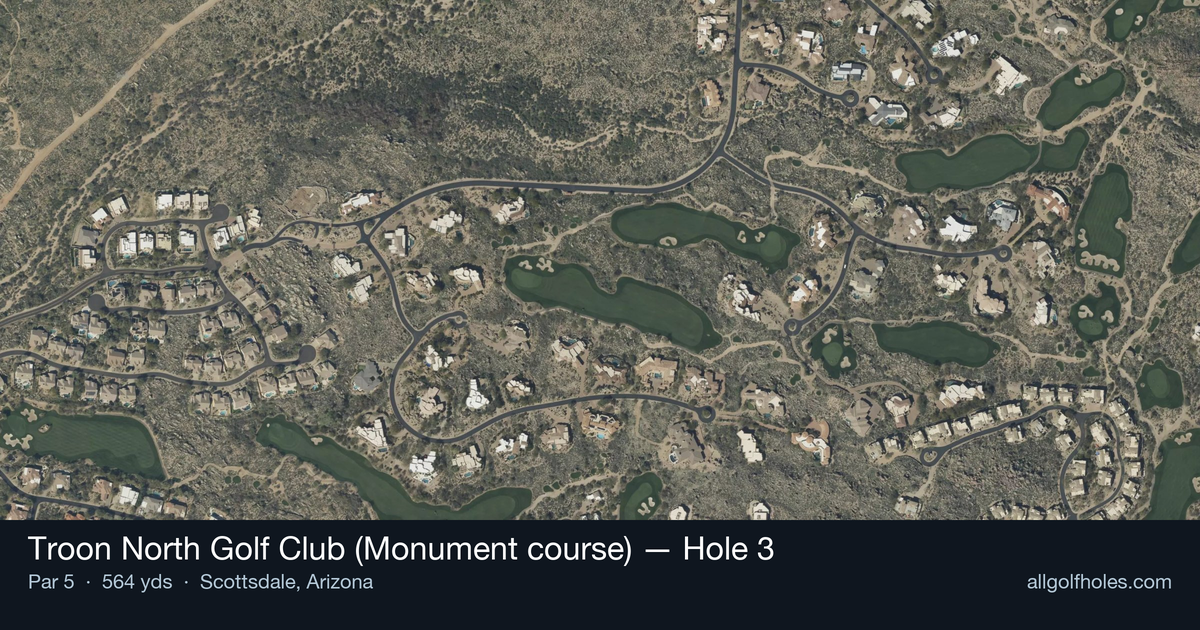
Aerial source not provided
Green size: 37 yds deep × 30 yds wide
Scorecard yardage is for Championship tees. The aerial shows its labeled reference position; distance rings measure to the green.
Championship tees · Par 5 · 564 yards
The plan for No. 3
The signature hole at Troon North Golf Club Monument course earns its legendary status through one extraordinary feature: a massive 25-foot granite boulder positioned directly in the middle of the fairway. This iconic monolith, which gives both the hole and course their name, transforms what could be a straightforward 564-yard par 5 into one of Arizona's most photographed and strategically demanding holes. The enormous granite monument forces golfers to choose their path carefully, creating a risk-reward scenario that defines desert golf at its finest. Players must navigate around this immovable natural hazard while managing the desert terrain and small green complex. The hole's unique character and visual drama make it an unforgettable centerpiece of this acclaimed Scottsdale layout.
Off the tee
Your tee shot strategy hinges entirely on the massive boulder positioned at the dogleg. Most players should aim to play safely to either side of the monument, with the right side generally offering a better angle for the second shot. A solid drive of about 240-260 yards will leave you in prime position to assess your options around the boulder. Avoid the temptation to try threading the needle too close to the rock - the visual intimidation factor can lead to poor swings and costly mistakes.
Approach & recovery
Your second shot presents the hole's defining strategic moment. Longer hitters may have an opportunity to reach the green in two by playing around either side of the boulder, but this requires precise execution given the small target. The safer play is a well-positioned layup that avoids the monument and sets up a comfortable wedge distance to the green. Pay attention to pin position when making this decision, as the small green offers limited bailout areas.
On the green
The compact green demands accuracy on your approach shot, whether it's your second or third. Desert greens typically feature subtle breaks that can be deceiving, so take time to read the grain and slope carefully. With Arizona's firm conditions, controlling spin and landing angle becomes crucial - a ball that lands too aggressively on this small target will likely find trouble. ## RISK VS REWARD This hole epitomizes risk/reward golf strategy. The boulder creates multiple strategic options: play conservatively around it for a certain par opportunity, or challenge it more aggressively to set up a potential eagle chance. Weather conditions, pin position, and your confidence level should all factor into this decision. The small green means that even successful aggressive play requires exceptional precision. ## DIFFERENT SKILL LEVELS **High Handicappers:** Focus on course management over heroics. Play safely around the boulder with your second shot, accepting a three-shot approach to the green. The monument is more photo opportunity than strategic challenge for developing players - embrace the conservative play and avoid big numbers. **Low Handicappers:** This hole rewards strategic aggression balanced with smart course management. Consider going for the green in two when conditions favor it, but don't force the issue if the pin position or lie doesn't support the attempt. Your short game skills around the small green will often determine your final score. The Monument hole stands as one of golf's most photographed and memorable par 5s, where the unique hazard creates strategic decisions you'll face nowhere else in the game.
Watch for
- Course conditioning and mapped hazards may affect line selection; confirm from the aerial.
Hole 3 Green Complex
Mapped green boundary
Green size: 4,778 sq ft
How did Hole 3 play?
How did this hole play today?
Frequently asked questions
Yardage reference: Championship tees · 564 yards.
Can this par 5 be reached in two?
↓
At 564 yards, A true three-shot hole for most players. Position your layup to leave a comfortable wedge distance.
How difficult is hole 3?
↓
This hole is a moderate challenge for most golfers. Key challenges include: long par 5, heavily bunkered.
How big is the green on hole 3?
↓
The green is medium-sized with moderate targets. Pay attention to pin placement when selecting your approach club.
Which side of the fairway is safer on hole 3?
↓
Aim for the right side of the fairway when possible. Missing left brings more trouble into play.
What's a good score on hole 3?
↓
This hole is a true three-shot hole where birdie requires execution. This longer par 5 demands patience. Two good shots set up the scoring opportunity.