Hole 14 at TPC Southwind
- Par
- 3
- Yardage
- 239 yds
- Stroke index
- 8
- Hazards
- 2 bunkers · Water
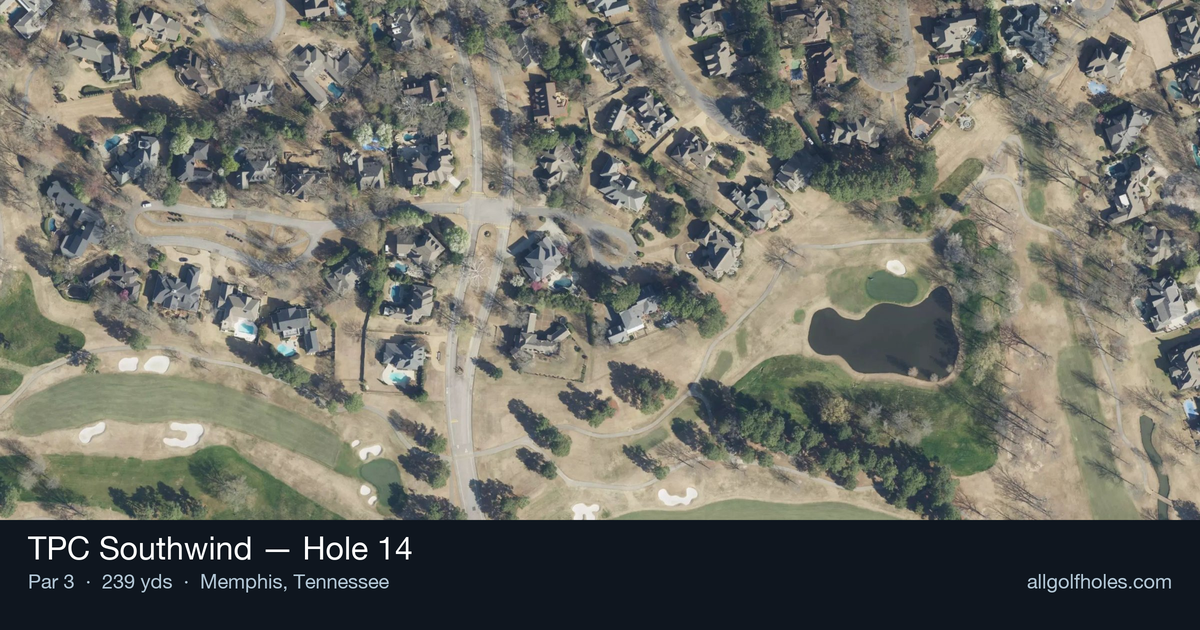
Aerial source not provided
Green size: 28 yds deep × 29 yds wide
Scorecard yardage is for Championship tees. The aerial shows its labeled reference position; distance rings measure to the green.
Championship tees · Par 3 · 239 yards
The plan for No. 14
TPC Southwind hole 14 stands as one of the most demanding par 3s on the PGA Tour, challenging players with a formidable 239-yard tee shot over water to a narrow, undulating green. This signature hole features water protection along the entire right side, creating a dramatic visual that can intimidate even seasoned professionals. The small green complex is further defended by strategic bunkers, including a pot bunker guarding the front edge that punishes anything short of the target. Club selection becomes critical on this lengthy par 3, often requiring a long iron or hybrid to reach the putting surface. The undulating green adds another layer of difficulty, demanding precise distance control to avoid leaving challenging putts. This hole epitomizes TPC Southwind's reputation for water-guarded greens and represents a true test of accuracy and nerve.
Off the tee
From 239 yards, most golfers will need a long iron, hybrid, or fairway wood to reach this green. The primary strategic consideration is avoiding the water that protects the entire right side - this means favoring the left side of the green as your target line, even if it means dealing with the front bunker. Club selection should prioritize carrying the water comfortably over trying to hit it close to a tucked pin. Take one extra club and swing smoothly rather than forcing a shot that could find the hazard. Wind conditions play a crucial role here, so factor in any crosswinds or helping/hurting breezes when making your club choice.
Approach & recovery
Since this is a par 3, your tee shot is your approach shot. The key is committing fully to your club selection and target line. Aim for the center-left portion of the green to give yourself the best margin for error away from the water. The small pot bunker at the front edge is certainly a hazard to avoid, but it's far more manageable than the water hazard. If the pin is tucked right near the water, resist the temptation to attack it directly - instead, play to the fat part of the green and rely on your putting to get close.
On the green
The undulating nature of this green creates numerous challenging pin positions and potential three-putt scenarios. The slopes and contours can be deceptive, so take time to read the green carefully from multiple angles. Putts will generally break away from the water hazard, and the elevated nature of many pin positions means uphill putts are often preferable to downhill sliders. Focus on lag putting to avoid the big numbers that can result from aggressive putting on this tricky surface. ## RISK VS REWARD This hole offers minimal reward for aggressive play and severe punishment for mistakes. The risk/reward equation heavily favors conservative course management. Even Tour professionals often aim away from water-side pins, accepting longer putts in exchange for eliminating big numbers. The reward of getting close to a right-side pin simply doesn't justify the risk of finding water and making double bogey or worse. ## DIFFERENT SKILL LEVELS **High-handicap players** should focus entirely on avoiding the water hazard. Aim well left of center, take plenty of club, and accept that the front bunker or even short of the green is far better than wet. Consider the bailout areas and don't be afraid to play conservatively - par here is an excellent score for any golfer. **Low-handicap players** can be slightly more aggressive with pin hunting, but should still respect the water hazard. These players can attack pins in the left portion of the green more confidently and should focus on distance control to avoid the challenging two-putt scenarios that the undulating green can create. Even scratch golfers should think twice before attacking water-side pins unless conditions are perfect. The 14th hole at TPC Southwind rewards patience, precision, and smart course management while severely punishing aggressive mistakes - making it a true test of both skill and strategic thinking.
Hole 14 Green Complex
Mapped green boundary
Green size: 3,344 sq ft
Course coverage
Tournament and creator videos about TPC Southwind — shared course coverage, not hole-specific clips.
Tournament coverage
FedEx St. Jude Championship highlights
FedEx St. Jude Championship | Final Round Highlights
2025
How did Hole 14 play?
How did this hole play today?
Frequently asked questions
Yardage reference: Championship tees · 239 yards.
What club should I use on this par 3?
↓
At 239 yards, most golfers will need a fairway wood or hybrid to reach this green. Adjust for elevation, wind, and pin position.
How difficult is hole 14?
↓
This hole is one of the tougher holes on the course for most golfers. Key challenges include: long par 3, water in play, small green.
What hazards should I watch out for on hole 14?
↓
Key hazards include: 2 greenside bunkers; water at 216.2 yards. Plan your shots to avoid these trouble spots.
How big is the green on hole 14?
↓
The green is small and requires precision. The green is wider than it is deep, rewarding shots that find the correct tier. Expect challenging pin positions with limited room for error.
What's a good score on hole 14?
↓
This hole is a challenging par where bogey is acceptable. This longer par 3 will test your long iron or hybrid game. Par is a good score.