Hole 4 at TPC Southwind
- Par
- 3
- Yardage
- 196 yds
- Stroke index
- 13
- Hazards
- 4 bunkers · Water
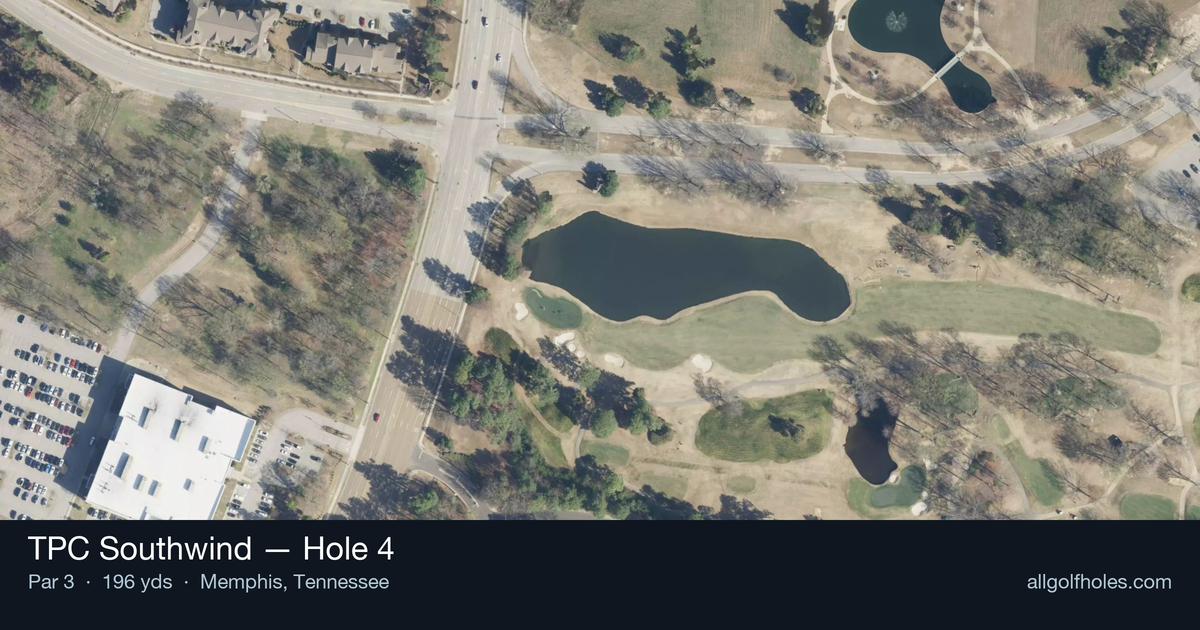
Aerial source not provided
Green size: 31 yds deep × 28 yds wide
Scorecard yardage is for Championship tees. The aerial shows its labeled reference position; distance rings measure to the green.
Championship tees · Par 3 · 196 yards
The plan for No. 4
TPC Southwind hole 4 presents a deceptively challenging par 3 that demands precision over power at 196 yards. This straightaway test requires a confident mid-iron tee shot to find a small, well-protected green complex. While the hole lacks water hazards, the compact target and strategic bunkering make club selection critical. The green's modest size leaves little room for error, rewarding accurate ball-strikers while punishing wayward shots. As part of the renowned Memphis layout that hosts PGA Tour professionals annually, this hole exemplifies TPC Southwind's philosophy of rewarding precision and course management. The absence of major hazards makes par achievable, but the demanding approach shot to the small green ensures that only well-executed swings find their mark.
Off the tee
Club selection is paramount on this hole. With the green sitting at 196 yards, most golfers will need anywhere from a 5-iron to a hybrid depending on wind conditions and pin position. The key is committing fully to your club choice - indecision leads to poor swings and missed greens. Aim for the center of the green regardless of pin position. The small green size means even a well-struck shot to the center leaves you with a manageable putt. Fighting pins on a small green is a recipe for trouble, especially when there's no significant penalty for missing your target by a few yards. Take one extra club if there's any doubt about distance. Missing long on a par-3 is typically preferable to coming up short, and the straight layout means you can be aggressive with your target line.
Approach & recovery
Since this is a par-3, your tee shot IS your approach shot. Focus on tempo and balance rather than trying to muscle the ball to the target. The 196-yard distance sits in that awkward range where many golfers are between clubs - when in doubt, take the longer club and make a smooth swing. Pay attention to wind conditions, which can significantly affect club selection on this exposed hole. A headwind might require moving up to a 4-iron or even a hybrid, while a helping breeze could allow for a smooth 6-iron.
On the green
The small green means you won't face extremely long putts, but it also means less room for error on your approach shot. When you do find the putting surface, focus on speed control - small greens often have subtle slopes that can catch you off guard. Most putts will be relatively straight given the size constraints, but don't assume anything. Take time to read the green properly, especially on shorter putts where overconfidence can lead to careless three-putts. ## RISK VS REWARD This hole offers a classic risk/reward scenario disguised as a simple par-3. The reward is a straightforward birdie opportunity if you hit the green in regulation. The risk lies in the small target - miss the green and you're facing a challenging up-and-down to save par. The smart play is always center green, but aggressive players might attack certain pin positions when they're feeling confident with their iron play. Just remember that even tour professionals treat small greens with respect. ## DIFFERENT SKILL LEVELS **High Handicappers:** Focus entirely on finding the green. Ignore pin positions and aim for the center every time. Take an extra club to ensure you reach the target, and don't be afraid to use a hybrid or fairway wood if that's your most reliable long-distance club. **Low Handicappers:** You can be more aggressive with pin hunting, but still respect the small target. This is a hole where course management trumps heroics. Consider the pin position in your club selection - a back pin might require an extra club to ensure you don't come up short. **Mid Handicappers:** Develop a consistent pre-shot routine for this hole. Pick your target, commit to your club, and execute with confidence. This is an excellent hole for building confidence with mid-to-long irons when played with proper strategy. The 4th hole rewards patience and precision over power. Master the art of committed club selection and center-green targeting, and you'll find yourself walking away with more pars than bogeys on this deceptively challenging par-3.
Hole 4 Green Complex
Mapped green boundary
Green size: 3,447 sq ft
Course coverage
Tournament and creator videos about TPC Southwind — shared course coverage, not hole-specific clips.
Tournament coverage
FedEx St. Jude Championship highlights
FedEx St. Jude Championship | Final Round Highlights
2025
How did Hole 4 play?
How did this hole play today?
Frequently asked questions
Yardage reference: Championship tees · 196 yards.
What club should I use on this par 3?
↓
At 196 yards, most golfers will need a long iron or hybrid (5-iron to 6-iron) to reach this green. Adjust for elevation, wind, and pin position.
How difficult is hole 4?
↓
This hole is one of the tougher holes on the course for most golfers. Key challenges include: water in play, heavily bunkered, small green.
What hazards should I watch out for on hole 4?
↓
Key hazards include: 4 greenside bunkers; water at 180.3 yards. Plan your shots to avoid these trouble spots.
How big is the green on hole 4?
↓
The green is small and requires precision. Expect challenging pin positions with limited room for error.