Hole 11 at TPC Southwind
- Par
- 3
- Yardage
- 159 yds
- Stroke index
- 18
- Hazards
- 2 bunkers · Water
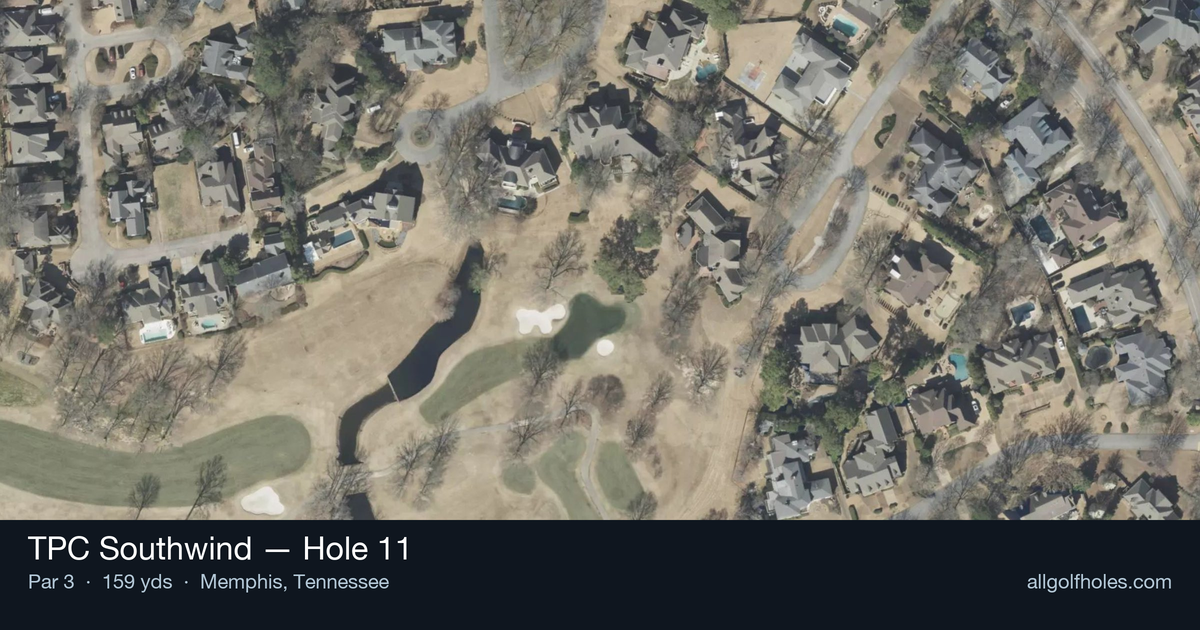
Aerial source not provided
Green size: 24 yds deep × 34 yds wide
Scorecard yardage is for Championship tees. The aerial shows its labeled reference position; distance rings measure to the green.
Championship tees · Par 3 · 159 yards
The plan for No. 11
TPC Southwind hole 11 stands as one of the PGA Tour's most iconic par 3s, earning its reputation as a smaller yet equally intimidating version of TPC Sawgrass's famous 17th. At 159 yards, this signature hole demands precision with a short iron over water to reach the island green surrounded entirely by hazard. The elevated tee shot offers no bailout options - it's green or water, making club selection and commitment crucial. Fast greens and swirling Memphis winds add complexity to what appears straightforward. This hole has decided countless professional rounds during the FedEx St. Jude Championship, where even Tour pros feel the pressure. The small target and unforgiving water hazard create a risk-reward scenario that tests nerves as much as skill, making it a defining moment in every round at this prestigious Tennessee venue.
Off the tee
Club selection is absolutely critical on this hole, as coming up short means finding water every time. Take one extra club and aim for the center of the green regardless of pin position - this conservative approach eliminates the temptation to get too aggressive with pin hunting. A smooth, controlled swing with a 7-iron or 8-iron (depending on conditions and tee position) will serve you better than trying to muscle a 9-iron. Focus on tempo and balance rather than distance, as the adrenaline from this intimidating setting often adds extra yards to your shot.
Approach & recovery
Since this is a par-3, your tee shot IS your approach shot, making club selection and target line even more crucial. The small green size means precision trumps everything else - aim for the fat part of the green and let your natural shot shape work within those boundaries. Wind conditions can dramatically affect club selection here, so pay close attention to the flag movement and any water ripples to gauge wind direction and strength. Commit fully to your club choice and swing with confidence, as tentative swings often lead to mishits and water balls.
On the green
TPC Southwind is known for its immaculate, fast greens, and the 11th is no exception. Once you've successfully found the putting surface, focus on lag putting to ensure you don't three-putt away your hard-earned par. The undulating nature of the green can create tricky reads, so take time to study the slope from multiple angles. Most importantly, be grateful you're putting rather than dropping another ball - aggressive putts that miss can easily roll off into the water hazard. ## RISK VS REWARD This hole presents a unique risk/reward scenario where the "reward" is simply making par and avoiding disaster. There's no real advantage to attacking pins here - the risk of finding water far outweighs any benefit from getting close to difficult pin positions. The smart play is always to the center of the green, treating any birdie opportunity as a bonus rather than the primary objective. Even PGA Tour professionals adopt this conservative strategy, understanding that surviving this hole without penalty strokes is often more valuable than chasing birdies. ## DIFFERENT SKILL LEVELS **High-handicap players** should focus entirely on finding the green from the appropriate tees - use the forward tees without hesitation and take plenty of club to ensure you clear the water. Don't worry about pin positions or getting close; just get on the green and two-putt for par. **Low-handicap players** can be slightly more aggressive with pin hunting, but only when the pin is in the center portion of the green. Even skilled players should resist the urge to attack back pins or pins near the edges. The percentages simply don't favor aggressive play on this hole, regardless of skill level. The key for all players is managing expectations and emotions - this hole can quickly deflate a good round if approached with the wrong mindset. Treat it as a survival test rather than a scoring opportunity, and you'll walk away with your confidence and scorecard intact.
Hole 11 Green Complex
Mapped green boundary
Green size: 4,371 sq ft
Course coverage
Tournament and creator videos about TPC Southwind — shared course coverage, not hole-specific clips.
Tournament coverage
FedEx St. Jude Championship highlights
FedEx St. Jude Championship | Final Round Highlights
2025
How did Hole 11 play?
How did this hole play today?
Frequently asked questions
Yardage reference: Championship tees · 159 yards.
What club should I use on this par 3?
↓
At 159 yards, most golfers will need a mid-iron (7-iron to 8-iron) to reach this green. Adjust for elevation, wind, and pin position.
How difficult is hole 11?
↓
This hole is a moderate challenge for most golfers. Key challenges include: water in play, small green.
What hazards should I watch out for on hole 11?
↓
Key hazards include: 2 greenside bunkers; water at 131.4 yards. Plan your shots to avoid these trouble spots.
How big is the green on hole 11?
↓
The green is small and requires precision. Expect challenging pin positions with limited room for error.
What's a good score on hole 11?
↓
This hole is a solid par with birdie chances for precise approach shots. Making par is a good result here. Focus on hitting the green and avoiding three-putts.