Hole 2 at National Golf Links of America
- Par
- 4
- Yardage
- 330 yds
- Hazards
- 4 bunkers
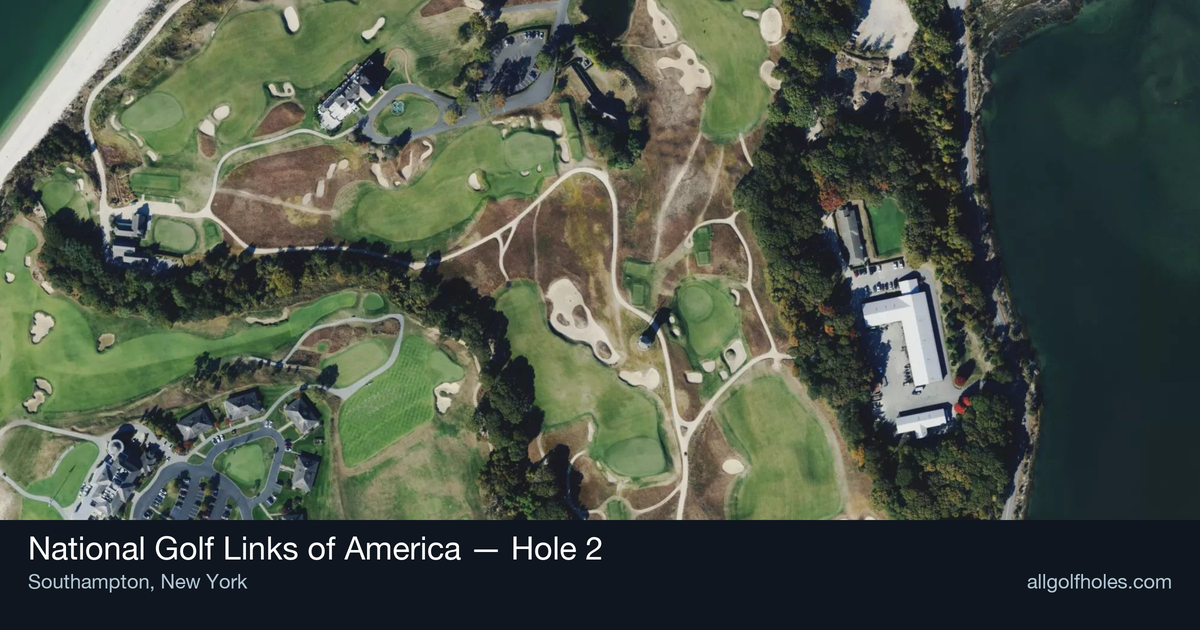
Aerial source not provided
Green size: 34 yds deep × 50 yds wide
Scorecard yardage is for Pro tees. The aerial shows its labeled reference position; distance rings measure to the green.
Pro tees · Par 4 · 330 yards
The plan for No. 2
The legendary "Sahara" at National Golf Links of America hole 2 presents a deceptively challenging par 4 that embodies the course's historic pedigree. Modeled after the famous 3rd hole at Royal St. George's, this 330-yard masterpiece demands precision over power from the tee shot. The straight layout may appear straightforward, but the small green complex requires a deft approach shot to find the putting surface. As part of C.B. Macdonald's early 20th-century architectural genius, the Sahara hole showcases the strategic principles that made National a template for American golf course design. The compact green rewards accurate iron play while punishing wayward approaches, making this short par 4 a true test of golf strategy and execution.
Off the tee
Your tee shot strategy should prioritize accuracy over distance on this historic hole. A controlled drive of around 240-260 yards leaves an ideal approach distance while keeping you in the prime landing zone. Consider using a 3-wood or hybrid off the tee if your driver tends to be erratic - the shorter approach shot gained isn't worth the risk of finding trouble. Target the center of the fairway, as the straight layout rewards conservative play. Wind conditions can significantly affect club selection here, so factor in the coastal Southampton location when making your decision. The goal is positioning yourself in the fairway with a clear line to the small green.
Approach & recovery
The approach shot to the small green requires exceptional precision and club selection. With no significant hazards protecting the green, your main challenge is hitting and holding this compact target. The small green size means there's little margin for error - being slightly off can leave you with a difficult up-and-down. Take one more club than the yardage suggests to ensure you reach the putting surface, as coming up short on a small green is often more penalizing than being slightly long. Pay attention to pin position, as the small green makes certain locations much more accessible than others. A smooth, controlled swing with a mid-to-short iron is typically the winning approach.
On the green
The small green at the Sahara demands respect with your putter. While specific break patterns aren't detailed, the compact size means you'll often face relatively short putts if you've hit a quality approach shot. Focus on speed control, as the small target makes three-putts particularly costly. When the pin is tucked near an edge, aim for the center of the green and take your two-putt par. The small green rewards conservative putting strategy - getting close to every pin position isn't always the percentage play. ## RISK VS REWARD The Sahara offers a subtle risk/reward proposition. The temptation is to attack with driver and wedge, but the small green punishes imprecise approach shots regardless of the club in your hands. The smart play is laying back to your favorite yardage, even if it means hitting a longer iron into the green. For longer hitters, consider whether hitting driver actually helps - being 80 yards away with a wedge isn't necessarily better than being 110 yards away with a comfortable 9-iron if you're more accurate with the longer club. ## DIFFERENT SKILL LEVELS **Higher Handicappers:** Focus entirely on finding the fairway with your tee shot, even if it means using a 5-wood or hybrid. From there, aim for the center of the small green regardless of pin position. Two-putt pars are excellent scores on this hole. **Lower Handicappers:** You can be more aggressive with pin hunting, but only when you're confident in your approach shot. Consider the pin position when selecting your tee shot - certain angles might be preferable for specific pin locations. This is a hole where course management skills can really shine. The Sahara rewards patience and precision over power. Respect this historic design by playing within yourself, and you'll find scoring opportunities on what initially appears to be a straightforward short par 4.
Watch for
- Course conditioning and mapped hazards may affect line selection; confirm from the aerial.
Hole 2 Green Complex
Mapped green boundary
Green size: 10,732 sq ft
Course coverage
Tournament and creator videos about National Golf Links of America — shared course coverage, not hole-specific clips.
Official & tour
Tour & network videos
Official coverage mentioning National Golf Links of America.
Inside Trump International Golf Links, Doonbeg | 3 Key Holes
Featured by these creators
Creator videos about this course
YouTube creators who filmed or featured National Golf Links of America. · Stats as of Oct 12, 2026 · 6d ago
All eyes on the leaders 👀 The final round is underway at Trump International Golf Links.
How did Hole 2 play?
How did this hole play today?
Frequently asked questions
Yardage reference: Pro tees · 330 yards.
What's the best strategy off the tee?
↓
For this 330-yard par 4, most players will hit 3-wood or driver to set up a comfortable approach.
How difficult is hole 2?
↓
This hole is a good scoring opportunity for most golfers. Key challenges include: large green requiring good lag putting.
How big is the green on hole 2?
↓
The green is large and can play quite long. The green is wider than it is deep, rewarding shots that find the correct tier. Three-putt territory if you don't manage your approach distance well.
What's a good score on hole 2?
↓
This hole is a birdie opportunity if you find the fairway. This shorter par 4 rewards accuracy off the tee with a short iron approach.