Hole 3 at National Golf Links of America
- Par
- 4
- Yardage
- 426 yds
- Hazards
- 13 bunkers
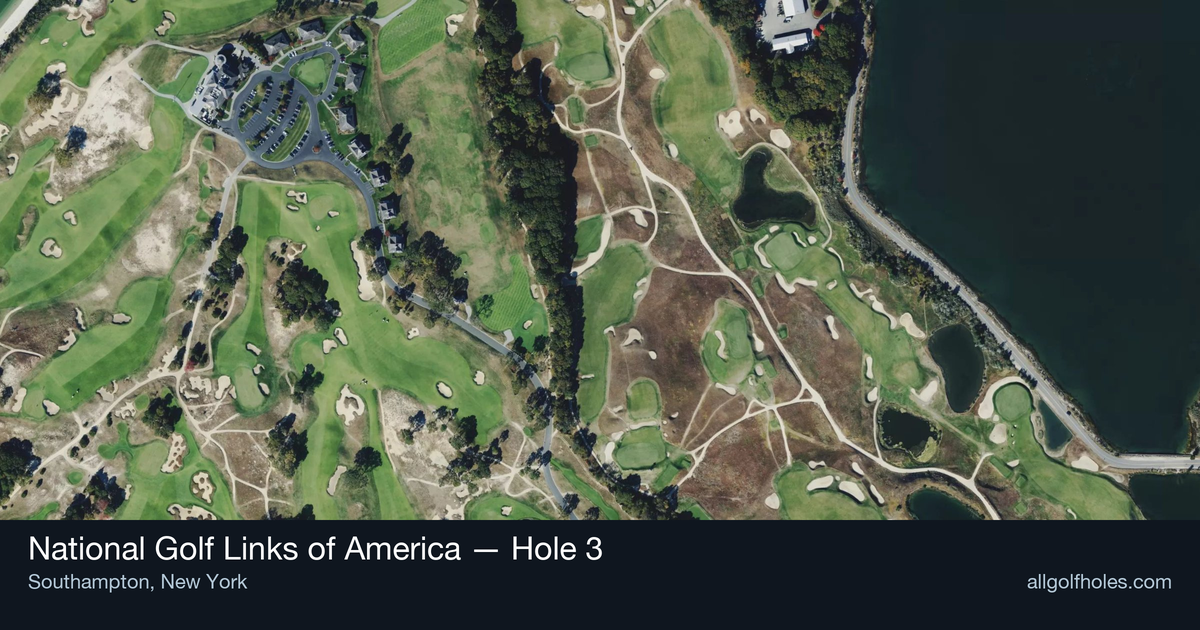
Aerial source not provided
Green size: 28 yds deep × 47 yds wide
Scorecard yardage is for Pro tees. The aerial shows its labeled reference position; distance rings measure to the green.
Pro tees · Par 4 · 426 yards
The plan for No. 3
The legendary "Alps" hole at National Golf Links of America presents one of golf's most famous blind approach shots, faithfully replicating Prestwick's iconic 17th. This 426-yard par 4 demands precision from the tee to set up the signature challenge: a completely blind second shot over a towering hill that guards the green. The confrontational mound creates an intimidating optical illusion, forcing golfers to trust their yardage and commit to carrying the obstacle. A massive bunker lurks at the green's front, punishing any approach that falls short of the target. The small, undulating putting surface rewards only the most precisely struck iron shots. This National Golf Links of America hole 3 embodies C.B. Macdonald's genius for adapting the world's greatest golf holes, creating a thrilling test of nerve and execution that has challenged golfers for over a century.
Off the tee
Your tee shot strategy centers on positioning for the optimal approach angle and distance. Driver is typically the right play here, as you'll want to get as close as possible to reduce the length of your blind approach shot. Aim for the center-right portion of the fairway, which provides the best angle to attack the green. The straight layout means there's no significant trouble off the tee, so you can be aggressive with your target line. Focus on a smooth, controlled swing that finds the short grass - accuracy trumps distance when you're setting up for such a demanding second shot.
Approach & recovery
This is where the "Alps" earns its fearsome reputation. You'll be hitting a mid-iron to long-iron (depending on conditions and tee shot placement) over a hill you cannot see beyond. The key is trusting your yardage completely - use a rangefinder or GPS to get exact distances to the pin. The massive bunker protecting the green front must be carried, and with the small green size, precision is everything. Take one extra club to ensure you clear the hill and bunker, as coming up short is often disastrous. Commit fully to your swing - any hesitation or deceleration will likely result in finding that front bunker.
On the green
The small green demands accuracy on your approach, but once you're putting, focus on speed control above all else. The undulating surface can create tricky breaks, particularly on longer putts. Pin positions in the front portion of the green are especially challenging given the bunker protection, while back pins offer slightly more margin for error on approach shots. Read putts carefully, as the green's subtle contours can be deceptive. Lag putting becomes crucial here - getting your first putt close is often more important than being aggressive with the line. ## RISK VS REWARD The primary risk/reward decision comes with club selection on the approach shot. Playing it safe with more club risks flying the small green, while being too conservative might leave you in the front bunker. There's also the option for shorter hitters to lay up short of the hill and play a wedge for their third shot, though this essentially concedes a bogey on a par 4. The reward for executing the blind approach successfully is significant - a well-struck shot can set up birdie opportunities on this challenging hole. ## DIFFERENT SKILL LEVELS **Low Handicap Players:** Should attack this hole aggressively, using driver off the tee and committing fully to the blind approach. Trust your distances and swing with confidence - your ball-striking ability gives you the best chance to find the small green. Consider pin position when selecting your approach club. **High Handicap Players:** Consider a more conservative strategy. If you struggle with longer irons, there's no shame in laying up short of the hill and playing a comfortable wedge for your third shot. Focus on keeping the ball in play off the tee and making solid contact on all shots. If you do attempt to go for the green, take plenty of club and swing smoothly - the worst miss here is short. The "Alps" hole rewards courage and precision while punishing indecision and poor execution. Whether you're channeling the spirits of golf's golden age or simply trying to navigate one of the game's most famous challenges, success here comes down to trusting your preparation and committing to your shots.
Watch for
- Course conditioning and mapped hazards may affect line selection; confirm from the aerial.
Hole 3 Green Complex
Mapped green boundary
Green size: 9,028 sq ft
Course coverage
Tournament and creator videos about National Golf Links of America — shared course coverage, not hole-specific clips.
Official & tour
Tour & network videos
Official coverage mentioning National Golf Links of America.
Inside Trump International Golf Links, Doonbeg | 3 Key Holes
Featured by these creators
Creator videos about this course
YouTube creators who filmed or featured National Golf Links of America. · Stats as of Oct 12, 2026 · 6d ago
All eyes on the leaders 👀 The final round is underway at Trump International Golf Links.
How did Hole 3 play?
How did this hole play today?
Frequently asked questions
Yardage reference: Pro tees · 426 yards.
What's the best strategy off the tee?
↓
For this 426-yard par 4, most players will hit driver to set up a comfortable approach.
How difficult is hole 3?
↓
This hole is a good scoring opportunity for most golfers. Key challenges include: large green requiring good lag putting.
How big is the green on hole 3?
↓
The green is large and can play quite long. The green is wider than it is deep, rewarding shots that find the correct tier. Three-putt territory if you don't manage your approach distance well.