Hole 9 at Wolf Creek Golf Course
- Par
- 4
- Yardage
- 390 yds
- Stroke index
- 17
- Hazards
- 6 bunkers · Water
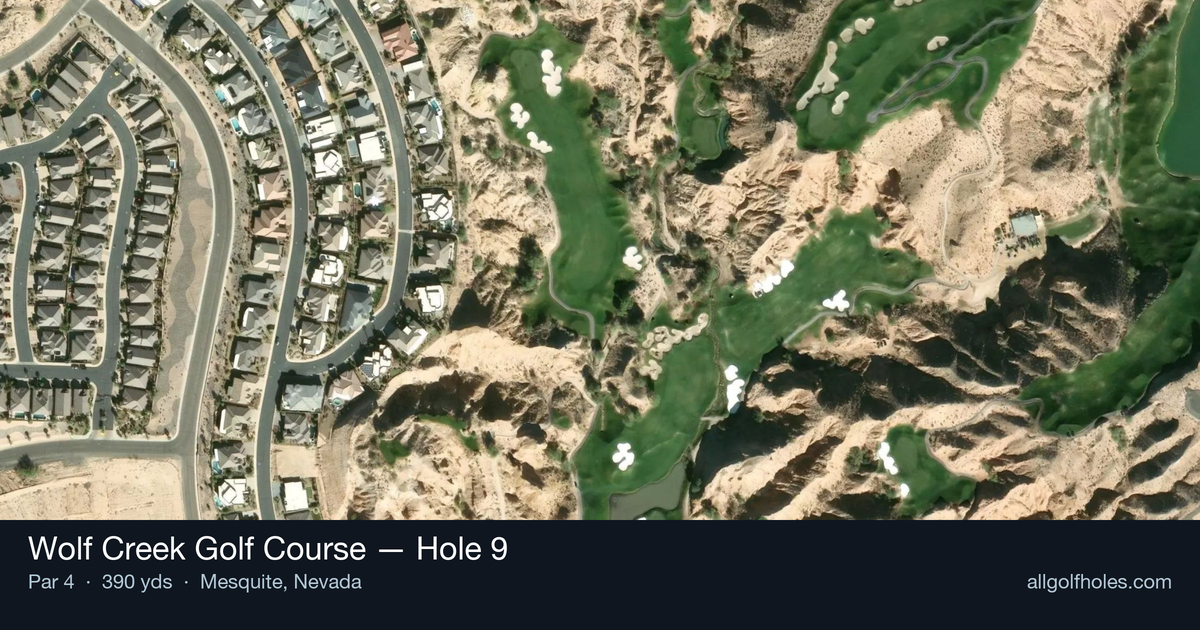
Aerial source not provided
Green size: 38 yds deep × 23 yds wide
Scorecard yardage is for Championship tees. The aerial shows its labeled reference position; distance rings measure to the green.
Championship tees · Par 4 · 390 yards
The plan for No. 9
The 9th hole at Wolf Creek Golf Course presents a deceptively challenging finale to the front nine, where the desert's dramatic beauty meets precision golf. This 390-yard par 4 demands accuracy over power, as the approach shot transforms into an all-or-nothing target challenge. The small green sits precariously surrounded by a meandering creek that guards the putting surface short, left, and long, creating one of Wolf Creek's most visually stunning yet intimidating targets. The back-to-front sloped green rewards aggressive play but severely punishes miscalculation. Set against the red-rock canyon backdrop that defines this Mesquite masterpiece, the hole epitomizes Wolf Creek's philosophy of delivering unforgettable shot values where spectacular scenery meets strategic complexity.
Off the tee
Your tee shot strategy should prioritize position over distance. With the approach being the critical shot, focus on finding the optimal angle and distance for your comfort zone. A driver may be tempting given the shorter length, but consider a 3-wood or hybrid that ensures you stay in the fairway and leaves a full swing with a mid-iron. The key is avoiding any trouble that could complicate your approach angle. Target the center of the fairway, as the subsequent approach shot will demand pinpoint accuracy regardless of your position.
Approach & recovery
This is where the hole reveals its true teeth. The approach shot is an all-or-nothing proposition to a small target surrounded by water. The back-to-front slope means anything long will feed toward the creek behind the green, while coming up short obviously finds water as well. Club selection is critical - take enough club to ensure you reach the green, but not so much that you fly it into the back hazard. Aim for the center of the green regardless of pin position, as the penalty for missing is severe. A smooth, confident swing is essential here - any deceleration or tentative contact will likely find the creek.
On the green
The back-to-front slope creates challenging putting scenarios, especially with back pin positions. Putts from above the hole require delicate touch to avoid racing past and potentially off the green. When the pin is back, approach shots that land on the front portion will naturally feed toward the hole due to the slope. Focus on lag putting to avoid three-putts, as getting on this green in regulation is already an accomplishment worth protecting. ## RISK VS REWARD The primary risk/reward decision comes with approach club selection and target line. Playing aggressively to back pins when they're accessible can yield birdie opportunities, but the penalty for missing is stroke-and-distance. The reward is significant - this hole offers one of the better birdie chances at Wolf Creek if you can navigate the water successfully. However, the risk of a big number is equally real, making par an excellent score here. ## DIFFERENT SKILL LEVELS **Higher handicap players** should adopt an ultra-conservative approach: use whatever club ensures you stay dry on the approach, even if it means a longer putt. Consider laying up short of the creek if your confidence with mid-to-long irons is low, then pitch on for a possible up-and-down par. The goal is avoiding penalty strokes. **Lower handicap players** can be more aggressive with their approach, but should still respect the water hazard. Focus on smooth tempo and trust your yardages. Consider the wind conditions carefully, as desert courses can have swirling winds that affect club selection. Even skilled players should view par as a victory on this hole and not force birdie opportunities that aren't clearly there. The 9th hole at Wolf Creek perfectly encapsulates target golf at its most dramatic - where precision trumps power and course management separates good rounds from disaster.
Watch for
- Course conditioning and mapped hazards may affect line selection; confirm from the aerial.
Hole 9 Green Complex
Mapped green boundary
Green size: 4,483 sq ft
How did Hole 9 play?
How did this hole play today?
Frequently asked questions
Yardage reference: Championship tees · 390 yards.
What's the best strategy off the tee?
↓
For this 390-yard par 4, most players will hit driver to set up a comfortable approach.
How difficult is hole 9?
↓
This hole is one of the tougher holes on the course for most golfers. Key challenges include: water in play, heavily bunkered, small green.
How big is the green on hole 9?
↓
The green is small and requires precision. The green is deeper than wide, so club selection is crucial. Expect challenging pin positions with limited room for error.
Which side of the fairway is safer on hole 9?
↓
Aim for the right side of the fairway when possible. Missing left brings more trouble into play.
What's a good score on hole 9?
↓
This hole is a medium-length test where par is a solid result. A straightforward par 4 where course management pays off.