Hole 8 at Wolf Creek Golf Course
- Par
- 3
- Yardage
- 248 yds
- Stroke index
- 5
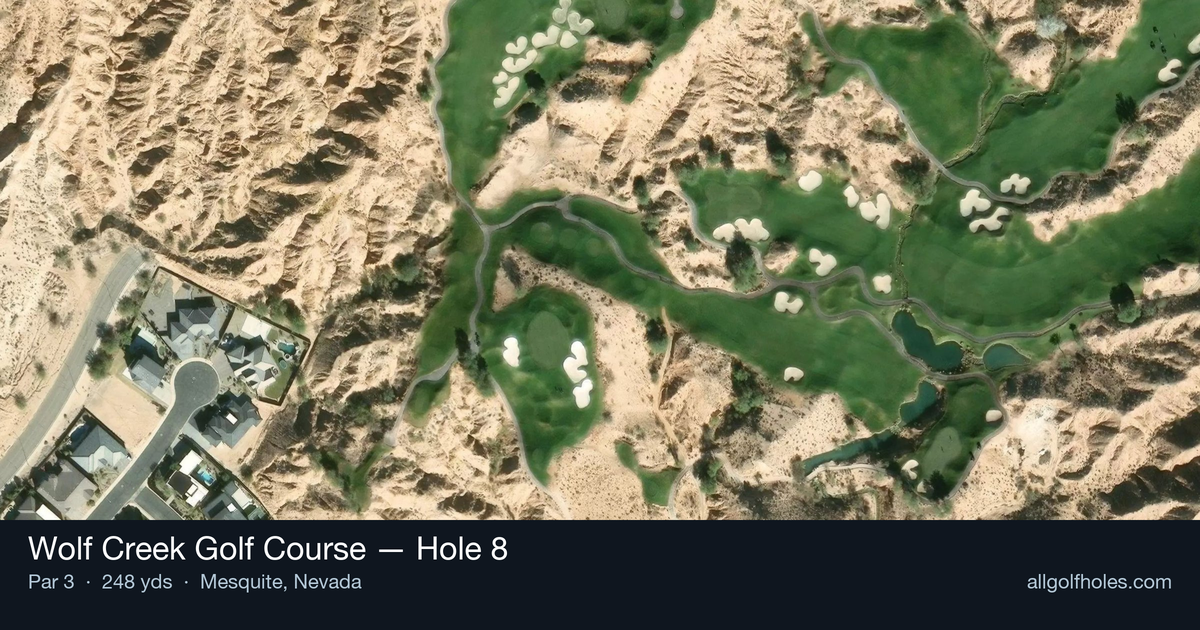
Aerial source not provided
Green size: 32 yds deep × 21 yds wide
Scorecard yardage is for Championship tees. The aerial shows its labeled reference position; distance rings measure to the green.
Championship tees · Par 3 · 248 yards
The plan for No. 8
Wolf Creek Golf Course hole 8 presents a demanding 248-yard par 3 that epitomizes this desert masterpiece's dramatic character. Carved through Mesquite's stunning red-rock canyons, this tee shot demands precision over raw power, with the small green requiring careful club selection and unwavering accuracy. The hole showcases Wolf Creek's renowned elevation changes, creating an unforgettable shot value that challenges golfers to commit fully to their line. Without significant hazards to distract, the focus remains purely on execution—hitting the compact target in regulation. This straightforward yet unforgiving design exemplifies why Wolf Creek's breathtaking beauty often overshadows the scorecard, leaving players mesmerized by the sheer artistry of golf architecture seamlessly integrated into Nevada's spectacular desert landscape.
Off the tee
Your tee shot strategy centers on committing to the right club for the conditions and trusting your swing. Given the 248-yard distance and small green size, most golfers will need a long iron or hybrid, though elevation changes common at Wolf Creek may require club adjustments. Focus on a smooth, controlled swing rather than trying to overpower the shot. Aim for the center of the green regardless of pin position - the small target demands a conservative approach. Take extra time to factor in wind conditions, which can be significant in the desert environment, and don't let the stunning red-rock scenery distract from your pre-shot routine.
Approach & recovery
Since this is a par 3, your tee shot IS your approach shot, making club selection absolutely critical. The key is accepting that reaching the green safely is more important than attacking a specific pin position. With a small green as your target, precision trumps aggression every time. Consider the day's conditions: morning rounds may play differently than afternoon due to desert temperature changes affecting ball flight. If there's any doubt between clubs, take the longer option and make a smooth swing - coming up short is often better than flying the green entirely.
On the green
The small green size means that even successful approach shots may leave challenging putts. Expect the putting surface to have subtle breaks that can be difficult to read against the dramatic desert backdrop. Focus on lag putting to ensure two-putts, as the combination of a difficult approach shot and tricky green can quickly turn pars into bogeys or worse. Pay attention to grain direction, which may be influenced by the prevailing desert winds and sun exposure throughout the day. ## RISK VS REWARD This hole offers limited risk/reward opportunities due to its straightforward design and small target. The primary decision is club selection - the reward for perfect execution is a potential birdie, but the risk of missing the small green entirely can lead to difficult up-and-downs. The smart play is conservative: aim for the center of the green and accept whatever putt remains. Aggressive pin-hunting on a small target rarely pays off on long par 3s. ## DIFFERENT SKILL LEVELS **High-handicap players** should focus entirely on finding the green, regardless of pin position. Consider taking one extra club and making a smooth swing rather than forcing a shot. If the green proves unreachable, aim for the best miss that provides the easiest recovery shot. **Low-handicap players** can be more aggressive with pin positions, but should still respect the small target size. These players might adjust strategy based on specific pin locations, but should never sacrifice accuracy for the sake of getting closer to difficult pins. **Mid-handicap players** should lean toward the conservative approach, using the center of the green as their target while building confidence in their long iron play. The beauty of Wolf Creek's 8th hole lies not just in its stunning desert setting, but in its demand for precise execution - a perfect example of how great golf course architecture creates memorable challenges that test every aspect of your game.
Watch for
- Course conditioning and mapped hazards may affect line selection; confirm from the aerial.
Hole 8 Green Complex
Mapped green boundary
Green size: 3,606 sq ft
How did Hole 8 play?
How did this hole play today?
Frequently asked questions
Yardage reference: Championship tees · 248 yards.
What club should I use on this par 3?
↓
At 248 yards, most golfers will need a fairway wood or hybrid to reach this green. Adjust for elevation, wind, and pin position.
How difficult is hole 8?
↓
This hole is a moderate challenge for most golfers. Key challenges include: long par 3, small green.
How big is the green on hole 8?
↓
The green is small and requires precision. The green is deeper than wide, so club selection is crucial. Expect challenging pin positions with limited room for error.
What's a good score on hole 8?
↓
This hole is a challenging par where bogey is acceptable. This longer par 3 will test your long iron or hybrid game. Par is a good score.