Hole 17 at Wolf Creek Golf Course
- Par
- 5
- Yardage
- 562 yds
- Stroke index
- 6
- Hazards
- 9 bunkers · Water
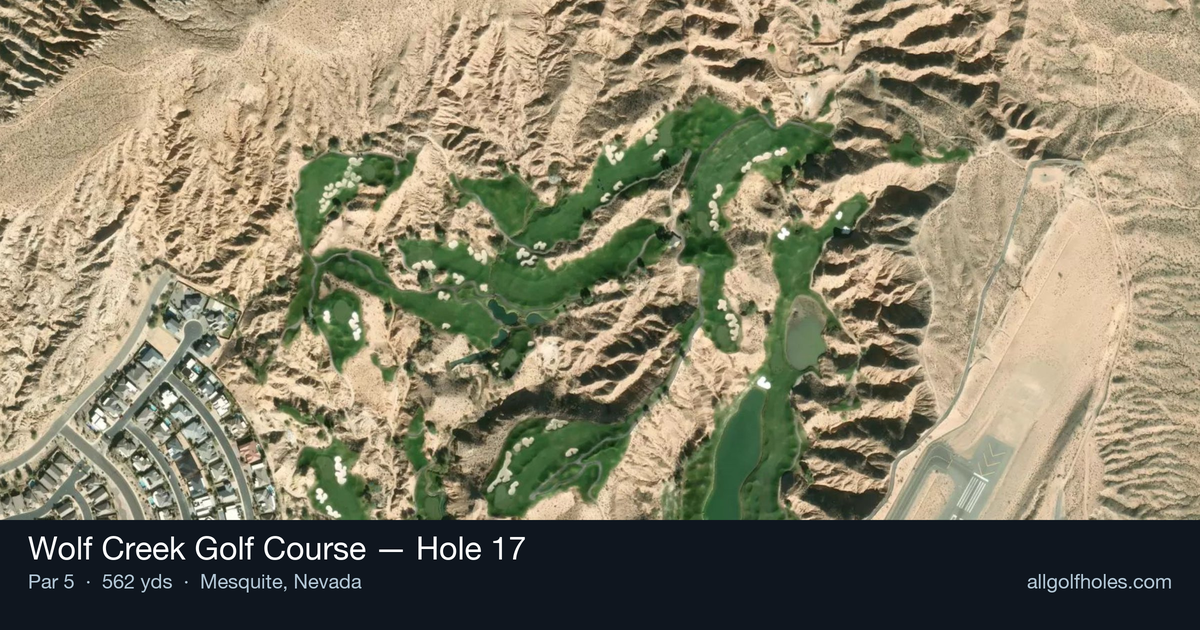
Aerial source not provided
Green size: 35 yds deep × 24 yds wide
Scorecard yardage is for Championship tees. The aerial shows its labeled reference position; distance rings measure to the green.
Championship tees · Par 5 · 562 yards
The plan for No. 17
Wolf Creek Golf Course hole 17 presents a commanding 562-yard par 5 that epitomizes the dramatic desert golf experience this iconic Mesquite layout is renowned for. Carved through stunning red-rock canyon terrain, this straight par 5 offers golfers multiple strategic options while showcasing the breathtaking elevation changes that make Wolf Creek famous. The emerald fairway provides a generous landing area for the tee shot, though the desert landscape demands precision to avoid the natural hazards that frame this spectacular hole. With its compact green complex nestled against the dramatic canyon backdrop, the approach shot requires careful club selection and course management. This penultimate hole captures the essence of Wolf Creek's unforgettable shot values, delivering both scoring opportunity and visual splendor that golfers remember long after their round concludes.
Off the tee
Your target line should favor the center-right portion of the fairway, giving yourself the best angle for your second shot. Most players should focus on a smooth driver swing rather than trying to bomb it - position trumps distance here. The key is finding the widest part of the landing zone, typically around 250-280 yards out, which sets up an ideal approach distance. Avoid the temptation to overcook your drive, as accuracy off the tee is crucial for setting up your scoring opportunity.
Approach & recovery
The approach strategy depends entirely on your tee shot position and skill level. If you're in good position after your drive, a long iron or hybrid layup to about 100-120 yards leaves you with a comfortable wedge into the small green. More aggressive players might consider going for the green in two, but this requires perfect contact and precise distance control given the green's compact size. The key is committing fully to whichever strategy you choose - indecision leads to poor contact and missed opportunities.
On the green
Wolf Creek's signature small greens demand respect, and the 17th is no exception. Focus on getting your ball below the hole whenever possible, as uphill putts are always more manageable on these compact putting surfaces. The green's size means there are no gimme two-putts, so take extra time reading your line and pace. Conservative lag putting often yields better results than aggressive attempts at holing long putts. ## RISK VS REWARD This hole epitomizes risk/reward golf strategy. The reward of reaching in two and setting up an eagle putt is significant, but the risk of missing the small green and facing a difficult up-and-down can quickly turn birdie into bogey. Weather conditions, your current round momentum, and match situation should all factor into this decision. When in doubt, the layup approach typically yields more consistent results. ## DIFFERENT SKILL LEVELS **High-handicap players** should treat this as a three-shot hole, focusing on two solid strikes to set up a manageable wedge. Your priorities are keeping the ball in play and avoiding big numbers - par here is an excellent score that keeps momentum building. **Low-handicap players** have the option to be more aggressive, but should carefully evaluate conditions and their current ball-striking confidence. Even scratch golfers often benefit from the disciplined layup approach, especially late in competitive rounds where steady play trumps heroics. The beauty of Wolf Creek's design shines through on this hole - it rewards good golf strategy while providing options for players of all skill levels to find success through smart course management.
Watch for
- Course conditioning and mapped hazards may affect line selection; confirm from the aerial.
Hole 17 Green Complex
Mapped green boundary
Green size: 4,188 sq ft
How did Hole 17 play?
How did this hole play today?
Frequently asked questions
Yardage reference: Championship tees · 562 yards.
Can this par 5 be reached in two?
↓
At 562 yards, A true three-shot hole for most players. Position your layup to leave a comfortable wedge distance.
How difficult is hole 17?
↓
This hole is one of the tougher holes on the course for most golfers. Key challenges include: long par 5, water in play, heavily bunkered, small green.
How big is the green on hole 17?
↓
The green is small and requires precision. The green is deeper than wide, so club selection is crucial. Expect challenging pin positions with limited room for error.
What's a good score on hole 17?
↓
This hole is a true three-shot hole where birdie requires execution. This longer par 5 demands patience. Two good shots set up the scoring opportunity.