Hole 5 at Edgewood Tahoe G.C.
- Par
- 3
- Yardage
- 220 yds
- Stroke index
- 11
- Hazards
- 2 bunkers · Water
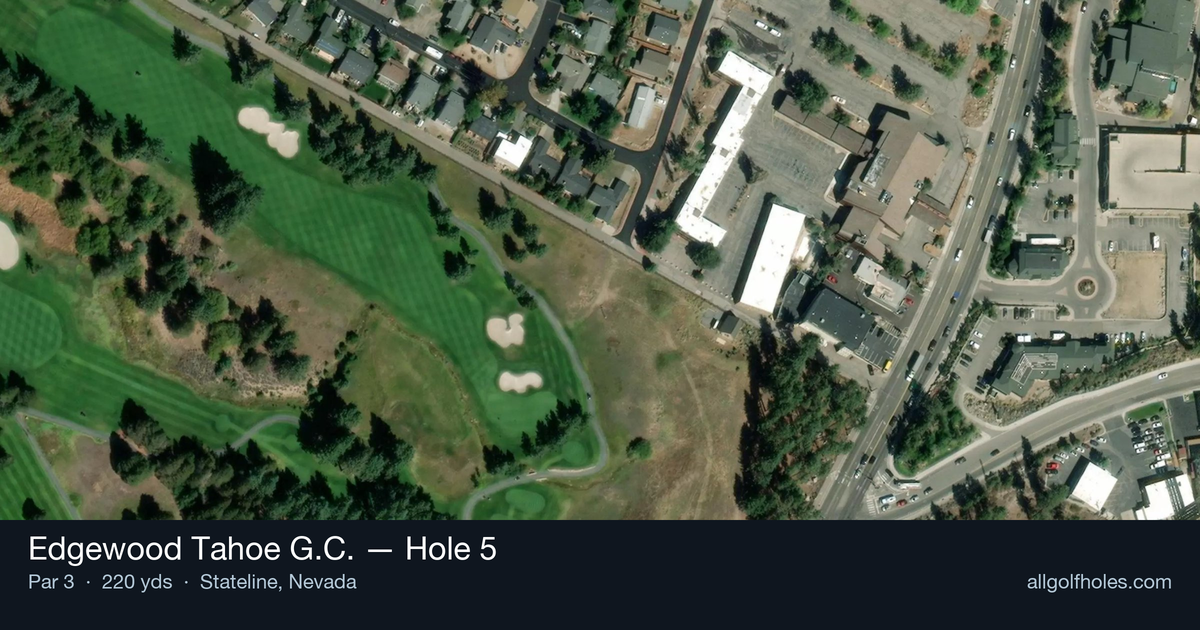
Aerial source not provided
Green size: 33 yds deep × 30 yds wide
Scorecard yardage is for Pro tees. The aerial shows its labeled reference position; distance rings measure to the green.
Pro tees · Par 3 · 220 yards
The plan for No. 5
At 220 yards, Edgewood Tahoe G.C. hole 5 presents a demanding par 3 that tests precision over the pristine Lake Tahoe landscape. This straightforward tee shot requires careful club selection to find the small, well-protected green complex nestled against the stunning Sierra Nevada backdrop. The lack of significant hazards might seem forgiving, but the compact target demands accuracy from tee to pin. With the prevailing left-to-right ball flight common throughout Edgewood, players must account for the mountain winds that can dramatically affect trajectory. The elevated tee position offers breathtaking views while creating an optical illusion that can deceive distance judgment. Success here hinges on committing to the right club and trusting your swing amid one of golf's most spectacular settings.
Off the tee
Club selection is everything on this hole. Most golfers will need a 4-iron through 6-iron depending on conditions, with hybrids offering a higher ball flight for better green-holding ability. Take one extra club and make a smooth, controlled swing rather than forcing a shorter iron. The target line is straightforward down the center, but pay attention to pin position - a back pin may require an additional half-club. Factor in Tahoe's elevation (about 6,200 feet), which can add 10-15 yards to your normal distances. Commit fully to your club choice and swing with confidence.
Approach & recovery
Since this is a par 3, your tee shot IS your approach shot. Focus on landing the ball in the center of the green and letting it work toward the pin rather than attacking tight pin positions. The small green size means there's little margin for error, so prioritize finding the putting surface over getting close to the flag. If the pin is tucked, aim for the fat part of the green and take your two-putt par. Wind can be a factor at this elevation, so adjust your club selection accordingly and trust your read of the conditions.
On the green
Edgewood's greens are known for their multiple tiers and challenging slopes, so expect subtle breaks that can catch you off guard. As noted by course reviewers, these greens provide "slippery putts should you find yourself above the hole," making lag putting essential. Read your putt from multiple angles, especially from below the hole. Speed control is more important than line on most putts here - getting the ball to the hole with proper pace will minimize three-putts. If you're above the pin, be extra cautious with your first putt. ## RISK VS REWARD This hole offers limited risk/reward opportunities since it's a straightforward par 3. The main decision is club selection - taking enough club to ensure you reach the green versus the risk of flying it long. Given the small target, the reward for aggressive play is minimal compared to the penalty for missing the green entirely. The smart play is conservative: take plenty of club, aim for the center of the green, and accept the longer putt rather than risk a difficult up-and-down. ## DIFFERENT SKILL LEVELS **High Handicappers:** Focus entirely on finding the green with your tee shot. Use a hybrid or fairway wood if needed to ensure you have enough club. Aim for the biggest part of the green regardless of pin position. A bogey from the green is better than a double bogey from the rough or bunkers. **Low Handicappers:** You can be more aggressive with pin-seeking, but respect the small target. Consider the pin position in your club selection - a front pin might allow for a more attacking approach, while a back pin requires extra club and careful distance control. Use your course management skills to identify when to attack and when to play safe based on your position in the round. The scenic beauty of this hole can be distracting, but maintaining focus on execution and club selection will lead to better scoring opportunities on this demanding one-shotter.
Watch for
- Course conditioning and mapped hazards may affect line selection; confirm from the aerial.
Hole 5 Green Complex
Mapped green boundary
Green size: 5,458 sq ft
How did Hole 5 play?
How did this hole play today?
Frequently asked questions
Yardage reference: Pro tees · 220 yards.
What club should I use on this par 3?
↓
At 220 yards, most golfers will need a fairway wood or hybrid to reach this green. Adjust for elevation, wind, and pin position.
How difficult is hole 5?
↓
This hole is one of the tougher holes on the course for most golfers. Key challenges include: long par 3, water in play.
What hazards should I watch out for on hole 5?
↓
Key hazards include: 2 greenside bunkers; water at 167.6 yards. Plan your shots to avoid these trouble spots.
How big is the green on hole 5?
↓
The green is medium-sized with moderate targets. Pay attention to pin placement when selecting your approach club.
What's a good score on hole 5?
↓
This hole is a challenging par where bogey is acceptable. This longer par 3 will test your long iron or hybrid game. Par is a good score.