Hole 7 at PGA WEST (Norman course)
- Par
- 3
- Yardage
- 181 yds
- Stroke index
- 15
- Hazards
- Water
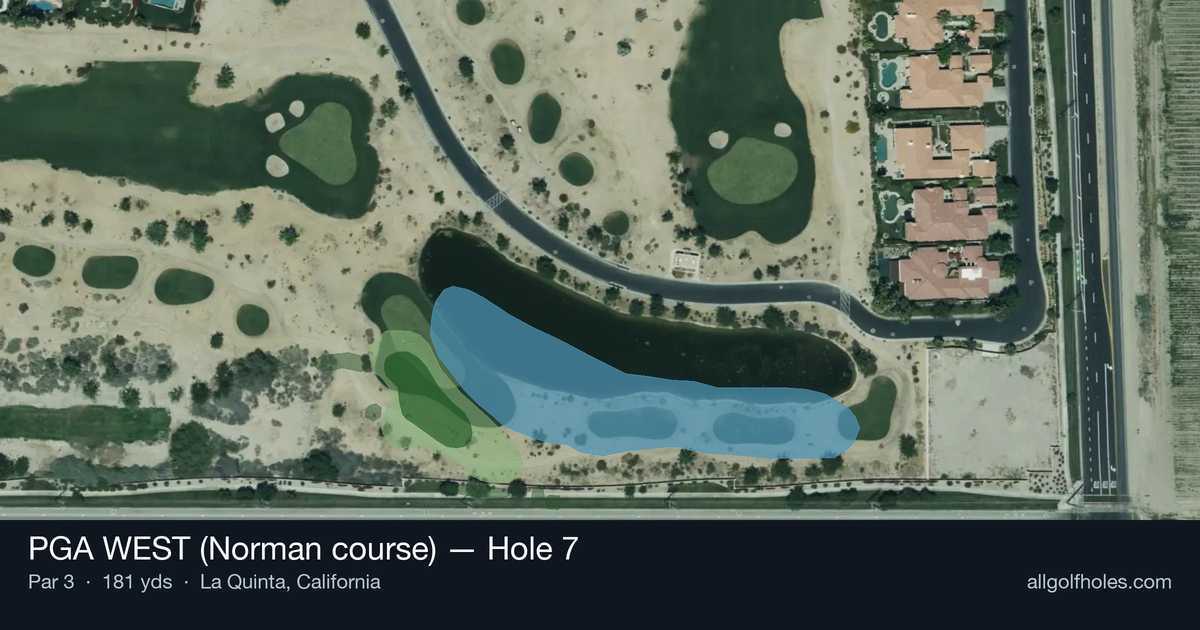
Aerial source not provided
Green size: 39 yds deep × 36 yds wide
Scorecard yardage is for Championship tees. The aerial shows its labeled reference position; distance rings measure to the green.
Championship tees · Par 3 · 181 yards
The plan for No. 7
The seventh hole at PGA WEST's Norman course presents a deceptively straightforward par 3 challenge that demands precision over power. At 181 yards, this mid-iron test features a small, well-protected green that punishes anything less than a committed swing. While the hole appears relatively benign with minimal hazards flanking the target, the compact putting surface creates a premium on accuracy rather than distance control. The straight-line approach offers no bailout areas, making club selection and execution paramount. What makes PGA WEST Norman course hole 7 memorable is its simplicity – sometimes the most honest holes prove the most challenging, rewarding only those who can deliver their tee shot with surgical precision to the small green complex.
Off the tee
Club selection is critical on this 181-yard one-shotter. Most golfers will be looking at anything from a 6-iron to a hybrid depending on conditions and personal distances. Take one extra club and make a smooth, controlled swing rather than forcing a shot. Aim for the center of the green regardless of pin position - with a small target, the middle gives you the best margin for error. Focus on tempo and balance; this isn't a hole where you need to be aggressive with your swing.
Approach & recovery
Since this is a par 3, your tee shot IS your approach shot. The key is committing fully to your club selection and target line. Don't second-guess yourself on the tee - indecision leads to poor swings. Make practice swings that mirror your intended shot, visualizing the ball flight to the center of the green. Pay attention to wind conditions, as they can significantly affect club selection on a shot of this length.
On the green
With a small green, you'll likely face shorter putts than on larger putting surfaces, but the premium on accuracy from the tee means you need to be prepared for various positions. Focus on speed control rather than trying to be too aggressive with line. Two-putting from anywhere on this green should be your primary goal, as getting too aggressive can lead to three-putts that damage your scorecard. ## RISK VS REWARD The risk/reward calculation here is subtle but important. The reward for aggressive pin-hunting is minimal - even a perfect shot to a tucked pin only saves you a few feet of putting. The risk of missing the small green entirely far outweighs any potential benefit. Play conservatively to the center of the green and rely on your putting to make up any distance. ## DIFFERENT SKILL LEVELS **High Handicappers:** Take plenty of club and aim for the absolute center of the green. Don't worry about pin positions - your goal is simply to find the putting surface. Consider taking a lesson specifically on mid-iron distance control, as holes like this expose any inconsistencies in your iron play. **Low Handicappers:** While you have the skill to attack pins, resist the temptation unless the pin is in a very accessible position. This hole rewards patience and course management. Use it as a confidence-builder by committing to solid fundamentals rather than trying to make something spectacular happen. The beauty of this hole lies in its simplicity - it's a pure test of one golf skill at a time. Master your distance control and club selection here, and you'll find these lessons translate throughout your entire game.
Watch for
- Course conditioning and mapped hazards may affect line selection; confirm from the aerial.
Hole 7 Green Complex
Mapped green boundary
Green size: 5,142 sq ft
How did Hole 7 play?
How did this hole play today?
Frequently asked questions
Yardage reference: Championship tees · 181 yards.
What club should I use on this par 3?
↓
At 181 yards, most golfers will need a long iron or hybrid (5-iron to 6-iron) to reach this green. Adjust for elevation, wind, and pin position.
How difficult is hole 7?
↓
This hole is a moderate challenge for most golfers. Key challenges include: water in play.
What hazards should I watch out for on hole 7?
↓
Key hazards include: water at 106.8 yards. Plan your shots to avoid these trouble spots.
How big is the green on hole 7?
↓
The green is medium-sized with moderate targets. Pay attention to pin placement when selecting your approach club.