Hole 13 at Tobacco Road Golf Club
- Par
- 5
- Yardage
- 573 yds
- Stroke index
- 2
- Hazards
- 3 bunkers · Water
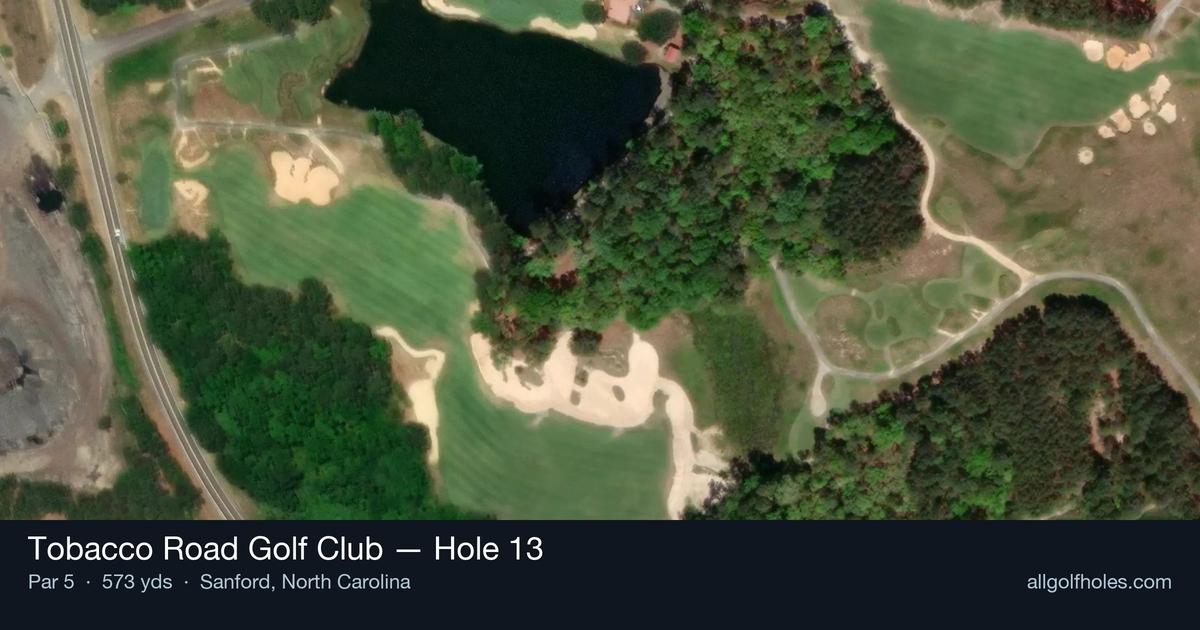
Aerial source not provided
Green size: 17 yds deep × 40 yds wide
Scorecard yardage is for Pro tees. The aerial shows its labeled reference position; distance rings measure to the green.
Pro tees · Par 5 · 573 yards
The plan for No. 13
The 13th hole at Tobacco Road Golf Club marks the beginning of Mike Strantz's thrilling closing stretch, presenting a deceptively strategic 573-yard par 5 that epitomizes the course's risk-reward philosophy. This signature hole features a green dramatically perched between towering mounds, creating one of golf's most visually striking targets. While the straightforward layout suggests a simple three-shot approach—drive, mid-iron, wedge—Strantz's masterful use of bunkers, dunes, and native vegetation transforms each shot into a calculated decision. The elevated green complex, nestled among the sculpted landforms, offers genuine birdie and eagle opportunities for those who navigate the visual intimidation factor. Despite appearing manageable on paper, this hole perfectly captures Tobacco Road's essence: spectacular beauty married with strategic complexity that rewards precision and punishes indecision.
Off the tee
Your tee shot strategy should focus on finding the optimal position for your second shot rather than maximum distance. A moderately straight drive of around 230 yards into the center-left portion of the fairway provides the best angle for your approach. The visual intimidation from the surrounding dunes and bunkers can cause players to overthink their club selection, but a smooth, controlled swing with your preferred fairway wood or driver is the key. Avoid the temptation to bomb it down the right side, as this can leave you blocked out or in trouble with the native areas that guard that side of the landing zone.
Approach & recovery
The second shot is where this hole's true character emerges. From a well-positioned drive, you'll face roughly 150 yards to the green complex, making this an ideal mid-iron opportunity. The approach requires careful target line selection, as the green is surrounded by strategic bunkering and mounding. Focus on the center of the green rather than attacking pins, as the small green size makes precision paramount. The elevated, perched nature of the green means shots that come up short can roll back significantly, while anything long will likely find the back bunkers or native areas.
On the green
The small green demands respect with your putting strategy. The perched nature between mounds creates subtle breaks that can be deceiving. Most putts will break away from the higher mounded areas, so read your putts carefully and don't underestimate the influence of the surrounding topography. Pin positions on this compact surface can vary dramatically in difficulty, with back pins being particularly challenging due to the falloff behind the green. ## RISK VS REWARD This hole epitomizes risk/reward golf strategy. The birdie and eagle opportunities are genuine for players who execute all three shots properly, but the penalty for poor execution is severe. The key decision point comes on the second shot - aggressive players can attack with a mid-iron to set up a wedge, while conservative players might lay back with a shorter iron to ensure they avoid the trouble and leave a comfortable third shot. The reward clearly favors the aggressive approach, but only with proper execution. ## DIFFERENT SKILL LEVELS **Low Handicappers** should view this as a definitive birdie opportunity, playing aggressively with driver off the tee and attacking the green in two when conditions permit. Focus on precise club selection and commit fully to your target lines. **Mid-to-High Handicappers** should embrace the three-shot strategy: hit a comfortable drive to the center of the fairway, advance the ball with a mid-iron to about 100 yards out, then attack with a wedge. This approach removes much of the visual intimidation while still providing excellent scoring opportunities. Don't let the dramatic visuals fool you into overthinking - this hole rewards steady, strategic play more than heroic shots. The 13th at Tobacco Road proves that signature holes don't need water hazards or extreme length to create memorable golf - just brilliant strategic design that rewards good thinking and precise execution.
Watch for
- Course conditioning and mapped hazards may affect line selection; confirm from the aerial.
Hole 13 Green Complex
Mapped green boundary
Green size: 3,858 sq ft
Course coverage
Tournament and creator videos about Tobacco Road Golf Club — shared course coverage, not hole-specific clips.
Featured by these creators
Creator videos about this course
YouTube creators who filmed or featured Tobacco Road Golf Club. · Stats as of Oct 12, 2026 · 6d ago
A first look at all 12 holes of Tobacco Road’s brand new Par 3 course, The Matchbox. @Chevrolet #Ad
D.J. Pie gets rich at Tobacco Road
How did Hole 13 play?
How did this hole play today?
Frequently asked questions
Yardage reference: Pro tees · 573 yards.
Can this par 5 be reached in two?
↓
At 573 yards, A true three-shot hole for most players. Position your layup to leave a comfortable wedge distance.
How difficult is hole 13?
↓
This hole is one of the tougher holes on the course for most golfers. Key challenges include: long par 5, water in play, small green.
What hazards should I watch out for on hole 13?
↓
Key hazards include: water at 295.1 yards. Plan your shots to avoid these trouble spots.
How big is the green on hole 13?
↓
The green is small and requires precision. The green is deeper than wide, so club selection is crucial. Expect challenging pin positions with limited room for error.
What's a good score on hole 13?
↓
This hole is a true three-shot hole where birdie requires execution. This longer par 5 demands patience. Two good shots set up the scoring opportunity.