Hole 6 at Tobacco Road Golf Club
- Par
- 3
- Yardage
- 148 yds
- Stroke index
- 13
- Hazards
- 3 bunkers
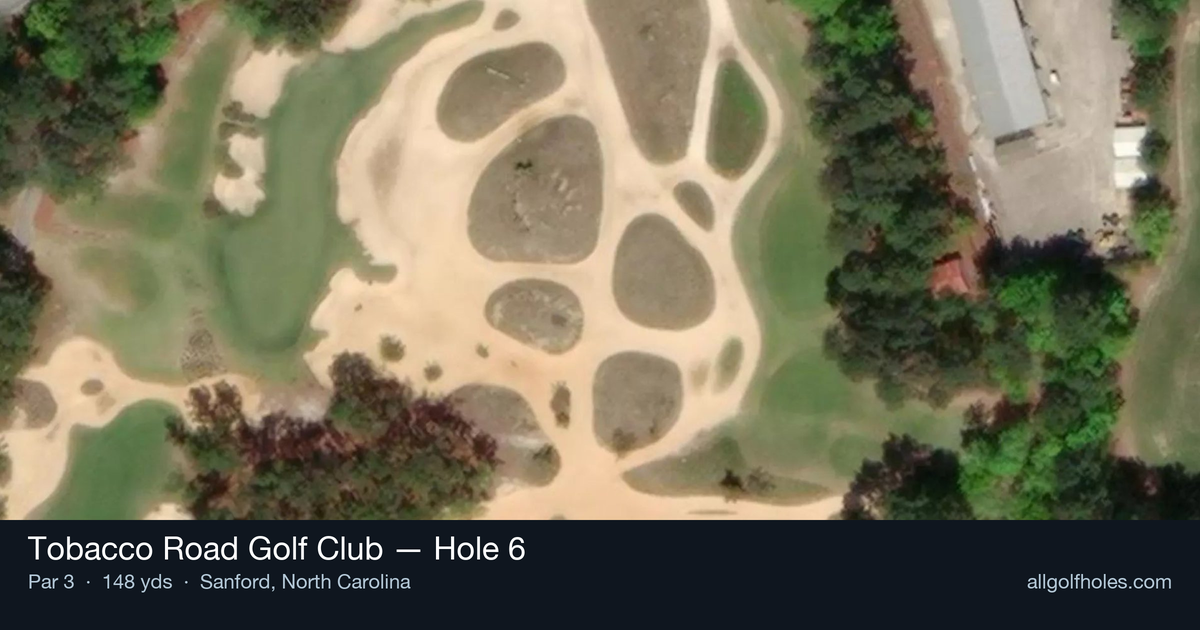
Aerial source not provided
Green size: 24 yds deep × 63 yds wide
Scorecard yardage is for Pro tees. The aerial shows its labeled reference position; distance rings measure to the green.
Pro tees · Par 3 · 148 yards
The plan for No. 6
The iconic Tobacco Road Golf Club hole 6 stands as Mike Strantz's most celebrated par 3, featuring a dramatic elevated tee box perched atop a towering sand dune that offers breathtaking views of the surrounding North Carolina landscape. At 148 yards, this signature hole demands precise club selection as golfers fire downhill to a compact target below, where the small green sits nestled in the natural sandy terrain. The elevated perspective creates an optical illusion that can deceive even experienced players, making distance control the primary challenge on this visually stunning hole. With minimal hazards protecting the putting surface, accuracy rather than power becomes paramount, as missing the green complex leaves difficult recovery shots from the unforgiving sandy surrounds that define Strantz's bold architectural vision.
Off the tee
From the elevated tee perched atop the sand dune, golfers face a deceptively challenging shot that plays significantly shorter than the yardage suggests. The dramatic elevation drop typically requires one to two clubs less than the distance would normally dictate. Focus on smooth tempo and solid contact rather than trying to guide the ball - the elevated position can create anxiety that leads to tentative swings. The target line should favor the center of the small green, as missing either side will leave challenging recovery shots. Take extra time to factor in wind conditions, which can be more pronounced from this elevated position. Trust your club selection and commit fully to your swing, as the elevated tee shot is unforgiving to indecisive execution.
Approach & recovery
Since this is a par 3, the tee shot serves as your approach to the green. The key is accepting that the elevation will significantly reduce the effective distance - most players will use a 7-iron to 9-iron depending on conditions and their normal distances. The small green size means precision trumps power, making this an excellent scoring opportunity when played correctly. Pay careful attention to pin position, as the compact green offers limited bailout areas. When the pin is tucked, aim for the center of the green and rely on your putting rather than trying to get too aggressive with your target line.
On the green
The small green at the 6th typically features subtle breaks that can be difficult to read from the elevated tee. Take time during your approach to study the green's contours as you walk down from the tee. Most putts will break more than they appear due to the green's position and surrounding terrain. Focus on speed control, as the elevated green and its surroundings can create optical illusions about distance and break. Lag putting becomes crucial here - getting your first putt close is more important than trying to make everything, especially on longer putts where the break can be deceptive. ## RISK VS REWARD This hole offers a clear risk/reward scenario: the elevated position and moderate distance create an excellent birdie opportunity, but the small target and dramatic elevation change can quickly turn a scoring chance into a bogey or worse. The reward of an easy birdie is balanced against the risk of a difficult recovery if you miss the green. The smart play is to aim for the center of the green regardless of pin position, accepting that a 20-foot putt for birdie is better than a challenging chip shot from below the green. Aggressive pin-seeking is only advisable when you're hitting the ball particularly well and conditions are calm. ## DIFFERENT SKILL LEVELS **High-Handicap Players:** Focus entirely on finding the green rather than attacking pin positions. Use one extra club to ensure you clear any trouble short of the green, and aim for the largest part of the putting surface. Accept that par is an excellent score here and don't let the dramatic setting create pressure that leads to poor swings. **Low-Handicap Players:** This hole offers a legitimate birdie opportunity with proper execution. You can be more aggressive with pin positions, but still respect the small target. Use the elevated position to your advantage by taking a smooth, confident swing with proper club selection. Consider wind and adrenaline factors that might affect distance control. The 6th hole at Tobacco Road exemplifies why Strantz's design philosophy continues to captivate and challenge golfers. Success here comes from embracing the bold architecture while maintaining disciplined course management - a perfect microcosm of what makes this course such a unique test of golf.
Watch for
- Course conditioning and mapped hazards may affect line selection; confirm from the aerial.
Hole 6 Green Complex
Mapped green boundary
Green size: 6,691 sq ft
Course coverage
Tournament and creator videos about Tobacco Road Golf Club — shared course coverage, not hole-specific clips.
Featured by these creators
Creator videos about this course
YouTube creators who filmed or featured Tobacco Road Golf Club. · Stats as of Oct 12, 2026 · 6d ago
A first look at all 12 holes of Tobacco Road’s brand new Par 3 course, The Matchbox. @Chevrolet #Ad
D.J. Pie gets rich at Tobacco Road
How did Hole 6 play?
How did this hole play today?
Frequently asked questions
Yardage reference: Pro tees · 148 yards.
What club should I use on this par 3?
↓
At 148 yards, most golfers will need a short iron (9-iron to PW) to reach this green. Adjust for elevation, wind, and pin position.
How difficult is hole 6?
↓
This hole is a good scoring opportunity for most golfers.
What hazards should I watch out for on hole 6?
↓
Key hazards include: 3 greenside bunkers. Plan your shots to avoid these trouble spots.
How big is the green on hole 6?
↓
The green is fairly large with multiple pin positions. The green is deeper than wide, so club selection is crucial. Lag putting becomes important on longer putts.
What's a good score on hole 6?
↓
This hole is a legitimate birdie opportunity for accurate iron players. Most golfers should target par, with birdie chances if you hit the green in regulation.