Hole 7 at Shadow Creek Golf Course
- Par
- 5
- Yardage
- 571 yds
- Stroke index
- 11
- Hazards
- 7 bunkers
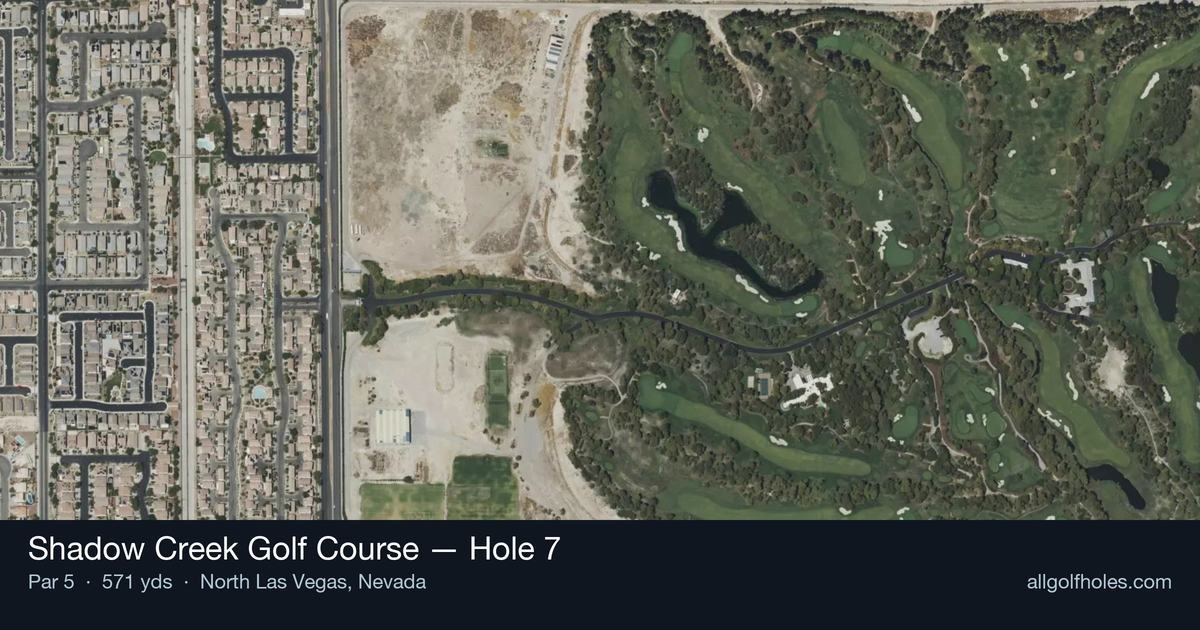
Aerial source not provided
Green size: 29 yds deep × 32 yds wide
Scorecard yardage is for Championship tees. The aerial shows its labeled reference position; distance rings measure to the green.
Championship tees · Par 5 · 571 yards
The plan for No. 7
Shadow Creek Golf Course hole 7 presents a deceptively strategic par 5 that exemplifies Tom Fazio's masterful desert architecture. At 571 yards, this dogleg left begins with a forced carry over a natural barranca before the fairway sweeps gracefully leftward around the 245-yard mark, where a strategically placed bunker guards the right side. The generous landing area rewards accurate tee shots, setting up longer hitters for an aggressive approach to the multi-plateaued green complex. However, numerous bunkers lurking just short of the putting surface demand precise distance control on second shots. Against the backdrop of soaring Nevada mountains and Shadow Creek's signature lush conditioning, this hole offers genuine birdie opportunities for those who navigate its subtle challenges with both power and finesse.
Off the tee
Your tee shot strategy centers on clearing the barranca carry and positioning yourself for the dogleg left turn around the 245-yard mark. Driver is the preferred club for most players, as length here sets up better angles and shorter approach shots. Target the right-center of the fairway to account for the left-turning hole design. The bunker positioned on the right side of the fairway bend serves as a useful landmark - you'll want to carry well past this hazard to optimize your approach angle. Focus on a smooth, controlled swing rather than maximum distance, as accuracy off the tee pays dividends on this hole.
Approach & recovery
From a well-positioned drive, many golfers will face a genuine risk/reward decision for their second shot. The multi-plateaued green is guarded by numerous bunkers just short, making club selection critical. If going for the green in two, ensure you have enough club to clear the front bunkers - coming up short here leads to difficult recovery shots. The small green size demands precision, so consider the pin position carefully. A layup strategy targeting the 100-yard range sets up a comfortable wedge approach and removes much of the risk from this scoring hole.
On the green
The small, multi-plateaued green at the 7th requires careful attention to pin position and green reading. The various levels create subtle breaks that can be deceiving from distance. Approach putts should focus on getting the ball to the correct tier rather than being overly aggressive with the pin. Two-putting from the wrong level can be challenging, so prioritize getting your ball on the same plateau as the hole location. The green's compact size means most putts will be relatively short, but the elevation changes demand respect. ## RISK VS REWARD This hole presents one of Shadow Creek's clearest risk/reward scenarios. Longer hitters who can carry the green-side bunkers have legitimate eagle opportunities, making this an aggressive play worth considering in match play or when chasing a score. However, the small target and penalty for missing short make the conservative three-shot approach very appealing. The key decision point comes after your drive - assess your lie, distance remaining, and current round situation before committing to going for the green in two. ## DIFFERENT SKILL LEVELS **Low Handicappers** should view this as a birdie hole and consider going for the green in two when conditions allow. Focus on precise distance control and ensure you can carry the front bunkers with room to spare. Your short iron accuracy will be tested on the small green. **High Handicappers** benefit most from a three-shot strategy here. Use the hole's length to your advantage by playing three comfortable shots rather than forcing a risky second. Lay up to your favorite wedge distance and attack the pin with your most reliable club. This approach minimizes big numbers while still providing birdie opportunities through solid wedge play and putting.
Watch for
- Course conditioning and mapped hazards may affect line selection; confirm from the aerial.
Hole 7 Green Complex
Mapped green boundary
Green size: 3,834 sq ft
How did Hole 7 play?
How did this hole play today?
Frequently asked questions
Yardage reference: Championship tees · 571 yards.
Can this par 5 be reached in two?
↓
At 571 yards, A true three-shot hole for most players. Position your layup to leave a comfortable wedge distance.
How difficult is hole 7?
↓
This hole is a moderate challenge for most golfers. Key challenges include: long par 5, heavily bunkered, small green.
How big is the green on hole 7?
↓
The green is small and requires precision. Expect challenging pin positions with limited room for error.
What's a good score on hole 7?
↓
This hole is a true three-shot hole where birdie requires execution. This longer par 5 demands patience. Two good shots set up the scoring opportunity.