Hole 3 at Shadow Creek Golf Course
- Par
- 4
- Yardage
- 486 yds
- Stroke index
- 1
- Hazards
- 2 bunkers · Water
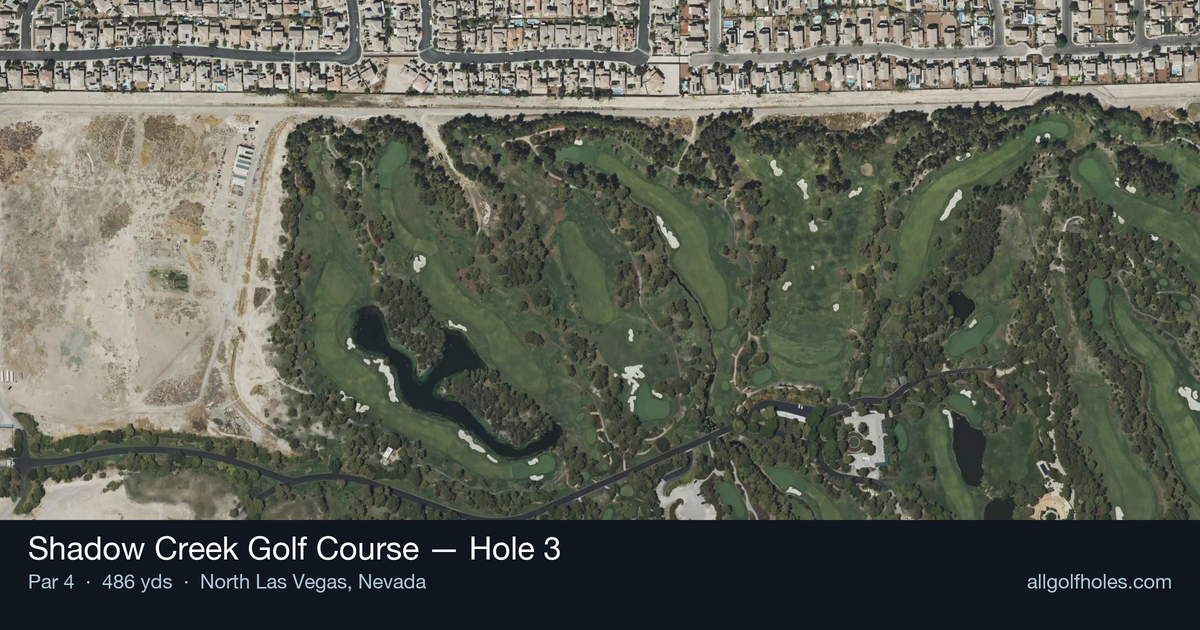
Aerial source not provided
Green size: 29 yds deep × 36 yds wide
Scorecard yardage is for Championship tees. The aerial shows its labeled reference position; distance rings measure to the green.
Championship tees · Par 4 · 486 yards
The plan for No. 3
Shadow Creek Golf Course hole 3 stands as the course's most demanding test, earning its number one handicap ranking through sheer length and precision requirements. This formidable 486-yard par 4 stretches across the Nevada desert landscape with soaring mountains providing a dramatic backdrop to Tom Fazio's masterful design. The straight layout demands two exceptional shots, starting with a tee shot that must find the generous fairway to set up a challenging approach to a compact green complex. Without significant hazards to distract, this hole relies purely on distance and accuracy to separate scores. The small green rewards precise iron play and punishes anything less than committed swings. It's a hole that exemplifies Shadow Creek's philosophy of strategic golf in a spectacular setting.
Off the tee
Your tee shot strategy centers on maximizing distance while maintaining position for the best possible approach angle. With 486 yards to navigate, most golfers will need every yard they can safely generate off the tee. Driver is typically the play here, focusing on the center of the fairway to avoid any rough or collection areas that could compromise your approach distance. The straight layout allows you to be aggressive with your target line, aiming down the middle of the fairway. However, pay attention to wind conditions, which can be significant in the Las Vegas desert environment. A slight fade or draw to match the day's conditions often proves more reliable than attempting to hit it perfectly straight.
Approach & recovery
The approach shot represents the hole's critical scoring moment, where club selection and precision become paramount. With a small green as your target, accuracy trumps distance considerations. Most golfers will face a long-iron or fairway wood approach, making it essential to commit fully to your club choice and swing. Focus on the center of the green regardless of pin position - the small target doesn't allow for aggressive pin-hunting unless you're hitting a shorter iron. Take one more club than you think you need, as coming up short of a small green often results in a more difficult up-and-down than being pin-high or slightly long.
On the green
Shadow Creek's small greens demand respect, and the third hole exemplifies this design philosophy. Expect subtle breaks that can be difficult to read, particularly given the desert's firm conditions. The key to successful putting here is speed control - getting your first putt close enough to ensure a confident second putt. Study the green's surroundings carefully, as the mountain backdrop can create optical illusions affecting your read. Most putts will break slightly toward the lowest point of the green, but don't overread the breaks on what appears to be a relatively straightforward putting surface. ## RISK VS REWARD The third hole presents a more conservative risk/reward profile than many championship holes. The primary risk lies in being overly aggressive with an already demanding shot. The reward for patient, strategic play is significant - making par on the #1 handicap hole provides momentum and confidence for the remaining holes. Avoid the temptation to force extra distance off the tee or attack difficult pin positions on approach. The hole's length provides enough challenge without adding unnecessary risks to your strategy. ## DIFFERENT SKILL LEVELS **High-Handicap Players:** Focus on advancing the ball as far as possible off the tee while staying in play. Consider laying up to a comfortable wedge distance if your second shot would require a club you're not confident with. Making bogey and moving on represents solid course management on this demanding hole. **Low-Handicap Players:** This hole demands your A-game from start to finish. Trust your distance control and commit to aggressive swings with longer clubs. The small green rewards precise iron play, so don't bail out early - attack the center of the green with confidence in your technique. The third hole at Shadow Creek serves as an early reminder that this Tom Fazio masterpiece demands respect and rewards strategic thinking. Whether you're grinding for par or hunting birdie, success comes through patience, precision, and smart course management rather than brute force.
Watch for
- Course conditioning and mapped hazards may affect line selection; confirm from the aerial.
Hole 3 Green Complex
Mapped green boundary
Green size: 4,943 sq ft
How did Hole 3 play?
How did this hole play today?
Frequently asked questions
Yardage reference: Championship tees · 486 yards.
What's the best strategy off the tee?
↓
For this 486-yard par 4, most players will hit driver to set up a comfortable approach.
How difficult is hole 3?
↓
This hole is one of the tougher holes on the course for most golfers. Key challenges include: long par 4, water in play.
What hazards should I watch out for on hole 3?
↓
Key hazards include: water at 212.8 yards. Plan your shots to avoid these trouble spots.
How big is the green on hole 3?
↓
The green is medium-sized with moderate targets. The green is deeper than wide, so club selection is crucial. Pay attention to pin placement when selecting your approach club.
Which side of the fairway is safer on hole 3?
↓
Aim for the right side of the fairway when possible. Missing left (water) brings more trouble into play.
What's a good score on hole 3?
↓
This hole is one of the tougher holes where par feels like birdie. A challenging par 4. Accept that bogey happens and avoid big numbers.