Hole 7 at Cascata
- Par
- 3
- Yardage
- 157 yds
- Stroke index
- 17
- Hazards
- 2 bunkers · Water
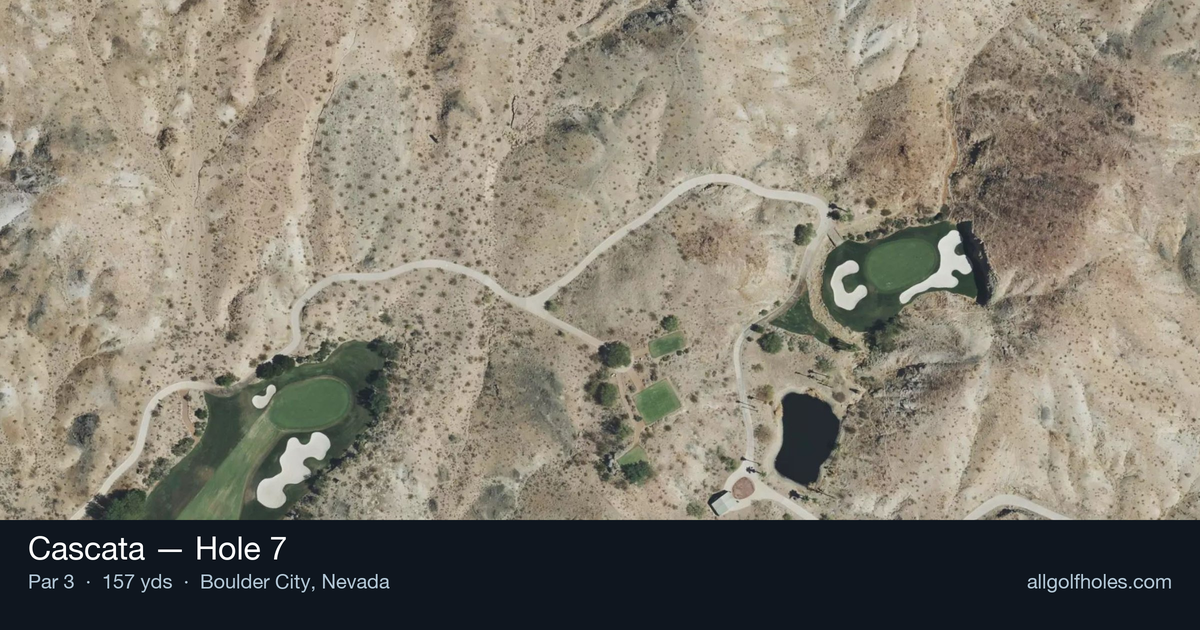
Aerial source not provided
Green size: 30 yds deep × 23 yds wide
Scorecard yardage is for Championship tees. The aerial shows its labeled reference position; distance rings measure to the green.
Championship tees · Par 3 · 157 yards
The plan for No. 7
Cascata hole 7 stands as the true aesthetic jewel of this desert masterpiece, earning recognition as many players' favorite over the course's intended signature holes. This captivating par 3 stretches 157 yards through Nevada's dramatic landscape, demanding precision over raw power. From an elevated tee offering panoramic views for miles across the Mojave Desert, golfers face a straight shot to a small, well-protected green that rewards accuracy above all else. The hole's deceptive simplicity masks its strategic complexity, as desert winds and elevation changes can dramatically affect club selection. Without major hazards cluttering the design, the challenge lies in reading the conditions and executing a pure tee shot. This elegant one-shotter exemplifies Cascata's philosophy of blending natural beauty with thoughtful golf architecture, creating a memorable moment that lingers long after the round.
Off the tee
Your tee shot strategy centers on precise distance control and center-green targeting. In the desert environment, take extra time to assess wind conditions, as gusts can easily affect a mid-iron shot. Select a club that allows you to make a confident, committed swing rather than forcing a shot. Most players will need anything from a 7-iron to a 5-iron depending on conditions and pin position. Aim for the center of the small green rather than chasing pins, as the compact target leaves little margin for error. The straight layout eliminates directional concerns, allowing you to focus purely on distance and trajectory.
Approach & recovery
Since this is a par 3, your tee shot serves as your approach. The key is accounting for the desert conditions that can make distance judgment tricky. The lack of significant hazards means you can be aggressive with your line, but the small green demands respect. Consider taking one extra club and making a smooth swing rather than trying to muscle a shorter iron. Pay attention to the pin position - when the flag is tucked, play to the fat part of the green and rely on your putting to get close.
On the green
The small green at the 7th requires careful putting strategy. With limited real estate, most putts will be relatively straight, but don't underestimate subtle breaks that can be difficult to read against the dramatic desert backdrop. Focus on speed control, as running putts off this compact surface will leave challenging recovery shots. When the pin is accessible, be aggressive with your putting - the shorter distances mean you can attack the hole with confidence. ## RISK VS REWARD This hole offers a pure risk/reward scenario around pin hunting versus playing safe. The reward of attacking tucked pins is significant given the scoring opportunity on this shorter par 3, but the risk of missing the small green entirely can lead to difficult up-and-downs. The smart play is typically center-green, letting your putting skills determine your score rather than gambling with precise iron play in potentially windy conditions. ## DIFFERENT SKILL LEVELS **High Handicappers:** Focus entirely on finding the green with a club you're confident with. Don't worry about pin positions - aim for the center and take your par or better. Consider taking an extra club to ensure you clear any front trouble and make a smooth, controlled swing. **Low Handicappers:** You can be more aggressive with pin hunting, especially when conditions are calm. Use your distance control skills to attack favorable pin positions, but recognize when to play conservatively based on wind and pin location. Your short game skills give you more margin for error around the green. **Course Management Tip:** Given this hole's reputation as one of Cascata's most beautiful, take a moment to enjoy the scenery, but don't let the views distract from the fundamental requirement of solid contact and distance control. The combination of desert conditions and a small target makes this a hole where conservative strategy often produces the best scores.
Watch for
- Course conditioning and mapped hazards may affect line selection; confirm from the aerial.
Hole 7 Green Complex
Mapped green boundary
Green size: 3,941 sq ft
How did Hole 7 play?
How did this hole play today?
Frequently asked questions
Yardage reference: Championship tees · 157 yards.
What club should I use on this par 3?
↓
At 157 yards, most golfers will need a mid-iron (7-iron to 8-iron) to reach this green. Adjust for elevation, wind, and pin position.
How difficult is hole 7?
↓
This hole is a moderate challenge for most golfers. Key challenges include: water in play, small green.
What hazards should I watch out for on hole 7?
↓
Key hazards include: 2 greenside bunkers; water at 147.9 yards. Plan your shots to avoid these trouble spots.
How big is the green on hole 7?
↓
The green is small and requires precision. Expect challenging pin positions with limited room for error.
What's a good score on hole 7?
↓
This hole is a solid par with birdie chances for precise approach shots. Making par is a good result here. Focus on hitting the green and avoiding three-putts.