Hole 10 at Cascata
- Par
- 4
- Yardage
- 466 yds
- Stroke index
- 6
- Hazards
- 4 bunkers
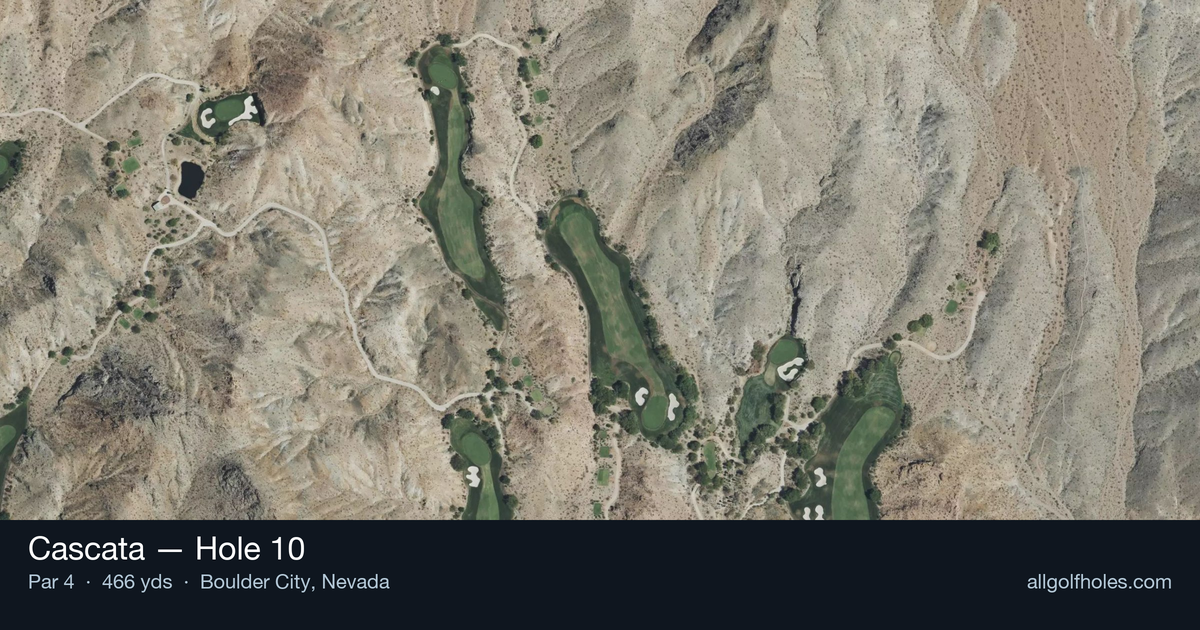
Aerial source not provided
Green size: 34 yds deep × 29 yds wide
Scorecard yardage is for Championship tees. The aerial shows its labeled reference position; distance rings measure to the green.
Championship tees · Par 4 · 466 yards
The plan for No. 10
Cascata hole 10 presents a strategic 466-yard par 4 that demands precision from tee to green. This downhill beauty features a generous fairway protected by a prominent bunker complex along the right side, creating an intimidating visual challenge for the tee shot. The hole's straight layout might appear forgiving, but the strategic bunker placement forces golfers to carefully consider their line of attack. The approach shot plays to a compact, well-defended green surrounded by multiple bunkers on both sides, with the putting surface sloping back-to-front. Smart course management is essential here, as the bunker positioning rewards accurate drives while punishing wayward shots. This signature hole perfectly captures Cascata's desert mountain character, combining visual drama with tactical complexity.
Off the tee
The downhill nature of this hole provides extra carry and roll, making club selection critical for optimal positioning. Target the left-center portion of the fairway to avoid the large bunker complex that extends from about 240 to 290 yards on the right side. Most players will find a driver or strong 3-wood ideal here, but the key is committing to a target line that keeps you left of the trouble while still providing a clear approach angle. The generous fairway width allows for this strategy, but don't get lured into cutting too close to the right-side bunkers - the penalty for finding sand significantly complicates your approach shot.
Approach & recovery
From the ideal tee shot position, you'll face a mid-iron to long-iron approach depending on conditions and your tee shot distance. The small green demands precision, and with bunkers protecting both sides, favor the center of the putting surface rather than attacking pins. The back-to-front slope mentioned by course reviewers means shots landing beyond the pin will face challenging downhill putts. Club selection should account for the continued downhill lie, which will add distance to your approach. When in doubt, take one less club and focus on solid contact to the middle of the green.
On the green
The small green size and back-to-front slope create subtle but important putting challenges. Approach putts from above the hole require delicate touch, while uphill putts can be struck more aggressively. Pay attention to pin position - when the flag is in the back portion of the green, be especially cautious not to go long, as recovery shots from the back bunkers to a downsloping green are extremely difficult. Read putts conservatively and focus on lag putting to the low side when facing longer attempts. ## RISK VS REWARD The primary risk/reward decision comes on the tee shot. Aggressive players might be tempted to challenge the right-side bunkers to shorten the approach, but the penalty for missing is severe given the small green target ahead. The smarter play is accepting a slightly longer approach shot in exchange for a clear angle and level lie. From the fairway bunkers, reaching the green becomes significantly more challenging, often requiring a layup and turning this scoring opportunity into a bogey threat. ## DIFFERENT SKILL LEVELS **Higher Handicap Players:** Focus on course management over distance. Use a 3-wood or hybrid off the tee to ensure finding the fairway left of the bunkers. From there, play conservatively to the center of the green with whatever club gets you there comfortably. Don't be afraid to aim for the front edge - a two-putt par from anywhere on this small green is a victory. **Lower Handicap Players:** You can be more aggressive with driver while still respecting the right-side bunkers. From an optimal fairway position, attack pins on the front half of the green but play defensively to back pin positions. Use the downhill slope to your advantage but maintain discipline in club selection - the small green punishes overaggressive approaches even for skilled players. This hole exemplifies smart golf course design, rewarding strategic thinking while punishing reckless play, making it a true test of course management skills at this challenging Nevada layout.
Watch for
- Course conditioning and mapped hazards may affect line selection; confirm from the aerial.
Hole 10 Green Complex
Mapped green boundary
Green size: 4,866 sq ft
How did Hole 10 play?
How did this hole play today?
Frequently asked questions
Yardage reference: Championship tees · 466 yards.
What's the best strategy off the tee?
↓
For this 466-yard par 4, most players will hit driver to set up a comfortable approach.
How difficult is hole 10?
↓
This hole is a moderate challenge for most golfers. Key challenges include: long par 4, heavily bunkered.
How big is the green on hole 10?
↓
The green is medium-sized with moderate targets. Pay attention to pin placement when selecting your approach club.
What's a good score on hole 10?
↓
This hole is one of the tougher holes where par feels like birdie. A challenging par 4. Accept that bogey happens and avoid big numbers.