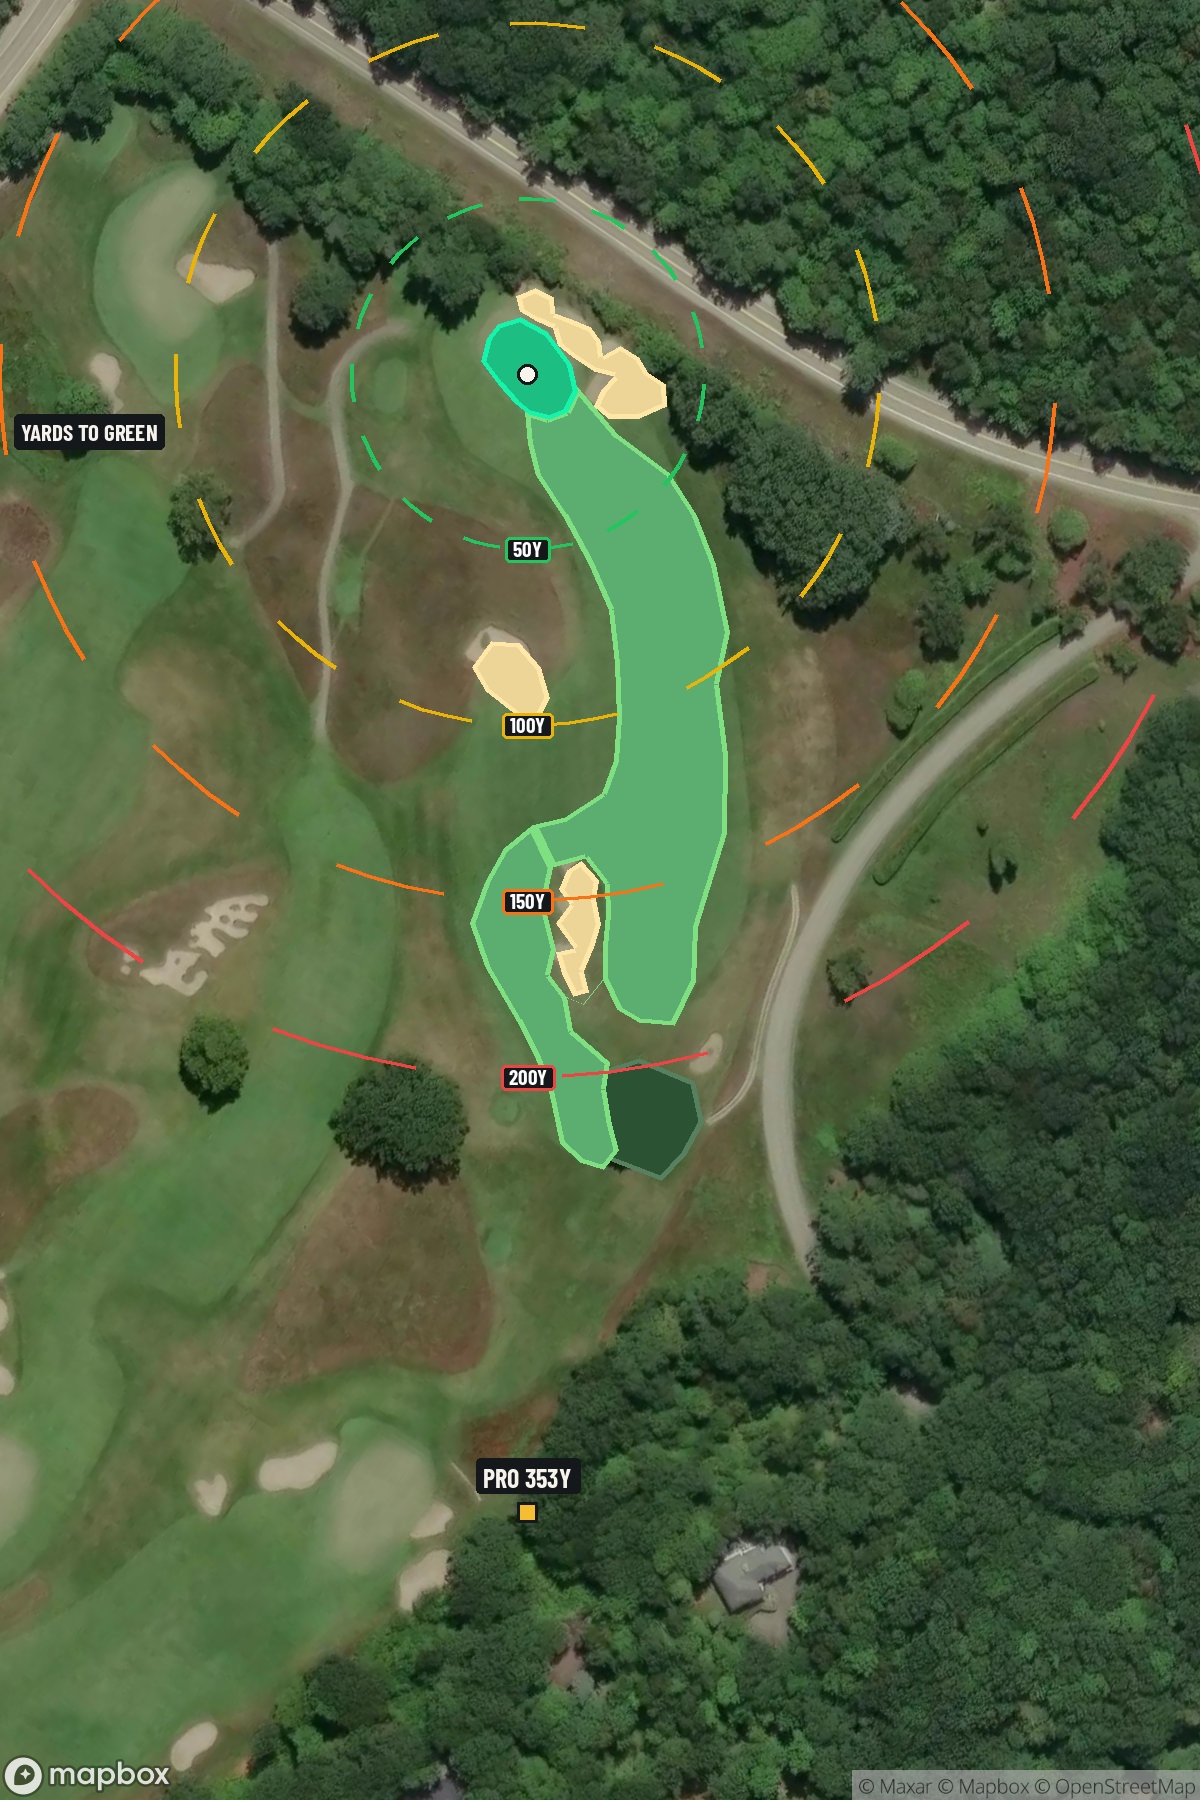
Hole 5 of 18 · Frankfort, Michigan

Hole 5 at Crystal Downs Country Club

Par
4
Yards
353
Bunkers
4
Hole 5 aerial at Crystal Downs Country Club
Map distances from Pro tee · 353 yds

The map's printed distances are measured from the Pro tee to the green; they do not move when you change tees.

Green size: 29 yds deep × 27 yds wide

Mapbox Satellite composite · capture date not provided. Green at the top.

Where this map comes from

Satellite photo
Date not published
Mapbox satellite
Green contours
2015–2016 survey
USGS lidar survey
Report a map problem
100%
Hole 5 aerial at Crystal Downs Country Club

The plan for No. 5

The play: Crystal Downs Country Club hole 5 presents a deceptively straightforward par 4 that epitomizes the understated brilliance of this Alister MacKenzie masterpiece. At 353 yards, this straight hole appears inviting from the tee, offering golfers a generous fairway framed by the natural Michigan landscape. However, the real challenge emerges on the approach shot to a small, subtly contoured green that demands precision over power. Without significant hazards to intimidate, the hole relies on MacKenzie's genius for strategic design—rewarding accurate placement while punishing wayward shots with difficult recovery positions. The green's compact dimensions and natural undulations create a premium on approach shot accuracy, making this seemingly benign hole a true test of golf course management and short iron precision.

Shot by shot

  1. Off the tee

    The tee shot strategy centers on finding the optimal distance for your approach shot. Most players should focus on a controlled drive that leaves a comfortable iron into the green - typically hitting driver to leave 100-140 yards remaining. The straight layout allows for an aggressive target line down the center of the fairway. Longer hitters might consider taking less than driver to dial in their preferred approach yardage, especially if they're more confident with a specific iron. The key is avoiding the temptation to simply bomb driver without considering what remains for the approach.

  2. Approach & recovery

    The approach shot is where this hole can make or break your score. With a small green as your target, precision trumps power. Focus on the center of the green unless the pin position clearly favors one side. Club selection should prioritize accuracy - take enough club to ensure you reach the putting surface rather than coming up short. Pay attention to pin position and green contours when selecting your target. Even on this relatively short approach, a well-struck iron to the heart of the green will typically leave a reasonable birdie putt.

  3. On the green

    The small green size means every putt matters significantly. Focus on lag putting to avoid three-putts, as short putts become crucial for par saves. Read the subtle breaks carefully - Crystal Downs' greens are known for their nuanced contours that can fool the eye. When putting, prioritize getting your first putt close rather than being overly aggressive for birdie. The small surface area means even slight misreads can leave challenging second putts. ## RISK VS REWARD This hole offers multiple risk/reward scenarios. Aggressive players can attack pins close to edges, while conservative players can aim for the center and rely on putting. The bigger decision comes off the tee - do you hit driver for a shorter approach, or lay back with a fairway wood for better control? The reward for precision is significant - birdies are very achievable with two good shots. However, the penalty for missing the small green can quickly turn birdie opportunities into bogey struggles. ## DIFFERENT SKILL LEVELS **High Handicappers:** Focus on two solid shots rather than trying to overpower the hole. Hit a comfortable tee shot that finds the fairway, then prioritize hitting the green with your approach rather than attacking pins. Par is an excellent score here. **Low Handicappers:** This is a birdie hole that demands execution. Consider your optimal approach distance when selecting tee shot strategy. Be aggressive with approach shots to accessible pins, but respect difficult pin positions by playing to the center of the green. **Scratch Players:** Look to be aggressive here while maintaining smart course management. This hole should yield birdies over time, but avoid the temptation to force shots that aren't there. Trust your iron play and putting to convert scoring opportunities.

  4. Watch for

    • Course conditioning and mapped hazards may affect line selection; confirm from the aerial.

The green on No. 5

Mapped boundary
Wide × deepyards
27×29
Areasq ft
4,427

Gear for Hole 5

We may earn a commission when you buy through these links.

Golfer feedback

How did Hole 5 play?

⚡ Quick Golfer Pulse

How did this hole play today?

1-tap anonymous vote

Frequently asked questions

Yardage reference: Pro tees · 353 yards.

What's the best strategy off the tee?

↓

For this 353-yard par 4, most players will hit 3-wood or driver to set up a comfortable approach.

How difficult is hole 5?

↓

This hole is a good scoring opportunity for most golfers. Key challenges include: small green.

How big is the green on hole 5?

↓

The green is small and requires precision. The green is wider than it is deep, rewarding shots that find the correct tier. Expect challenging pin positions with limited room for error.

What's a good score on hole 5?

↓

This hole is a medium-length test where par is a solid result. A straightforward par 4 where course management pays off.