Hole 11 of 18 · Frankfort, Michigan

Hole 11 at Crystal Downs Country Club

Par
3
Yards
196
Bunkers
3
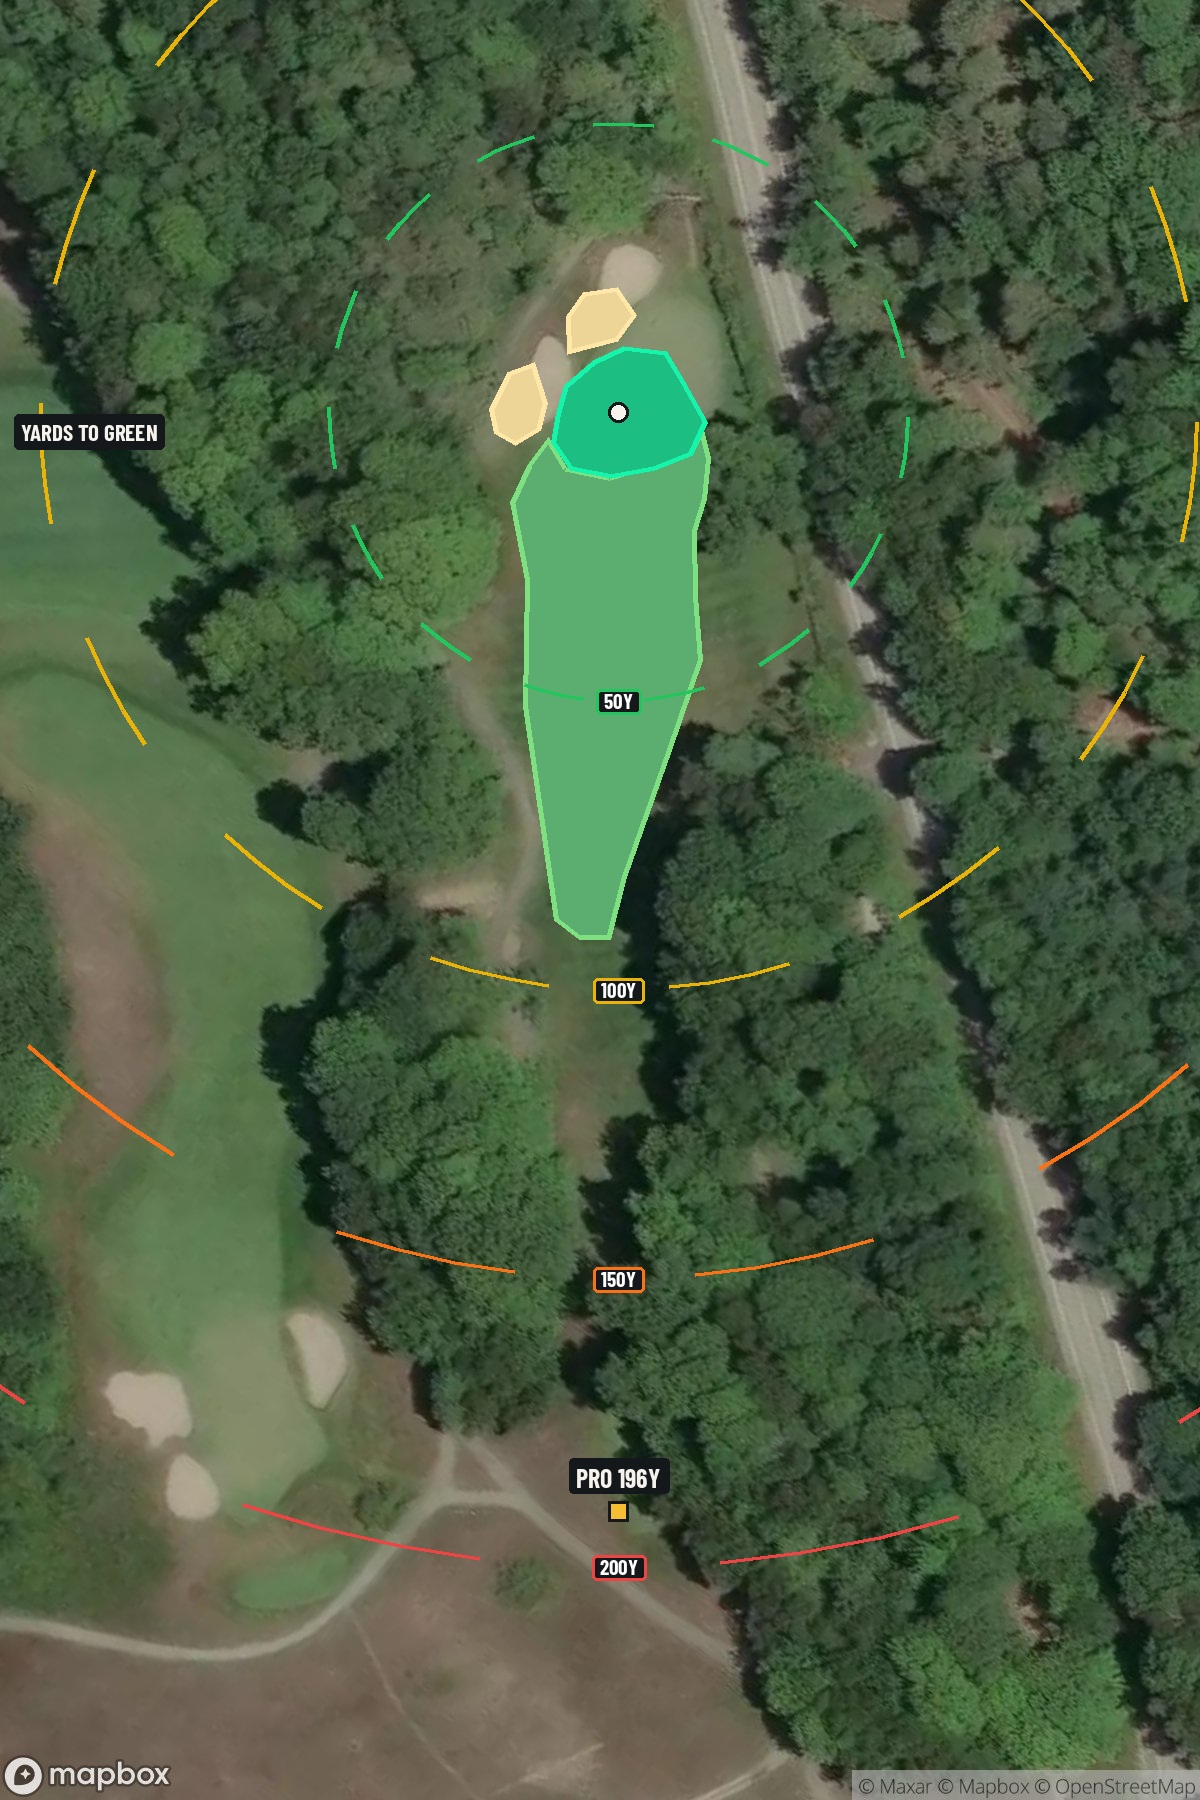
Hole 11 aerial at Crystal Downs Country Club
Map distances from Pro tee · 196 yds

The map's printed distances are measured from the Pro tee to the green; they do not move when you change tees.

Green size: 23 yds deep × 27 yds wide

Mapbox Satellite composite · capture date not provided. Green at the top.

Where this map comes from

Satellite photo
Date not published
Mapbox satellite
Green contours
2015–2016 survey
USGS lidar survey
Report a map problem
100%
Hole 11 aerial at Crystal Downs Country Club

The plan for No. 11

The play: Crystal Downs Country Club hole 11 presents a deceptively challenging par 3 that epitomizes the understated brilliance of this Alister MacKenzie masterpiece overlooking Lake Michigan. At 196 yards, this seemingly straightforward tee shot demands precision to a small, subtly contoured green that punishes wayward approaches. The absence of dramatic hazards makes club selection and distance control paramount, as the compact putting surface offers little margin for error. Wind patterns from nearby Lake Michigan can dramatically alter playing conditions, transforming what appears to be a routine mid-iron into a strategic puzzle. The green's intimate scale rewards accurate iron play while severely testing short game skills for those who miss the mark, making this hole a perfect example of MacKenzie's philosophy that great holes don't always need bunkers to create memorable golf.

Shot by shot

  1. Off the tee

    Club selection is paramount on this hole. Most players will be looking at anything from a 6-iron to a 4-iron depending on conditions and personal distance. The key is choosing a club you can swing confidently and smoothly - avoid the temptation to force a shorter iron or baby a longer one. Aim for the center of the green initially, as the small target leaves little room for error. Pay close attention to wind conditions, as they'll significantly impact your club choice at this distance.

  2. Approach & recovery

    Since this is a par 3, your tee shot IS your approach. Focus on a smooth, balanced swing rather than trying to muscle the shot. The small green means you need to commit fully to your target line and distance. Without significant hazards to navigate around, you can play aggressively toward the pin when it's accessible, but always respect the green's size limitations. A shot that lands soft and stops quickly will serve you better than one that runs through the green.

  3. On the green

    With a small putting surface, you'll likely face shorter putts than on larger greens, which is an advantage. However, the compact nature means any slopes will be more pronounced relative to the space available. Read putts carefully and don't underestimate subtle breaks. Speed control becomes crucial - with less green to work with, a putt that's slightly off pace has less room to find the hole. ## RISK VS REWARD The risk/reward calculation here is straightforward: the reward for an aggressive shot toward a tucked pin is significant (potential birdie), but the risk of missing the small green entirely can lead to difficult up-and-downs. The smart play is typically to aim for the center of the green and take your two-putt par, especially when pin positions are challenging. ## DIFFERENT SKILL LEVELS **High-handicap players** should focus entirely on finding the green, regardless of pin position. Choose a club you're confident with and aim for the largest part of the green. A bogey from the green is much better than a double-bogey from short of it. **Low-handicap players** can be more aggressive with pin hunting, especially when conditions are favorable. Your superior distance control allows you to attack pins more readily, but still respect the small target and avoid forcing shots when the pin is in a difficult position. The beauty of this hole lies in its simplicity - it's a pure test of your iron play without the complications of major hazards, making solid execution the only path to success.

  4. Watch for

    • Course conditioning and mapped hazards may affect line selection; confirm from the aerial.

The green on No. 11

Mapped boundary
Wide × deepyards
27×23
Areasq ft
3,867

Gear for Hole 11

We may earn a commission when you buy through these links.

Golfer feedback

How did Hole 11 play?

⚡ Quick Golfer Pulse

How did this hole play today?

1-tap anonymous vote

Frequently asked questions

Yardage reference: Pro tees · 196 yards.

What club should I use on this par 3?

↓

At 196 yards, most golfers will need a long iron or hybrid (5-iron to 6-iron) to reach this green. Adjust for elevation, wind, and pin position.

How difficult is hole 11?

↓

This hole is a moderate challenge for most golfers. Key challenges include: small green.

How big is the green on hole 11?

↓

The green is small and requires precision. Expect challenging pin positions with limited room for error.