Hole 3 of 18 · Frankfort, Michigan

Hole 3 at Crystal Downs Country Club

Par
3
Yards
191
Bunkers
4
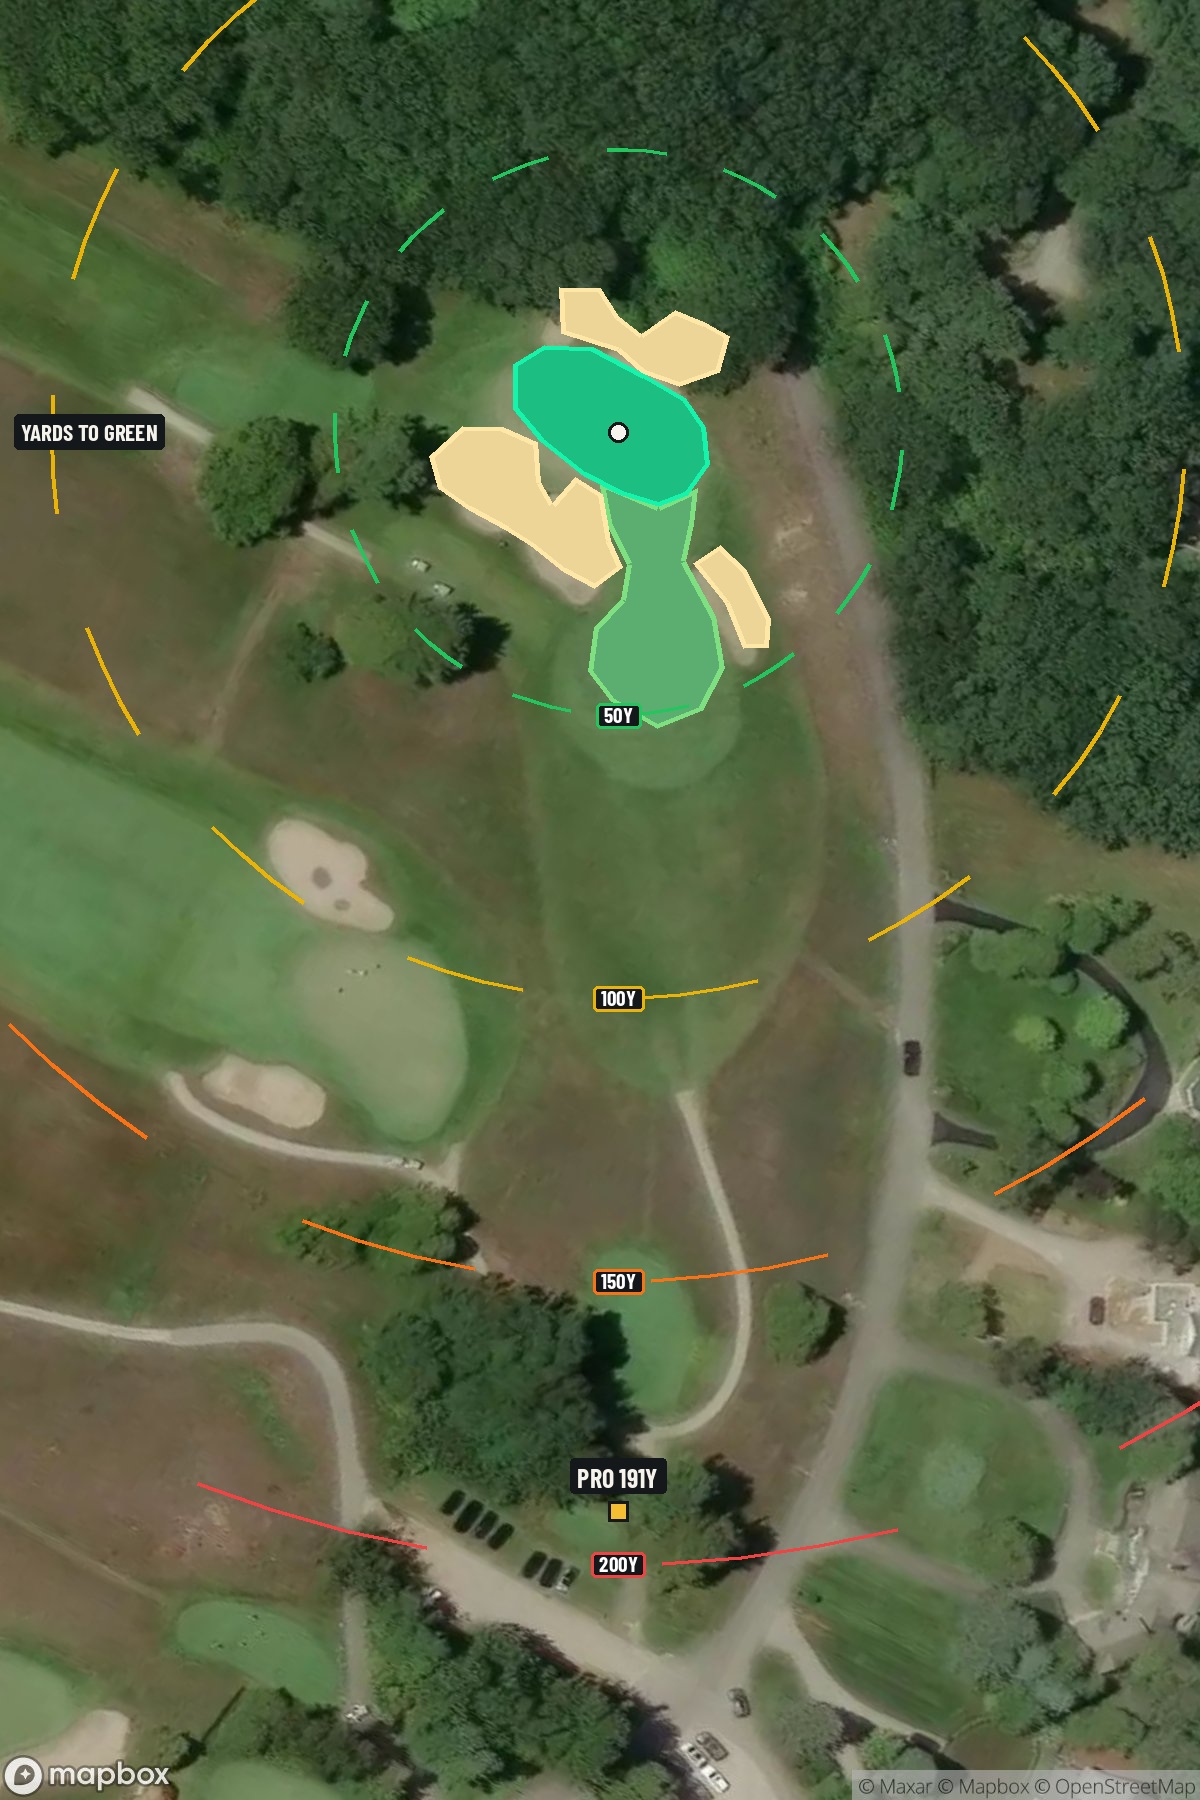
Hole 3 aerial at Crystal Downs Country Club
Map distances from Pro tee · 191 yds

The map's printed distances are measured from the Pro tee to the green; they do not move when you change tees.

Green size: 29 yds deep × 35 yds wide

Mapbox Satellite composite · capture date not provided. Green at the top.

Where this map comes from

Satellite photo
Date not published
Mapbox satellite
Green contours
2015–2016 survey
USGS lidar survey
Report a map problem
100%
Hole 3 aerial at Crystal Downs Country Club

The plan for No. 3

The play: Crystal Downs Country Club hole 3 presents a deceptively challenging par 3 that epitomizes the course's renowned strategic design philosophy. At 191 yards, this straight shot demands precision over a clean carry to a small, well-protected green nestled into the natural Michigan terrain. The elevated tee provides stunning views across the property, but don't let the scenery distract from the task at hand. With minimal hazards flanking the target, the primary challenge lies in club selection and distance control to this compact putting surface. The green's subtle contours punish wayward approaches, rewarding only the most committed tee shots. This hole exemplifies Crystal Downs' reputation for requiring thoughtful execution over raw power, making it a memorable test that golfers revisit long after their round.

Shot by shot

  1. Off the tee

    Club selection is paramount on this hole. Most golfers will be looking at anything from a 6-iron to a 4-iron depending on wind conditions and pin position. The key is committing fully to your yardage and swinging with confidence - tentative swings rarely find small greens. Aim for the center of the green unless the pin is tucked in a corner, in which case assess your confidence level honestly. The straight layout means you can trust your target line, but pay close attention to wind direction as it will significantly impact club selection on this exposed hole.

  2. Approach & recovery

    Since this is a par 3, your tee shot IS your approach. Focus on a smooth, controlled swing rather than trying to muscle the ball. The small green rewards precision over power. Take one extra club if you're between selections - being long but on the green is infinitely better than coming up short. Watch for subtle green contours that may not be immediately visible from the tee. Even small greens can have significant slope, so observe how other players' balls react upon landing.

  3. On the green

    Small greens typically feature more pronounced slopes and faster putting surfaces. Lag putting becomes crucial here - three-putting from 40 feet is a real possibility if you're not careful with speed control. Study the green carefully during your approach to identify the general slope direction. Most small greens have one dominant slope, and understanding this will help you leave putts below the hole whenever possible. ## RISK VS REWARD This hole offers limited risk/reward opportunities, which is precisely its strategic challenge. The reward for finding the green is a legitimate birdie chance, while the risk of missing it entirely can lead to difficult up-and-downs. The only real strategic decision is pin hunting versus playing safe to the center. Conservative play to the middle of the green is usually the percentage play, especially when the pin is in a challenging position. ## DIFFERENT SKILL LEVELS **High Handicappers:** Focus entirely on finding the green rather than attacking pins. Take enough club to ensure you reach the putting surface, even if it means being long. A 30-foot putt is much easier than a pitch shot from short grass. **Low Handicappers:** Can be more aggressive with pin hunting, especially when the pin is accessible. Still respect the small target - even skilled players should think twice about attacking very difficult pin positions. Use your course management skills to identify when to be aggressive versus when to take your par and move on. The beauty of this hole lies in its honest examination of your iron play. There's nowhere to hide, making it a perfect example of strategic golf architecture where success comes from execution rather than navigation.

  4. Watch for

    • Course conditioning and mapped hazards may affect line selection; confirm from the aerial.

The green on No. 3

Mapped boundary
Wide × deepyards
35×29
Areasq ft
5,606

Gear for Hole 3

We may earn a commission when you buy through these links.

Golfer feedback

How did Hole 3 play?

⚡ Quick Golfer Pulse

How did this hole play today?

1-tap anonymous vote

Frequently asked questions

Yardage reference: Pro tees · 191 yards.

What club should I use on this par 3?

↓

At 191 yards, most golfers will need a long iron or hybrid (5-iron to 6-iron) to reach this green. Adjust for elevation, wind, and pin position.

How difficult is hole 3?

↓

This hole is a good scoring opportunity for most golfers.

How big is the green on hole 3?

↓

The green is medium-sized with moderate targets. The green is deeper than wide, so club selection is crucial. Pay attention to pin placement when selecting your approach club.