Hole 2 at Olympia Fields Country Club (North Course)
- Par
- 4
- Yardage
- 446 yds
- Stroke index
- 5
- Hazards
- 7 bunkers
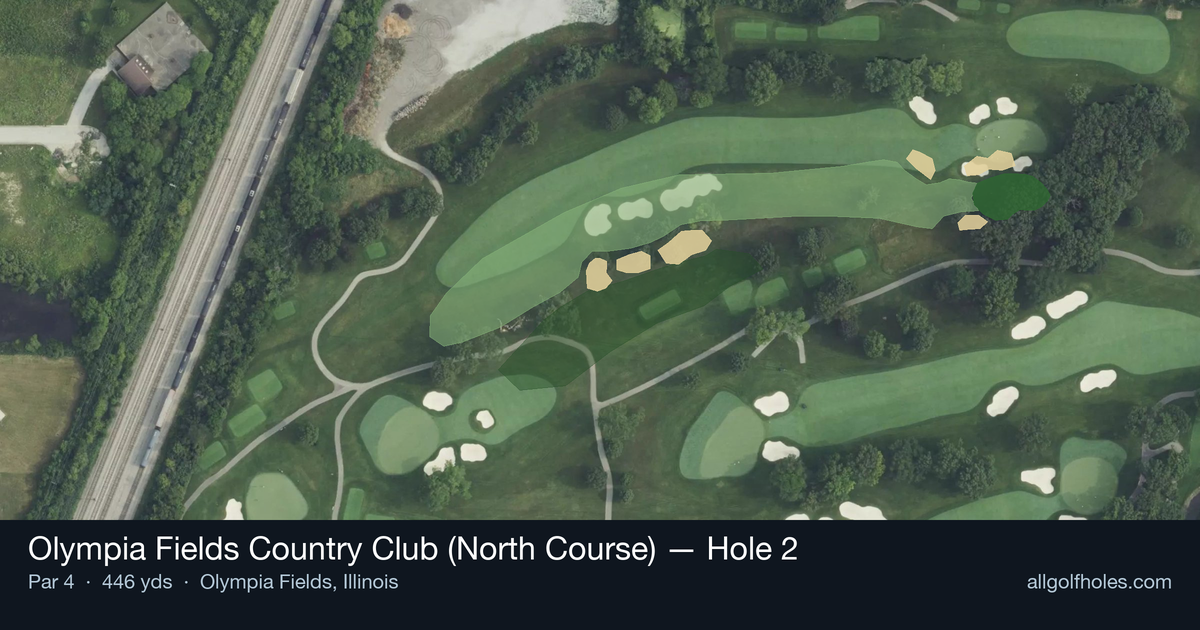
Aerial source not provided
Green size: 39 yds deep × 24 yds wide
Scorecard yardage is for Championship tees. The aerial shows its labeled reference position; distance rings measure to the green.
Championship tees · Par 4 · 446 yards
The plan for No. 2
The second hole at Olympia Fields Country Club (North Course) presents a deceptive challenge that has tested champions since hosting multiple major championships. This 446-yard par 4 demands precision from the opening tee shot, as the straight layout offers no forgiveness for wayward drives. The absence of dramatic hazards might fool players into complacency, but the hole's true defense lies in its demanding length and small green complex that requires surgical approach shots. From the tee, golfers face a generous fairway that encourages aggressive play, yet the real test awaits in the approach. The compact green punishes anything less than precise iron play, making distance control paramount. This strategic par 4 exemplifies Olympia Fields' championship pedigree, rewarding thoughtful course management while penalizing overly aggressive tactics with difficult recovery shots.
Off the tee
The key off the tee is maximizing distance while maintaining fairway position. With the hole's straight design and absence of major hazards, golfers can be aggressive with their driver selection. Aim for the center-left portion of the fairway to create the optimal angle for your approach shot. The generous landing area allows for an attacking mentality, but don't sacrifice accuracy for distance - finding the fairway is crucial for setting up a clean look at the green.
Approach & recovery
The approach shot represents the hole's primary scoring challenge. From the fairway, you'll likely face a mid to long-iron into a small green that demands precision. Focus on club selection that ensures you reach the putting surface, as coming up short leaves a difficult recovery. The compact green size means target selection is critical - aim for the center of the green rather than attacking specific pin positions unless you're hitting the shot particularly well.
On the green
The small green requires careful speed control and precise putting. With limited real estate, approach shots that find the putting surface often leave reasonable birdie opportunities. Focus on lag putting to ensure you don't compound mistakes by three-putting. The green's compact nature means most putts will be relatively straight, but pay attention to subtle breaks that can affect shorter putts. ## RISK VS REWARD This hole offers a classic risk/reward scenario through club selection and target choice. The reward for an aggressive, well-struck tee shot is a shorter iron into the green, increasing birdie chances. However, the risk lies in the approach shot - the small green punishes anything less than precise iron play. Conservative players might consider laying back off the tee to ensure a comfortable approach distance with a more lofted club. ## DIFFERENT SKILL LEVELS **Low Handicappers:** Attack with driver off the tee and look to get as close to optimal approach distance as possible. Be aggressive with approach shots when hitting the ball well, but respect the small green when your iron play is inconsistent. **High Handicappers:** Consider a fairway wood or hybrid off the tee if driver accuracy is inconsistent. Focus on finding the fairway first, then play a conservative approach to the center of the green. Accept par as a good score and avoid the temptation to attack difficult pin positions. The strategic key is recognizing this as a hole where patience and precision trump aggression, making it essential to play within your capabilities while still challenging yourself to execute quality shots.
Watch for
- Course conditioning and mapped hazards may affect line selection; confirm from the aerial.
Hole 2 Green Complex
Mapped green boundary
Green size: 5,666 sq ft
How did Hole 2 play?
How did this hole play today?
Frequently asked questions
Yardage reference: Championship tees · 446 yards.
What's the best strategy off the tee?
↓
For this 446-yard par 4, most players will hit driver to set up a comfortable approach.
How difficult is hole 2?
↓
This hole is a good scoring opportunity for most golfers.
How big is the green on hole 2?
↓
The green is medium-sized with moderate targets. The green is wider than it is deep, rewarding shots that find the correct tier. Pay attention to pin placement when selecting your approach club.
What's a good score on hole 2?
↓
This hole is a demanding hole where bogey is not unusual. This longer par 4 will test most golfers. Focus on position over distance.