Hole 11 at Olympia Fields Country Club (North Course)
- Par
- 4
- Yardage
- 397 yds
- Stroke index
- 10
- Hazards
- 9 bunkers
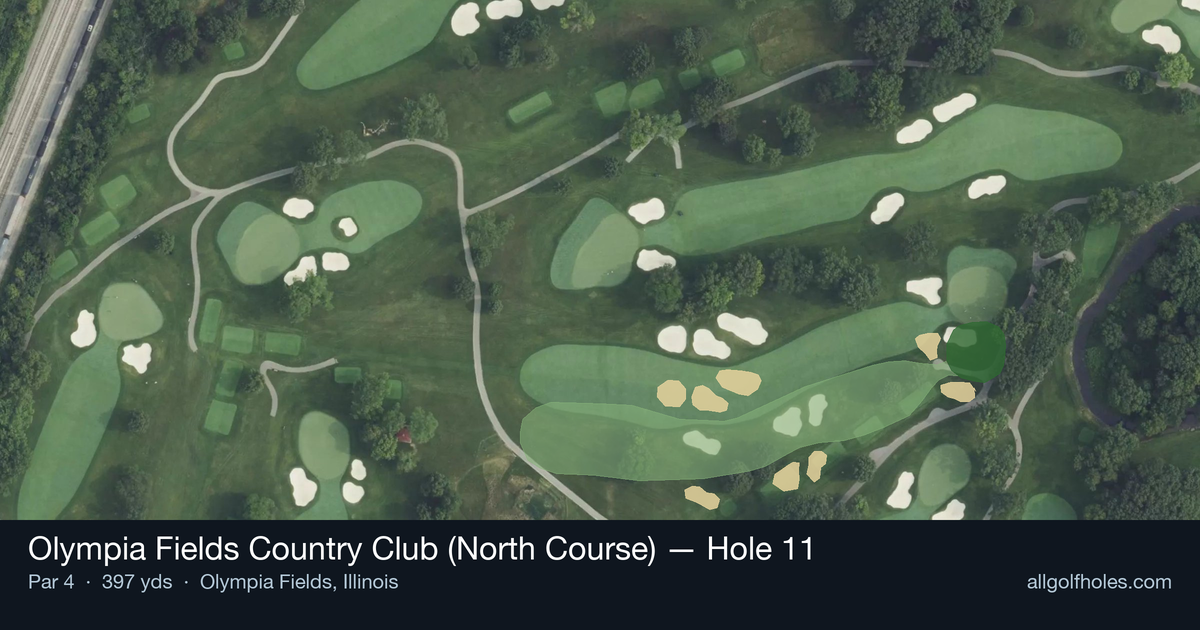
Aerial source not provided
Green size: 30 yds deep × 30 yds wide
Scorecard yardage is for Championship tees. The aerial shows its labeled reference position; distance rings measure to the green.
Championship tees · Par 4 · 397 yards
The plan for No. 11
The 11th hole at Olympia Fields Country Club (North Course) presents a deceptively challenging par 4 that demands precision over power. At 397 yards, this straight-away hole appears straightforward from the tee, but its true test lies in the approach to a small, well-protected green complex. The absence of major hazards might suggest an easier scoring opportunity, yet the compact target requires surgical accuracy with mid-to-short irons. Players must resist the urge to attack aggressively, as the small green punishes wayward approach shots with difficult recovery situations. This hole exemplifies Olympia Fields' reputation for rewarding strategic thinking and precise execution over brute force, making it a memorable test of golf fundamentals.
Off the tee
The key to success starts with an intelligent tee shot that sets up the ideal approach angle. With 397 yards to work with, most golfers should focus on finding the center of the fairway rather than maximizing distance. A well-struck driver or 3-wood to the landing zone around 250 yards out leaves a comfortable short to mid-iron approach. Target the middle of the fairway and avoid the temptation to cut corners or chase extra yardage. The straight layout rewards accuracy, and positioning yourself in the fairway's center provides the best angle to attack the small green. Consider the day's conditions - into the wind, a 3-wood might be the smarter play to ensure you stay in the short grass.
Approach & recovery
The approach shot is where this hole reveals its true challenge. With a small green as your target, club selection becomes critical. Most players will face anywhere from a 7-iron to a pitching wedge, depending on their tee shot distance and pin position. Focus on the center of the green regardless of pin position - the small target makes going flag-hunting a risky proposition. Take one more club than you think you need and make a smooth, controlled swing. The key is finding the putting surface first, then working on getting close to the hole. Miss the green, and you're facing a challenging up-and-down that can quickly turn a birdie opportunity into a bogey.
On the green
Once on the small green, putting strategy becomes paramount. With limited real estate, even seemingly short putts can be tricky due to subtle breaks that are magnified by the compact surface. Take extra time to read the green from multiple angles, as the smaller size means every slope and break is more pronounced. Focus on lag putting to the correct quadrant of the green rather than being overly aggressive with longer putts. The small surface means three-putts can happen quickly if you're not careful with pace control. Conservative putting strategy often yields better results than aggressive line choices. ## RISK VS REWARD This hole offers a classic risk/reward scenario disguised in simplicity. The reward is clear - at 397 yards with no major hazards, birdie opportunities abound for those who execute properly. However, the risk lies in the precision required, particularly on the approach shot to the small green. The biggest risk/reward decision comes with pin position. When the flag is tucked near an edge of the small green, the reward of a close approach must be weighed against the risk of missing the target entirely. Smart players will often aim for the fat part of the green and accept a longer putt rather than risk a difficult chip shot. ## DIFFERENT SKILL LEVELS **High-Handicap Players:** Focus entirely on finding the fairway with your tee shot, even if it means using a 3-wood or hybrid. On the approach, aim for the center of the green regardless of pin position and take an extra club to ensure you clear any front trouble. Your goal should be to two-putt for par consistently. **Low-Handicap Players:** This hole rewards precision and offers legitimate birdie chances. You can be more aggressive with driver off the tee if you're confident in your accuracy. On approach shots, you have the skill to work the ball toward specific pin positions, but still respect the small green size. Consider the day's conditions and pin placement when deciding how aggressive to be with your target selection. The beauty of Hole 11 lies in its straightforward challenge - execute two quality shots and give yourself a reasonable birdie putt. Miss your spots, and the small green will quickly remind you that even simple-looking holes demand respect and precision.
Watch for
- Course conditioning and mapped hazards may affect line selection; confirm from the aerial.
Hole 11 Green Complex
Mapped green boundary
Green size: 5,980 sq ft
How did Hole 11 play?
How did this hole play today?
Frequently asked questions
Yardage reference: Championship tees · 397 yards.
What's the best strategy off the tee?
↓
For this 397-yard par 4, most players will hit driver to set up a comfortable approach.
How difficult is hole 11?
↓
This hole is a good scoring opportunity for most golfers.
How big is the green on hole 11?
↓
The green is medium-sized with moderate targets. Pay attention to pin placement when selecting your approach club.
What's a good score on hole 11?
↓
This hole is a medium-length test where par is a solid result. A straightforward par 4 where course management pays off.