Hole 3 at Tiburon Golf Club (Black)
- Par
- 4
- Yardage
- 378 yds
- Stroke index
- 11
- Hazards
- 2 bunkers · Water
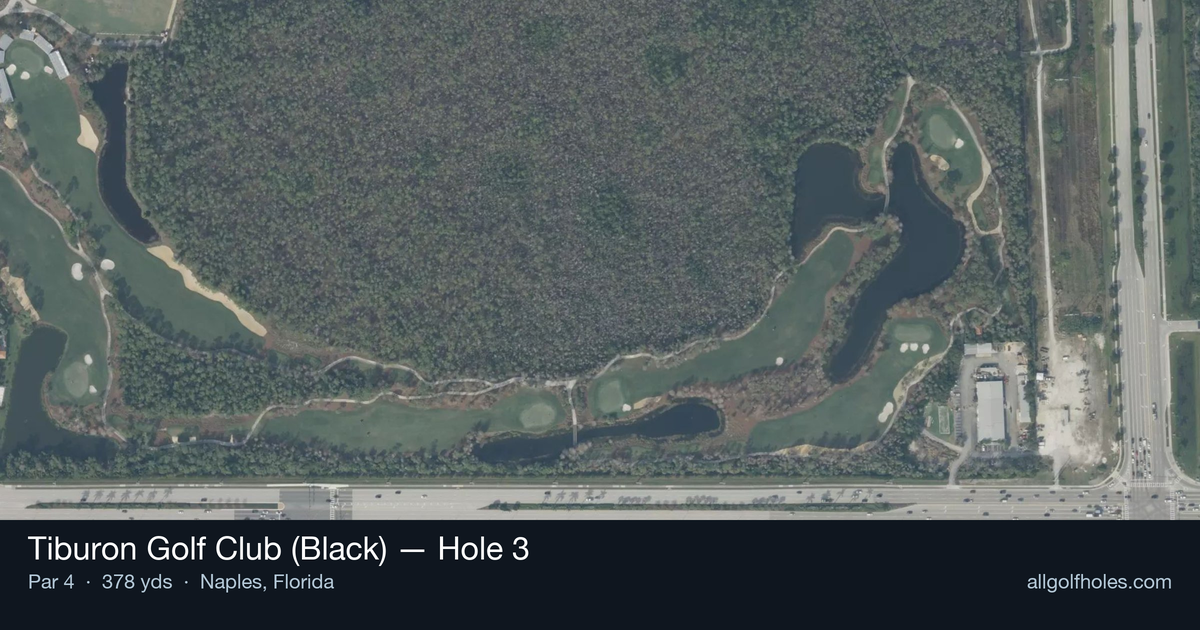
Aerial source not provided
Green size: 34 yds deep × 24 yds wide
Scorecard yardage is for Championship tees. The aerial shows its labeled reference position; distance rings measure to the green.
Championship tees · Par 4 · 378 yards
The plan for No. 3
The third hole at Tiburon Golf Club (Black) showcases Greg Norman's strategic design philosophy in a deceptively straightforward par 4. At 378 yards, this hole appears manageable from the tee, but the Great White Shark's architectural cunning reveals itself through subtle contours and positioning challenges. The straight layout demands precision over power, with the small green serving as the hole's primary defense. Players must navigate a well-positioned tee shot to set up the optimal approach angle to the compact putting surface. Without major hazards to intimidate, success depends entirely on course management and accurate iron play. This hole exemplifies Norman's ability to create strategic interest through green complexes rather than penal features, making it a true test of golf fundamentals that rewards thoughtful execution over aggressive play.
Off the tee
The tee shot strategy centers on positioning for your preferred approach distance rather than maximum distance. Most players should focus on a smooth, controlled swing with their driver or 3-wood, aiming for the center of the fairway. The straight layout allows you to be aggressive with your target line, but don't let the lack of visible trouble lull you into complacency. Club selection depends on your comfort zone for approach shots - if you're most confident with a 9-iron or wedge, lay back accordingly. Longer hitters might consider a 3-wood or hybrid to ensure they don't run through the landing zone, leaving an awkward distance for the approach.
Approach & recovery
The approach shot is where this hole's true character emerges. The small green demands pinpoint accuracy, making club selection and target selection crucial. Aim for the center of the green unless you're completely confident in your distance control. Given the green's compact size, any approach shot should prioritize hitting the putting surface over attacking pins. A mid-iron to short-iron approach (depending on your tee shot positioning) should focus on smooth tempo and solid contact. The straight hole layout means wind direction will play a significant role in club selection.
On the green
With a small green, you're likely looking at manageable putt distances regardless of pin position. However, this also means that any approach shot missing the green creates a challenging up-and-down situation. Focus on reading the overall slope and grain, as subtle breaks become more significant on shorter putts. The key putting strategy is aggressive speed control - with shorter putts available, you can be more aggressive with your line while maintaining excellent pace. Don't leave birdie putts short on a hole where you should be attacking. ## RISK VS REWARD This hole offers a clear risk/reward proposition: the reward of an excellent scoring opportunity against the risk of missing the small green and facing a difficult recovery. The smart play is conservative positioning off the tee followed by aggressive accuracy on the approach. The biggest risk comes from overconfidence - treating this as an "easy" hole can lead to sloppy execution. The reward for proper course management and execution is a legitimate birdie chance and at worst, a comfortable par. ## DIFFERENT SKILL LEVELS **High Handicappers:** Focus on hitting the fairway with whatever club gives you the most confidence, even if it's a hybrid or iron. Your approach should target the center of the green regardless of pin position. Two-putt par is an excellent score here. **Mid Handicappers:** This is your birdie hole. Play aggressive but smart - driver if you're comfortable, but don't force it. Attack the green with your approach, but respect the small target. This is where good course management pays dividends. **Low Handicappers:** You should be making birdie here regularly. The straight layout and manageable distance allow for aggressive play, but the small green demands your best precision. Consider pin position carefully and don't be afraid to take on challenging pin positions when your game is sharp. The Great White Shark's design philosophy shines through on this hole - it rewards the bold and precise while punishing the careless and overconfident.
Watch for
- Course conditioning and mapped hazards may affect line selection; confirm from the aerial.
Hole 3 Green Complex
Mapped green boundary
Green size: 3,185 sq ft
How did Hole 3 play?
How did this hole play today?
Frequently asked questions
Yardage reference: Championship tees · 378 yards.
What's the best strategy off the tee?
↓
For this 378-yard par 4, most players will hit 3-wood or driver to set up a comfortable approach.
How difficult is hole 3?
↓
This hole is a moderate challenge for most golfers. Key challenges include: water in play, small green.
How big is the green on hole 3?
↓
The green is small and requires precision. The green is wider than it is deep, rewarding shots that find the correct tier. Expect challenging pin positions with limited room for error.
What's a good score on hole 3?
↓
This hole is a medium-length test where par is a solid result. A straightforward par 4 where course management pays off.