Hole 5 at Doral Golf Resort and Spa 'The Blue monster'
- Par
- 4
- Yardage
- 394 yds
- Stroke index
- 13
- Hazards
- 11 bunkers · Water
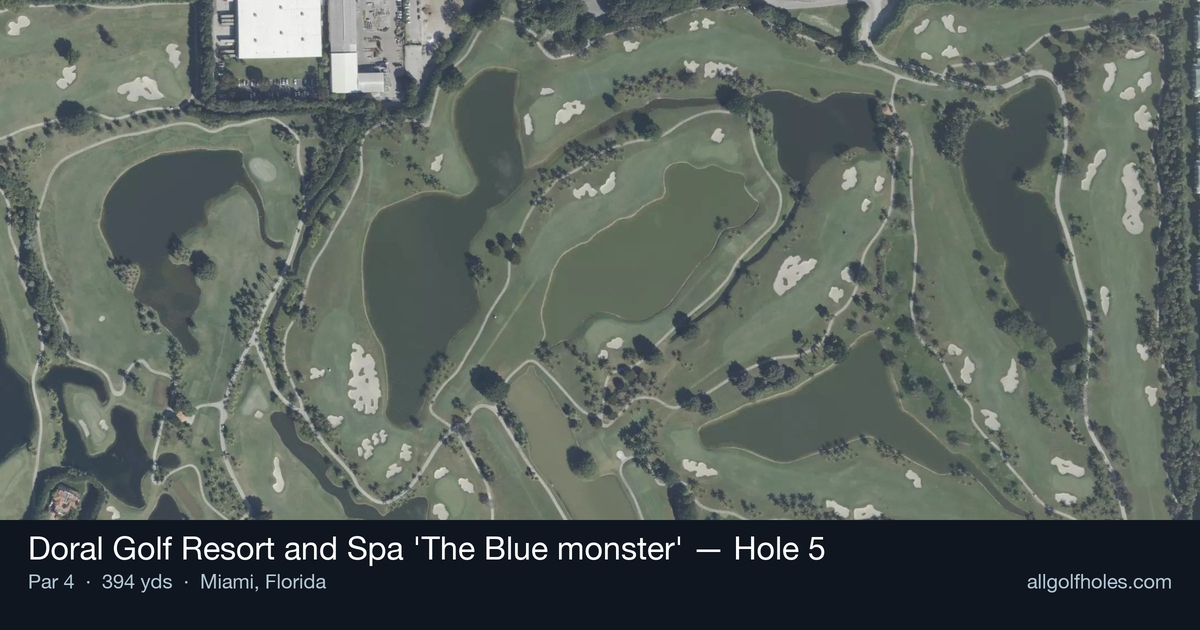
Aerial source not provided
Green size: 29 yds deep × 33 yds wide
Scorecard yardage is for Championship tees. The aerial shows its labeled reference position; distance rings measure to the green.
Championship tees · Par 4 · 394 yards
The plan for No. 5
The fifth hole at Doral Golf Resort and Spa 'The Blue Monster' presents a deceptively straightforward par 4 that demands precision over power. This 394-yard test features a generous fairway that invites aggressive tee shots, but the real challenge lies in the approach to a compact, well-defended green complex. The hole's strategic design rewards course management, as players must balance distance with accuracy to set up the optimal angle into the small green. Miami's prevailing winds often come into play, making club selection crucial on the approach shot. What makes this hole memorable is its ability to punish overconfident golfers while rewarding those who respect the Blue Monster's subtle demands for precision and strategy.
Off the tee
Your tee shot strategy should prioritize finding the optimal angle for your approach rather than maximum distance. Target the center-left portion of the fairway to give yourself the best line into the small green. A smooth driver or 3-wood swing focusing on accuracy will serve you better than an aggressive swing that might find trouble. Pay attention to the prevailing wind conditions typical of South Florida - if there's a helping wind, consider taking less club to maintain control and ensure you stay in the prime landing zone.
Approach & recovery
The approach shot is where this hole reveals its true character. With a small green as your target, precision becomes paramount. Club selection should account for the firm conditions often found at Doral, where shots can release more than expected. Aim for the center of the green regardless of pin position - the small target makes going for pins a high-risk proposition. A mid-iron to short-iron approach should be played with a controlled trajectory, focusing on landing softly and staying below the hole when possible.
On the green
The small green at the 5th demands accurate putting and smart green reading. While specific break patterns vary with pin position, the key is committing to your read and maintaining smooth tempo. Two-putt pars are excellent scores here, so don't be overly aggressive with longer putts. Focus on lag putting to the correct quadrant of the green, as three-putts can quickly derail your round on such a compact surface. ## RISK VS REWARD This hole offers a moderate risk/reward scenario where conservative play typically yields the best results. The scoring opportunity exists for those who execute two solid shots, but the small green penalizes aggressive play that misses the target. The reward of a potential birdie is balanced against the risk of missing the green entirely and facing a difficult up-and-down. Smart golfers will play within their capabilities rather than forcing low scores. ## DIFFERENT SKILL LEVELS **High-Handicap Players:** Focus on finding the fairway with your most reliable club off the tee, even if it's a hybrid or long iron. For the approach, take one extra club and swing smoothly, aiming for the center of the green. Accept bogey as a reasonable score and avoid the temptation to be overly aggressive. **Low-Handicap Players:** Use your distance control and course management skills to attack this hole strategically. Consider wind conditions and green firmness when selecting clubs. You have the skills to go for birdie, but recognize when par is the smart play based on pin position and conditions. This is a hole where your short game skills can really pay dividends if you do miss the green. The 5th hole at Doral's Blue Monster exemplifies why this course has challenged the world's best players for decades - it rewards thoughtful golf strategy while punishing careless execution.
Watch for
- Mapped water influences carry decisions and safe margins off the tee and on approaches.
- Mapped bunkers guard landing areas and greenside recovery lines.
Hole 5 Green Complex
Mapped green boundary
Green size: 3,928 sq ft
How did Hole 5 play?
How did this hole play today?
Frequently asked questions
Yardage reference: Championship tees · 394 yards.
What's the best strategy off the tee?
↓
For this 394-yard par 4, most players will hit driver to set up a comfortable approach.
How difficult is hole 5?
↓
This hole is one of the tougher holes on the course for most golfers. Key challenges include: water in play, heavily bunkered, small green.
How big is the green on hole 5?
↓
The green is small and requires precision. Expect challenging pin positions with limited room for error.
What's a good score on hole 5?
↓
This hole is a medium-length test where par is a solid result. A straightforward par 4 where course management pays off.