Hole 4 at Doral Golf Resort and Spa 'The Blue monster'
- Par
- 3
- Yardage
- 236 yds
- Stroke index
- 3
- Hazards
- 2 bunkers · Water
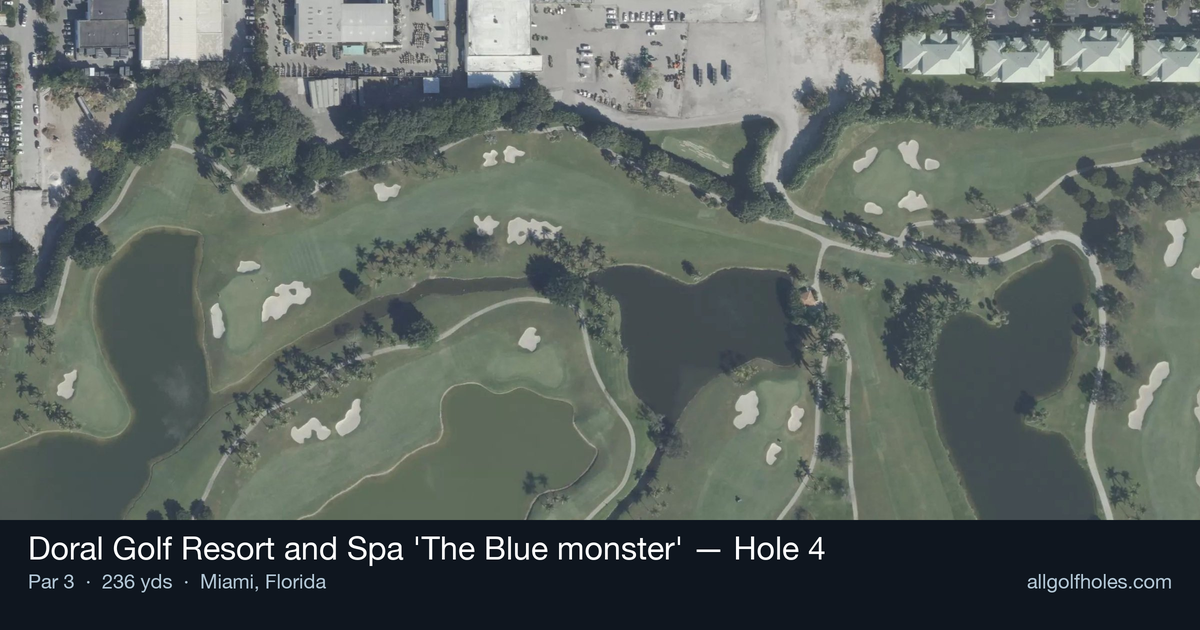
Aerial source not provided
Green size: 36 yds deep × 21 yds wide
Scorecard yardage is for Championship tees. The aerial shows its labeled reference position; distance rings measure to the green.
Championship tees · Par 3 · 236 yards
The plan for No. 4
The fourth hole at Doral Golf Resort and Spa 'The Blue Monster' presents a formidable par 3 challenge that exemplifies the course's legendary reputation. Stretching 236 yards, this demanding one-shotter requires precision and power to reach the small, well-protected green complex. The tee shot must navigate past strategically positioned hazards that guard the approaches, making club selection critical in Miami's often windy conditions. What sets this hole apart is its unforgiving nature - there's little room for error on the approach to the compact putting surface. The Blue Monster's signature difficulty shines through here, demanding golfers commit fully to their line and distance. This hole perfectly captures the championship pedigree that has made Doral a PGA Tour staple for decades.
Off the tee
Your tee shot is everything on this hole - there's no recovery opportunity. Club selection should prioritize finding the green over attacking specific pin positions. In typical South Florida conditions, factor in the wind carefully as it can easily turn a well-struck shot into trouble. Most players will need anywhere from a long iron to a fairway wood, depending on conditions and personal distance. Aim for the center of the green regardless of pin position, as the small target leaves little margin for error. Take one extra club if you're between selections - being short of this green is often more costly than being long.
Approach & recovery
Since this is a par 3, your tee shot serves as your approach. The small green demands accuracy over aggression. Focus on smooth tempo and solid contact rather than trying to muscle the shot. The green's compact size means even well-struck shots can find trouble if you're slightly off-line. Commit fully to your club selection and swing within yourself - this isn't the hole to try to squeeze extra yards from your swing.
On the green
The small green at the 4th creates challenging putting scenarios even when you find the surface. Expect subtle breaks and quick putting surfaces typical of championship-caliber courses. Pin position becomes crucial for two-putt strategy - when the flag is tucked, prioritize the fat part of the green and focus on lag putting. The compact surface means most putts will have some break, so take time to read the green carefully from multiple angles. ## RISK VS REWARD This hole offers limited risk/reward options - it's primarily about execution and smart decision-making. The main strategic choice involves club selection and target selection based on pin position. Aggressive players might attack certain pin positions, but the small green severely punishes misses. The conservative play of aiming center-green regardless of pin position often proves most effective, especially in tournament situations. ## DIFFERENT SKILL LEVELS **Low-Handicap Players:** Focus on precise distance control and commit to aggressive swings with longer clubs. You have the skill to attack certain pin positions, but respect the small target. Work on your pre-shot routine to handle the pressure this hole creates. **High-Handicap Players:** Take the most lofted club that can reach the green and aim for the center regardless of pin position. Don't be tempted to swing harder with a shorter club - smooth tempo with adequate loft gives you the best chance of finding and staying on the green. Consider the hole a success if you're putting for par, and don't compound mistakes by getting overly aggressive after a miss. The 4th hole at the Blue Monster rewards patience, precision, and smart course management while severely punishing overaggression and poor execution.
Watch for
- Mapped water influences carry decisions and safe margins off the tee and on approaches.
- Mapped bunkers guard landing areas and greenside recovery lines.
Hole 4 Green Complex
Mapped green boundary
Green size: 4,101 sq ft
How did Hole 4 play?
How did this hole play today?
Frequently asked questions
Yardage reference: Championship tees · 236 yards.
What club should I use on this par 3?
↓
At 236 yards, most golfers will need a fairway wood or hybrid to reach this green. Adjust for elevation, wind, and pin position.
How difficult is hole 4?
↓
This hole is one of the tougher holes on the course for most golfers. Key challenges include: long par 3, water in play, small green.
What hazards should I watch out for on hole 4?
↓
Key hazards include: 2 greenside bunkers; water at 137.5 yards. Plan your shots to avoid these trouble spots.
How big is the green on hole 4?
↓
The green is small and requires precision. Expect challenging pin positions with limited room for error.
What's a good score on hole 4?
↓
This hole is a challenging par where bogey is acceptable. This longer par 3 will test your long iron or hybrid game. Par is a good score.