Hole 5 at PGA West (TPC Stadium course)
- Par
- 5
- Yardage
- 535 yds
- Stroke index
- 7
- Hazards
- 5 bunkers · Water
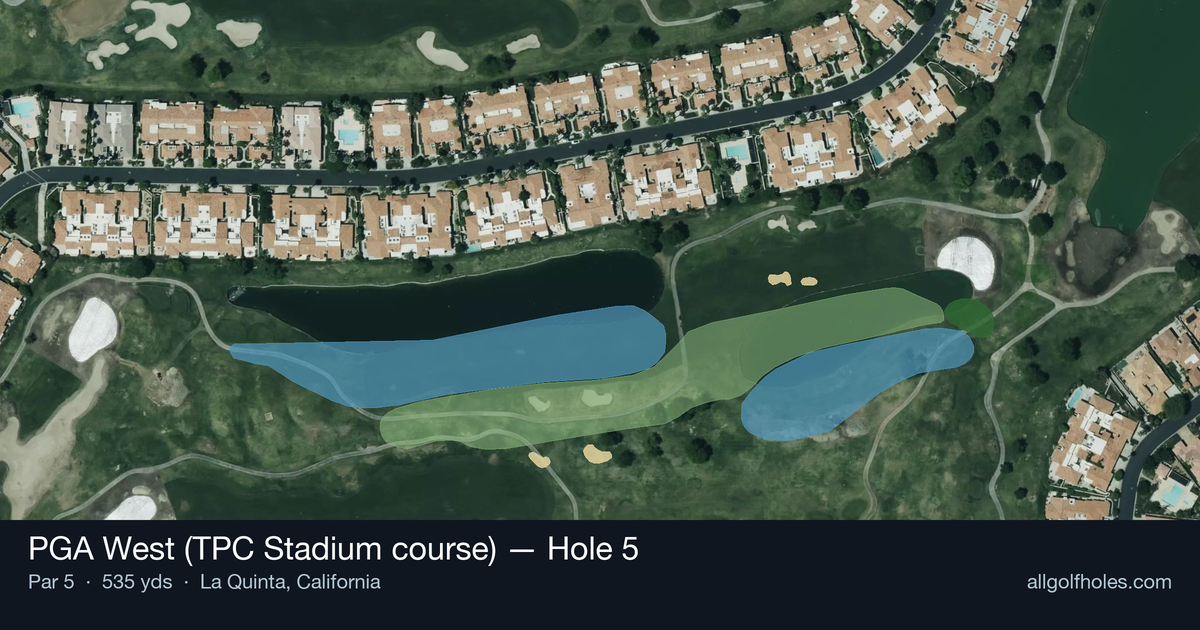
Aerial source not provided
Green size: 31 yds deep × 25 yds wide
Scorecard yardage is for Championship tees. The aerial shows its labeled reference position; distance rings measure to the green.
Championship tees · Par 5 · 535 yards
The plan for No. 5
Aptly named "Double Trouble," the 5th hole at PGA West (TPC Stadium course) exemplifies Pete Dye's diabolical design philosophy with a 535-yard par 5 that demands precision over two separate water carries. This straight-away hole presents golfers with the daunting challenge of navigating lakes on both the tee shot and approach, making club selection and course management paramount. The generous fairway between water hazards provides a safe landing area for those who execute properly, but the small green complex requires pinpoint accuracy on the final approach shot. As part of the PGA TOUR Q-School Finals rotation, this hole has tested countless professional hopefuls, separating those who can handle pressure from those who succumb to Dye's psychological warfare through strategic water placement.
Off the tee
The opening salvo on Double Trouble requires a confident swing over the first lake. Your target line should favor the right side of the fairway, as this provides the best angle for the challenging second shot. Driver is typically the right play here - you need distance to have any chance of reaching in two, and laying back with a 3-wood still leaves you with a daunting carry over water on your approach. Focus on a smooth, controlled swing rather than trying to crush the ball. The water hazard will punish any mishits, so commit fully to your swing and trust your preparation. Desert winds can be a factor, so pay attention to conditions and adjust your aim accordingly.
Approach & recovery
This is where Double Trouble earns its reputation. Your second shot must carry another water hazard, and with the small green as your target, precision becomes paramount. Most players will be hitting a long iron or fairway wood from 180-220 yards out, making club selection critical. Take one more club than you think you need - coming up short means finding the water. The small green demands accuracy, so focus on the center of the putting surface rather than chasing pins. If the pin is tucked behind water or in a difficult position, play to the fat part of the green and rely on your putting to make par or better.
On the green
The compact green at the 5th presents its own challenges after you've successfully navigated the water hazards. Pete Dye greens are known for subtle breaks and firm conditions, so approach putts with confidence but respect the speed. Pay attention to the grain direction common in desert courses, as this can significantly affect ball roll. Lag putting becomes crucial here - after conquering the water hazards, three-putting would be a disappointing way to waste a good score. ## RISK VS REWARD Double Trouble offers a classic risk/reward scenario. Longer hitters who successfully clear both water hazards have a legitimate eagle opportunity, making this one of the few genuine birdie holes on this difficult course. However, the penalty for failure is severe - water hazards on both shots can quickly turn birdie chances into double bogey or worse. The reward justifies the risk for confident ball-strikers, but course management suggests playing conservatively if you're struggling with your swing that day. ## DIFFERENT SKILL LEVELS **Low Handicappers:** Aggressive play is warranted here. Take driver off the tee and go for the green in two if you're in position. Your superior ball-striking ability gives you the best chance to capitalize on this scoring opportunity. Focus on committing to your shots rather than steering the ball. **High Handicappers:** Consider a more conservative approach. While you still need to clear the water on your drive, think about laying up short of the second water hazard with your approach, leaving a comfortable wedge to the small green. Making par on Double Trouble is an excellent score for any golfer. **Mid Handicappers:** Your strategy depends on how you're striking the ball that day. If you're hitting it well, be aggressive on both shots. If you're struggling, prioritize avoiding big numbers by playing more conservatively on the approach shot. The key to conquering Double Trouble is accepting that par is a good score while remaining aggressive enough to take advantage of this genuine birdie opportunity when your game is sharp.
Hole 5 Green Complex
Mapped green boundary
Green size: 4,036 sq ft
How did Hole 5 play?
How did this hole play today?
Frequently asked questions
Yardage reference: Championship tees · 535 yards.
Can this par 5 be reached in two?
↓
At 535 yards, A true three-shot hole for most players. Position your layup to leave a comfortable wedge distance.
How difficult is hole 5?
↓
This hole is a moderate challenge for most golfers. Key challenges include: water in play, small green.
What hazards should I watch out for on hole 5?
↓
Key hazards include: water at 190.9 yards. Plan your shots to avoid these trouble spots.
How big is the green on hole 5?
↓
The green is small and requires precision. Expect challenging pin positions with limited room for error.
What's a good score on hole 5?
↓
This hole is a solid birdie opportunity with smart layup strategy. Most golfers can reach in three. Position your layup to leave a comfortable wedge.