Hole 12 at PGA West (TPC Stadium course)
- Par
- 4
- Yardage
- 363 yds
- Stroke index
- 18
- Hazards
- 4 bunkers
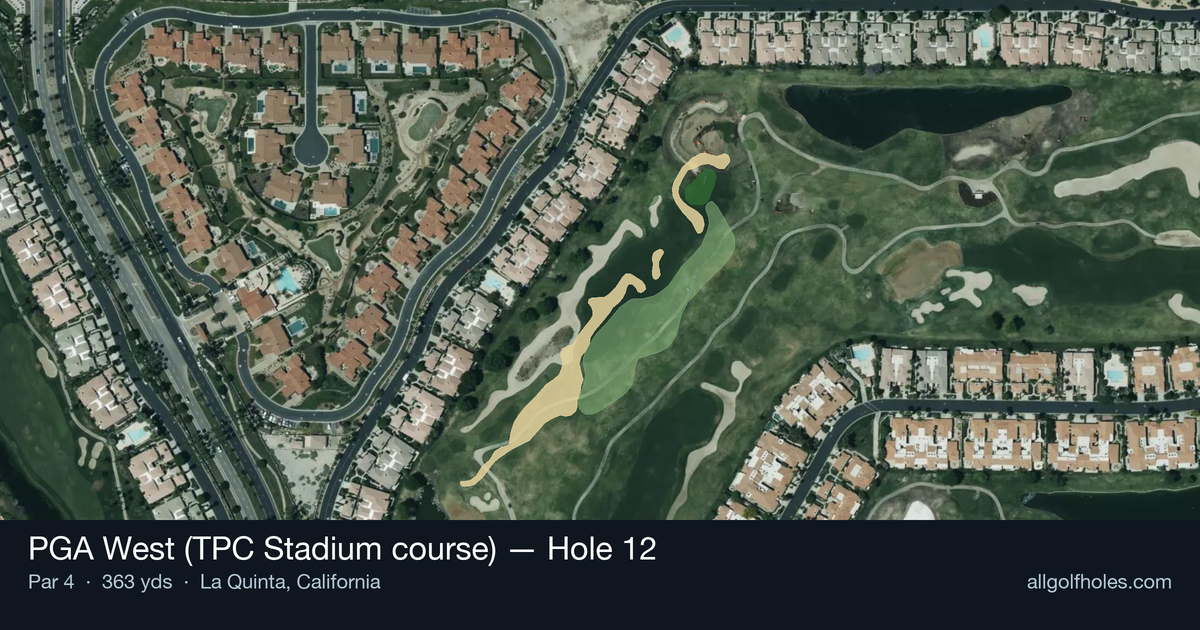
Aerial source not provided
Green size: 33 yds deep × 21 yds wide
Scorecard yardage is for Championship tees. The aerial shows its labeled reference position; distance rings measure to the green.
Championship tees · Par 4 · 363 yards
The plan for No. 12
Known as "The Moat," this deceptively challenging par 4 at PGA West (TPC Stadium course) epitomizes Pete Dye's strategic design philosophy. At 363 yards, this short par 4 lures players into aggressive play, but the approach shot reveals the hole's true defense. The small green sits fortress-like behind a distinctive crescent-shaped bunker complex that wraps around three sides from front right to back right, creating the moat-like appearance that gives the hole its name. While the tee shot offers a generous fairway, the approach demands precision and restraint—going long spells disaster. This seemingly innocent hole often produces higher scores than expected, making it a memorable test of discipline and accuracy in Dye's desert masterpiece.
Off the tee
The tee shot strategy centers on positioning for the optimal approach angle. Most players should consider laying back with a fairway wood or long iron, leaving a comfortable wedge distance into the green. This conservative approach removes the temptation to get too aggressive on the approach shot. The target line should favor the center-left portion of the fairway, providing the best angle to attack the pin while avoiding the bunker complex's most penal areas. For longer hitters, driver can be used but requires exceptional accuracy and course management skills. The key is leaving yourself a distance where you're completely comfortable with your club selection - typically a full wedge or short iron rather than an awkward in-between yardage.
Approach & recovery
The approach shot is where "Moat" earns its reputation. Club selection must account for the small green size and the severe penalty for missing long. Take one less club than the yardage suggests and focus on hitting the front portion of the green. The crescent-shaped bunker system wraps around from front-right to back-right, making these areas particularly treacherous. Pin position dramatically affects strategy. When the flag is tucked behind the bunkers, resist the urge to attack directly. Instead, aim for the fat part of the green and accept a longer putt. The putting surface is small enough that even a 30-foot putt is makeable, while a bunker shot from the "moat" can easily lead to double bogey or worse.
On the green
The small putting surface requires precise speed control, as balls that roll off the back edge face a difficult recovery. Most breaks will be subtle due to the green's size, but pay attention to the overall slope and drainage patterns. When putting from below the hole, be especially cautious with speed - a putt that rolls past the cup could find the back fringe or worse. Pin positions near the bunker complex demand extra respect. Focus on lagging putts close rather than charging the hole, as the penalty for an aggressive miss can be severe on this Pete Dye creation. ## RISK VS REWARD The primary risk/reward decision comes with tee shot positioning. Playing aggressively off the tee for a shorter approach shot increases the pressure on accuracy, while laying back provides more margin for error on the approach. The reward for perfect execution is a realistic birdie opportunity, but the penalty for miscalculation can be a big number. The approach shot offers little risk/reward - the smart play is always to err on the side of caution and avoid the bunker complex at all costs. ## DIFFERENT SKILL LEVELS **High-handicap players** should embrace a conservative strategy: fairway wood or hybrid off the tee, then a comfortable wedge to the center of the green. Accept par as a victory and avoid the temptation to attack tight pin positions. Focus on solid contact and club selection that ensures you won't go long. **Low-handicap players** can be more aggressive with driver off the tee if they're confident in their approach game. However, even skilled players should respect the bunker complex and prioritize finding the putting surface over attacking every pin position. The key is understanding when to be aggressive (front pins with room to work) versus when to play safe (back pins near the bunkers). This hole rewards patience and punishes greed - a perfect example of Pete Dye's strategic architecture that has challenged professionals during Q-School Finals and continues to test golfers of all skill levels.
Hole 12 Green Complex
Mapped green boundary
Green size: 3,679 sq ft
How did Hole 12 play?
How did this hole play today?
Frequently asked questions
Yardage reference: Championship tees · 363 yards.
What's the best strategy off the tee?
↓
For this 363-yard par 4, most players will hit 3-wood or driver to set up a comfortable approach.
How difficult is hole 12?
↓
This hole is a good scoring opportunity for most golfers. Key challenges include: small green.
How big is the green on hole 12?
↓
The green is small and requires precision. Expect challenging pin positions with limited room for error.
What's a good score on hole 12?
↓
This hole is a medium-length test where par is a solid result. A straightforward par 4 where course management pays off.