Hole 15 at PGA West (TPC Stadium course)
- Par
- 4
- Yardage
- 468 yds
- Stroke index
- 4
- Hazards
- 7 bunkers
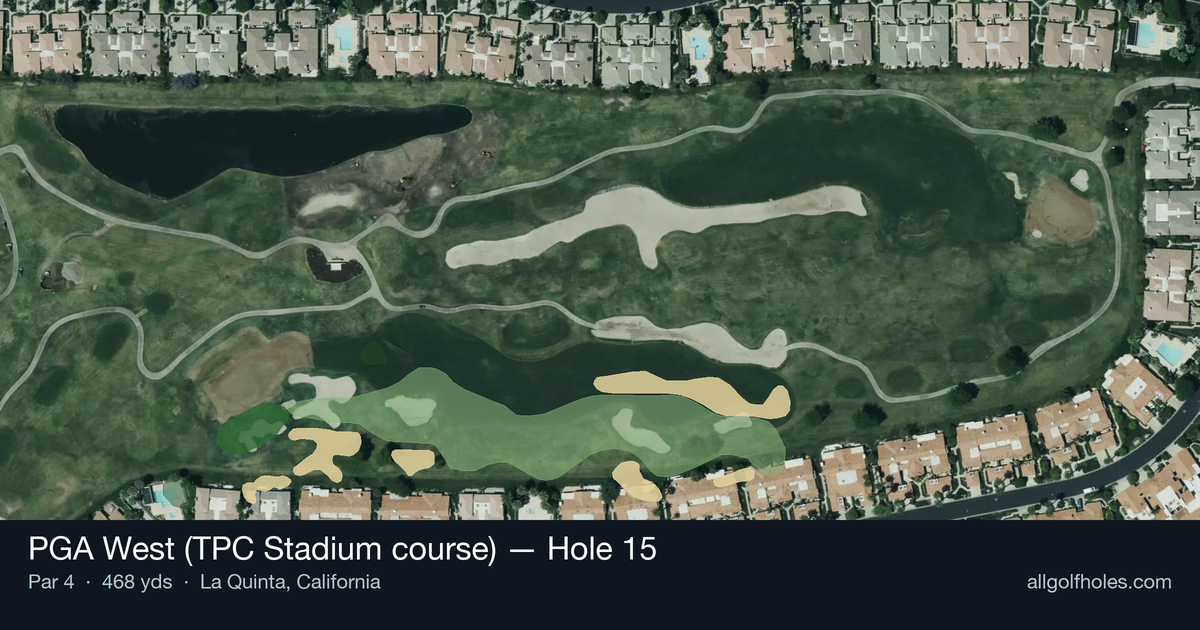
Aerial source not provided
Green size: 41 yds deep × 27 yds wide
Scorecard yardage is for Championship tees. The aerial shows its labeled reference position; distance rings measure to the green.
Championship tees · Par 4 · 468 yards
The plan for No. 15
The 15th hole at PGA West's TPC Stadium course presents a deceptively challenging 468-yard par 4 that embodies Pete Dye's strategic design philosophy. This subtle dogleg right demands precision over power, with a relatively narrow fairway that requires careful tee shot placement to set up the optimal approach angle. The hole's handicap rating of 4 reflects its difficulty, as players must navigate the gentle bend while avoiding the strategic hazards that guard both sides of the landing area. The compact green complex punishes wayward approach shots, demanding accuracy from whatever distance remains. Coming late in the round on this legendary Stadium Course—home to PGA Tour Q-School Finals—the 15th serves as a crucial scoring opportunity that can make or break a round before reaching the infamous closing stretch.
Off the tee
The key to success begins with finding the optimal angle for your approach shot. Aim for the left-center of the fairway to set up the best line into the green, accounting for the dogleg's subtle bend. A well-struck driver or 3-wood should position you perfectly in the landing zone, but accuracy is paramount over distance. The fairway provides reasonable width, but Pete Dye's design philosophy means that missing your target line will complicate your approach significantly. Focus on a smooth, controlled swing rather than trying to overpower the hole.
Approach & recovery
With the green's small size, your approach shot becomes the scoring determinant on this hole. From an ideal fairway position, you'll typically face a mid-iron to long-iron depending on conditions and pin placement. The key is committing fully to your club selection and swinging with confidence. Favor the center of the green regardless of pin position, as the small target leaves little margin for error. Any approach shot that finds the putting surface gives you a legitimate birdie opportunity, while missing the green often leads to difficult up-and-down situations.
On the green
The small green demands respect with your putter selection and read. Focus on getting your first putt close rather than being overly aggressive, as three-putts can quickly turn a scoring opportunity into a bogey. Pay attention to the overall slope and grain, typical of desert courses, and remember that Pete Dye greens often feature subtle breaks that can fool the eye. Lag putting becomes crucial here, especially on longer putts across this compact surface. ## RISK VS REWARD This hole offers a classic risk/reward scenario in club selection and target line. The reward for precise execution is significant - a well-positioned tee shot and accurate approach can set up excellent birdie chances. However, the risk of missing fairways or greens is equally substantial, as recovery shots become increasingly difficult. The smart play focuses on hitting your targets rather than trying to gain extra yardage, making this a true test of course management skills. ## DIFFERENT SKILL LEVELS **Low-Handicap Players:** Attack this hole with controlled aggression. Use your accuracy advantage to aim for specific sections of the fairway and green, taking advantage of favorable pin positions when they present themselves. Your short game skills allow for more aggressive approach shots. **High-Handicap Players:** Play conservatively to the center of both fairway and green. Consider using a 3-wood or hybrid off the tee for improved accuracy, and always aim for the heart of the green regardless of pin placement. Focus on avoiding big numbers rather than chasing birdies, as solid pars here maintain momentum for the challenging closing stretch. The 15th hole exemplifies Pete Dye's design philosophy of rewarding strategic thinking and precise execution. Success here builds confidence for the famous finishing holes while demonstrating that course management often trumps raw power in championship golf.
Hole 15 Green Complex
Mapped green boundary
Green size: 5,382 sq ft
How did Hole 15 play?
How did this hole play today?
Frequently asked questions
Yardage reference: Championship tees · 468 yards.
What's the best strategy off the tee?
↓
For this 468-yard par 4, most players will hit driver to set up a comfortable approach.
How difficult is hole 15?
↓
This hole is a moderate challenge for most golfers. Key challenges include: long par 4.
How big is the green on hole 15?
↓
The green is medium-sized with moderate targets. The green is wider than it is deep, rewarding shots that find the correct tier. Pay attention to pin placement when selecting your approach club.
What's a good score on hole 15?
↓
This hole is one of the tougher holes where par feels like birdie. A challenging par 4. Accept that bogey happens and avoid big numbers.