Hole 12 at PGA WEST (Norman course)
- Par
- 5
- Yardage
- 566 yds
- Stroke index
- 16
- Hazards
- 14 bunkers · Water
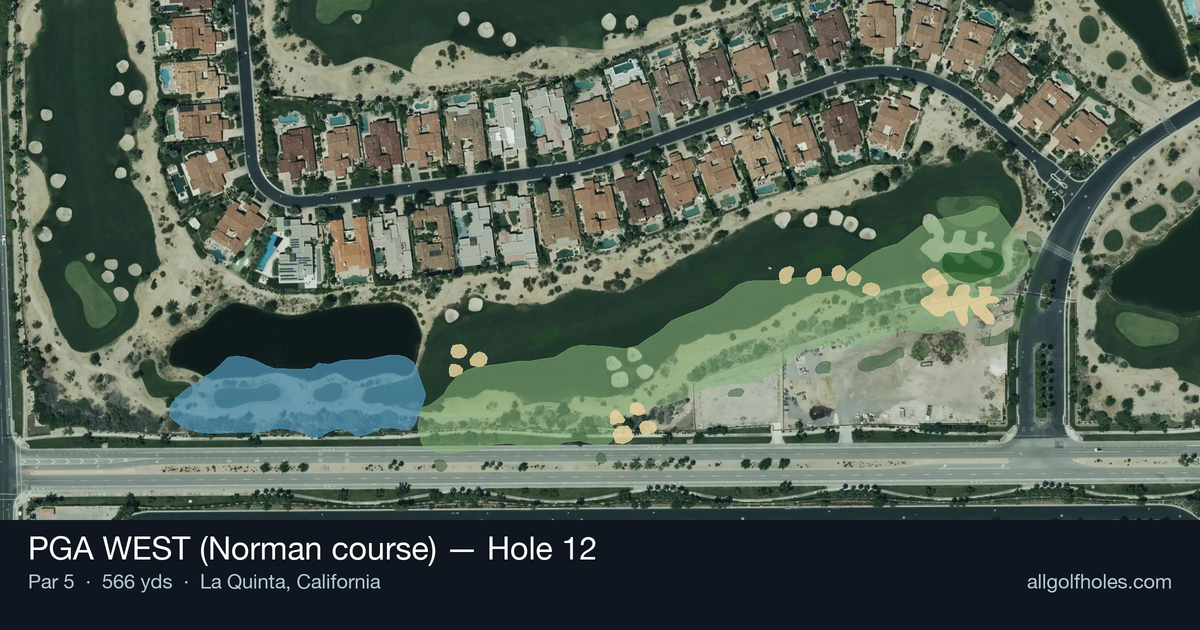
Aerial source not provided
Green size: 42 yds deep × 23 yds wide
Scorecard yardage is for Championship tees. The aerial shows its labeled reference position; distance rings measure to the green.
Championship tees · Par 5 · 566 yards
The plan for No. 12
The 566-yard 12th hole at PGA WEST's Norman course presents a deceptive scoring opportunity that demands precision over power. This straight par 5 stretches across the desert landscape with a generous fairway that invites aggressive play from the tee, but the real challenge emerges as golfers approach the small, well-protected green complex. With minimal hazards flanking the fairway, length becomes the primary consideration, as reaching this green in two requires both distance and accuracy. The compact putting surface punishes wayward approach shots, making course management crucial for birdie opportunities. Smart players will favor position over distance on their second shot, setting up a comfortable wedge to attack the pin. Despite its relatively low handicap ranking, this hole rewards strategic thinking and precise execution around the green.
Off the tee
The tee shot strategy centers on finding the optimal position for your second shot rather than maximum distance. Target the center-left portion of the fairway to set up the most favorable angle for your approach, whether attempting to reach in two or positioning for an ideal layup. Driver is the obvious choice for most players given the lack of forced carries or tight landing areas, but focus on tempo and accuracy over pure distance. The straight layout rewards committed swings down your preferred side of the fairway rather than tentative steering.
Approach & recovery
Your approach strategy depends entirely on your driving distance and comfort level with long irons or fairway woods. Players who can comfortably carry 220+ yards should consider going for the small green in two, aiming for the center and accepting any pin position. For the layup strategy, position your second shot in the 80-100 yard range to optimize your wedge distance into the small target. Avoid getting caught between clubs on either the go-for-it attempt or the layup - commit fully to your chosen strategy and execute with confidence.
On the green
The small green size makes lag putting the priority, as three-putts can quickly turn a birdie opportunity into bogey. Focus on getting your first putt within a comfortable two-putt range rather than being aggressive with longer attempts. Pay attention to the overall slope and grain direction, as subtle breaks can be magnified on smaller putting surfaces. When the pin is tucked, aim for the fat part of the green and take your two-putt par or birdie. ## RISK VS REWARD This hole offers excellent risk/reward balance with multiple ways to attack it successfully. Going for the green in two provides birdie and eagle opportunities but requires precise execution into a small target. The conservative three-shot approach virtually guarantees a birdie look with a short iron or wedge, making it attractive for players seeking to avoid big numbers. The lack of severe hazards means even slightly missed shots typically leave manageable recovery options. ## DIFFERENT SKILL LEVELS **Low Handicap Players:** Aggressive players should consider going for the green in two when conditions favor it, but be prepared to execute under pressure into a small target. Focus on course management and take advantage of this scoring opportunity through smart decision-making rather than heroic shots. **High Handicap Players:** Embrace the three-shot strategy and focus on consistent execution rather than trying to reach in two. Use this hole as a confidence builder by playing within your capabilities - a well-managed par 5 can provide momentum for the remaining holes. Prioritize keeping the ball in play and setting up comfortable distances for each subsequent shot.
Watch for
- Course conditioning and mapped hazards may affect line selection; confirm from the aerial.
Hole 12 Green Complex
Mapped green boundary
Green size: 5,199 sq ft
How did Hole 12 play?
How did this hole play today?
Frequently asked questions
Yardage reference: Championship tees · 566 yards.
Can this par 5 be reached in two?
↓
At 566 yards, A true three-shot hole for most players. Position your layup to leave a comfortable wedge distance.
How difficult is hole 12?
↓
This hole is a moderate challenge for most golfers. Key challenges include: long par 5, water in play.
What hazards should I watch out for on hole 12?
↓
Key hazards include: water at 102.0 yards. Plan your shots to avoid these trouble spots.
How big is the green on hole 12?
↓
The green is medium-sized with moderate targets. The green is wider than it is deep, rewarding shots that find the correct tier. Pay attention to pin placement when selecting your approach club.
What's a good score on hole 12?
↓
This hole is a true three-shot hole where birdie requires execution. This longer par 5 demands patience. Two good shots set up the scoring opportunity.