Hole 6 of 18 · Flourtown, Pennsylvania

Hole 6 at Philadelphia Cricket Club

Par
4
Yards
498
Handicap
1
Bunkers, water
6
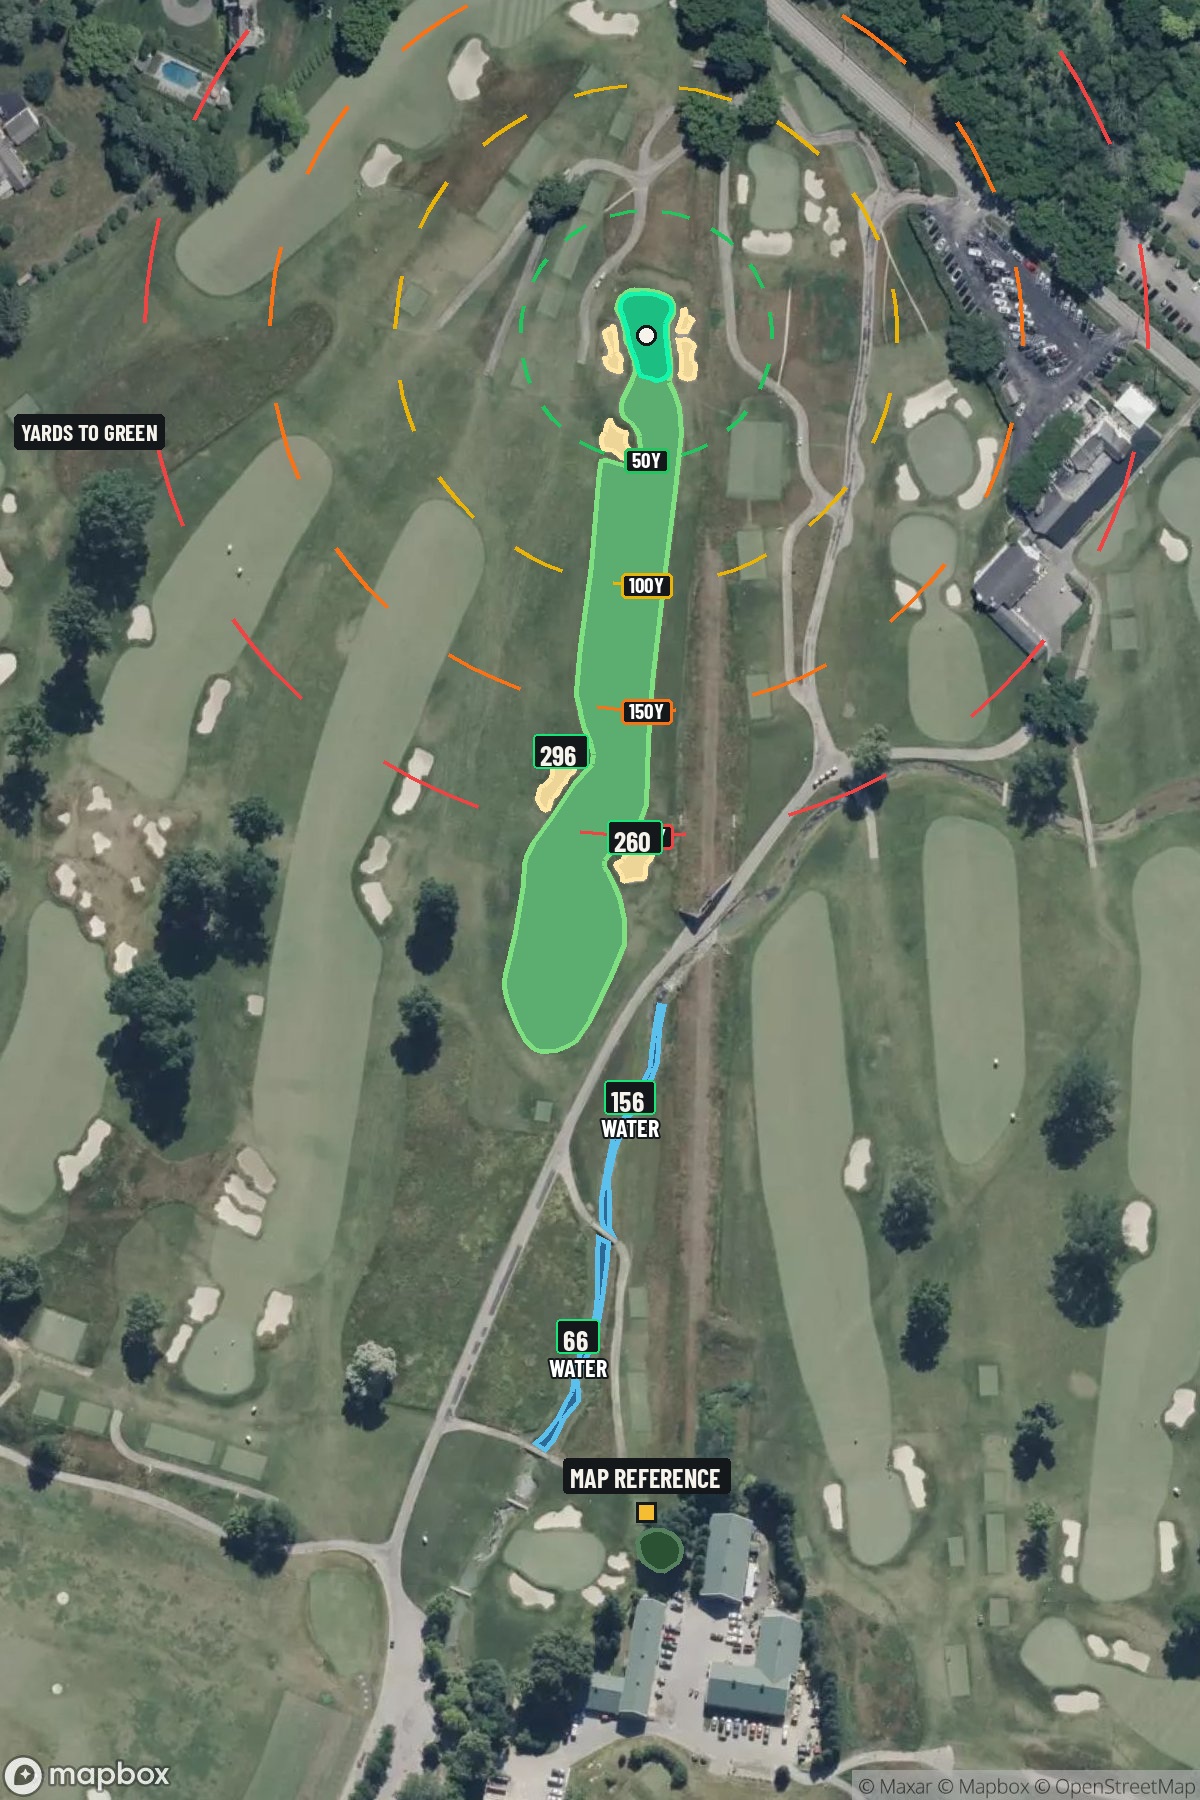
Hole 6 aerial at Philadelphia Cricket Club
Map distances from Map reference tee

The map's printed distances are measured from the Map reference tee to the green; they do not move when you change tees. Your Championship yardage is in the tiles above.

Green size: 36 yds deep × 22 yds wide

Mapbox Satellite composite · capture date not provided. Green at the top.

Where this map comes from

Satellite photo
Date not published
Mapbox satellite
Green contours
2017–2018 survey
USGS lidar survey
Report a map problem
100%
Hole 6 aerial at Philadelphia Cricket Club

The plan for No. 6

These notes were written before the current map. Where their distances differ, trust the map.

The play: The signature **Philadelphia Cricket Club hole 6** stands as the course's most demanding test, earning its stroke-1 handicap rating through sheer length and precision requirements. This imposing **498 yards par 4** presents a straight, no-nonsense challenge that separates skilled players from the field. The generous fairway invites an aggressive tee shot, but the real battle begins with the approach to a deceptively small, well-guarded green complex. Without major hazards to distract, golfers must rely on pure shotmaking and course management. The green's compact size demands pinpoint accuracy on the approach shot, making club selection and execution paramount. This hole epitomizes Philadelphia Cricket Club's championship pedigree, rewarding power and precision while punishing anything less than committed swings.

Shot by shot

  1. Off the tee

    Your primary objective off the tee is finding the fairway while maximizing distance. With no significant hazards mentioned, this hole rewards an aggressive tee shot strategy. Driver is likely the play for most golfers to give yourself the best chance at reaching the green in regulation. Focus on a smooth, controlled swing rather than trying to overpower the ball. The target line should favor the center of the fairway, allowing for natural shot shape. Position yourself in the optimal landing zone, typically around 250-280 yards out, to set up a manageable approach distance.

  2. Approach & recovery

    The approach shot is where this hole shows its teeth. With a small green as your target, precision trumps power. Depending on your tee shot distance, you'll likely face a mid-iron to long-iron approach. Take extra club to ensure you clear any front-edge trouble and give yourself margin for error. The key is committing to your yardage and making a confident swing. Aim for the center of the green regardless of pin position - the small target demands conservative target selection.

  3. On the green

    The small green size means every putt matters significantly. Focus on lag putting to avoid three-putts, which can quickly turn a challenging par into a damaging bogey or worse. Read putts carefully as subtle breaks can be magnified on smaller surfaces. When the pin is tucked near edges, prioritize getting your approach to the fat part of the green rather than attacking tight pins. ## RISK VS REWARD This hole offers limited risk/reward opportunities due to its straightforward design. The primary decision point comes with club selection on the approach - the temptation to attack pins must be weighed against the penalty of missing the small green entirely. The reward for finding the green in regulation is substantial, but the risk of short-siding yourself is equally significant. ## DIFFERENT SKILL LEVELS **High Handicappers:** Focus on course management over heroics. Consider laying up on the approach if you're uncertain about carrying your target distance. A controlled wedge from 100 yards may yield better results than forcing a long iron. Accept bogey as a reasonable score and avoid the big numbers. **Low Handicappers:** This hole demands your A-game. Trust your distances and commit to aggressive lines that give you the best angle to the pin. Your superior ball-striking ability should allow you to attack this green more directly, but respect the small target and have a clear miss strategy. The key to conquering this challenging hole lies in patient, strategic play that prioritizes accuracy over distance while maintaining the aggression necessary to reach the green in regulation.

  4. Watch for

    • Course conditioning and mapped hazards may affect line selection; confirm from the aerial.

The green on No. 6

Mapped boundary
Wide × deepyards
22×36
Areasq ft
4,754

Gear for Hole 6

We may earn a commission when you buy through these links.

Golfer feedback

How did Hole 6 play?

⚡ Quick Golfer Pulse

How did this hole play today?

1-tap anonymous vote

Frequently asked questions

Yardage reference: Championship tees · 498 yards.

What's the best strategy off the tee?

↓

For this 498-yard par 4, most players will hit driver to set up a comfortable approach.

How difficult is hole 6?

↓

This hole is one of the tougher holes on the course for most golfers. Key challenges include: long par 4, water in play, heavily bunkered.

How big is the green on hole 6?

↓

The green is medium-sized with moderate targets. The green is wider than it is deep, rewarding shots that find the correct tier. Pay attention to pin placement when selecting your approach club.

What's a good score on hole 6?

↓

This hole is one of the tougher holes where par feels like birdie. A challenging par 4. Accept that bogey happens and avoid big numbers.