Hole 2 of 18 · Flourtown, Pennsylvania

Hole 2 at Philadelphia Cricket Club

Par
4
Yards
423
Handicap
7
Bunkers, water
2
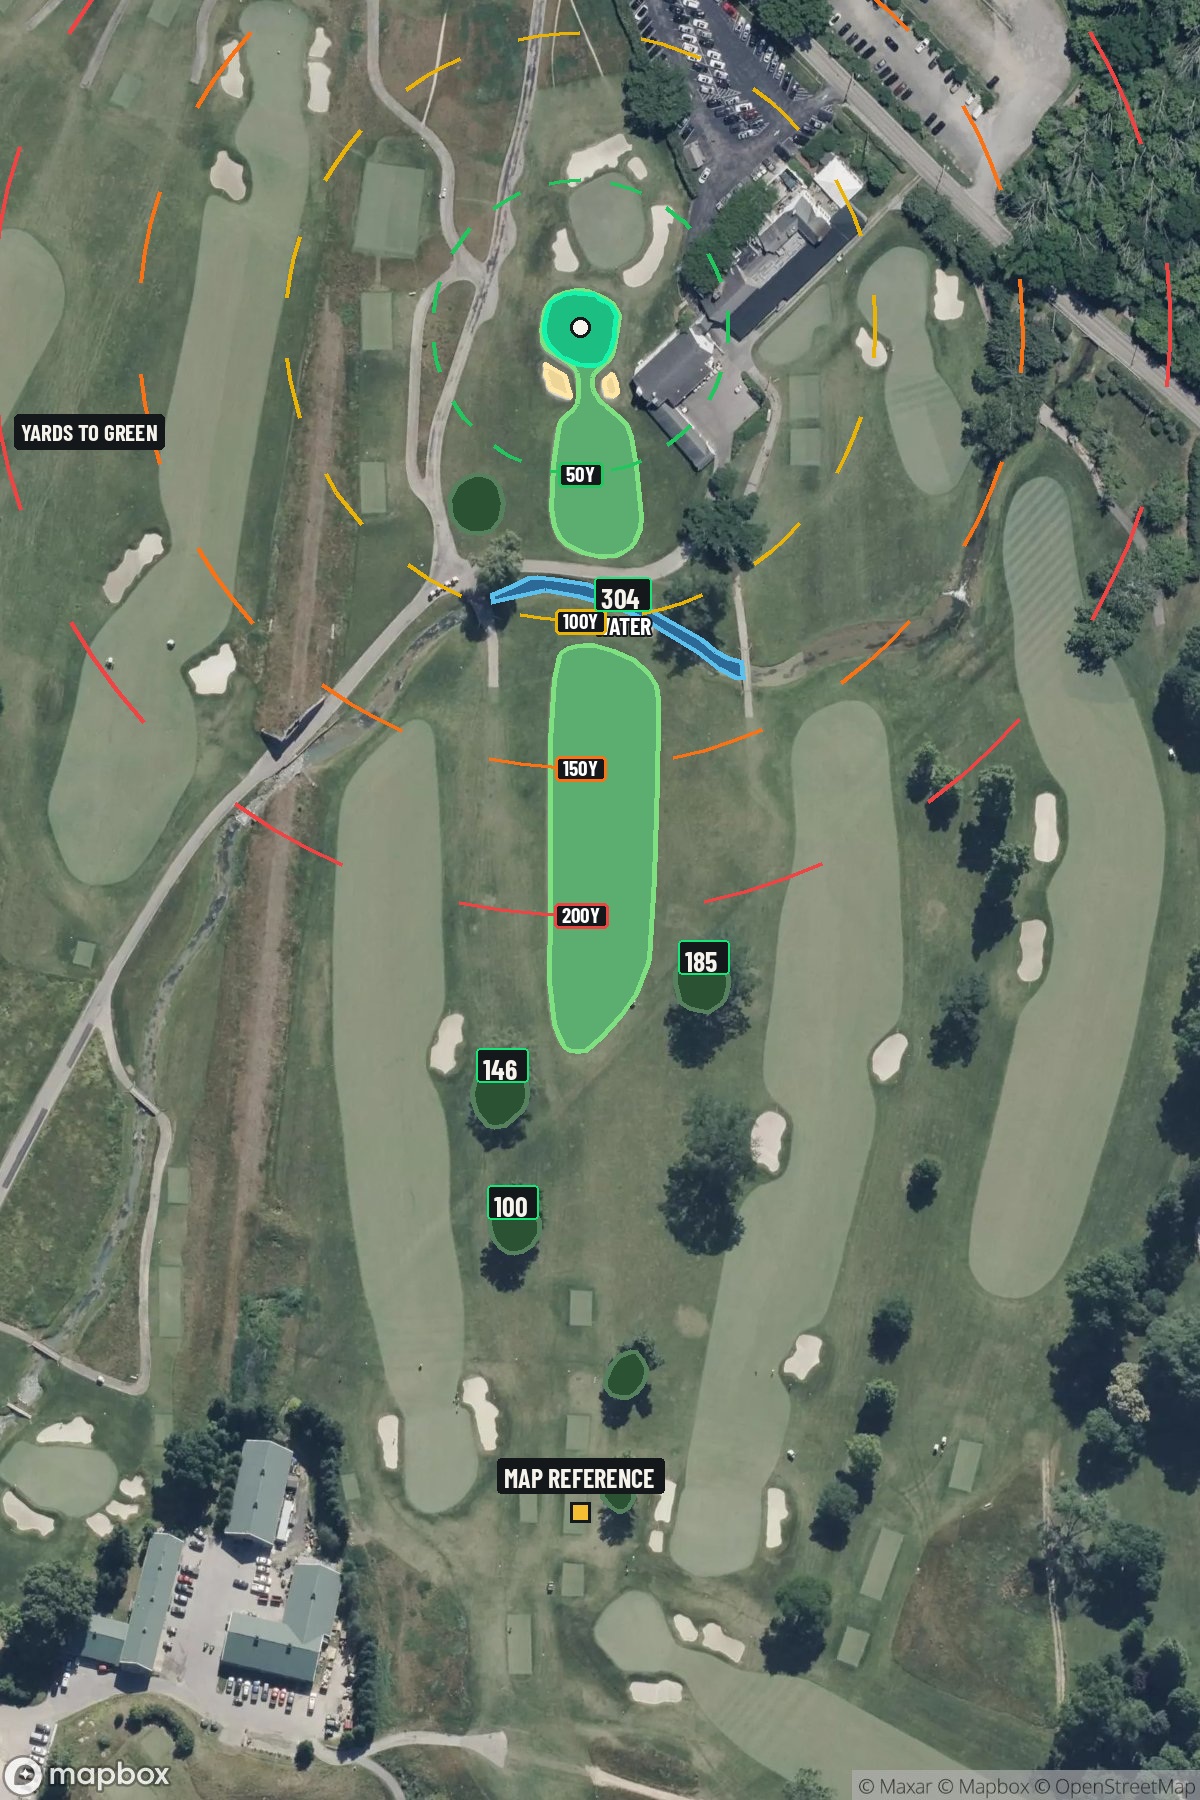
Hole 2 aerial at Philadelphia Cricket Club
Map distances from Map reference tee

The map's printed distances are measured from the Map reference tee to the green; they do not move when you change tees. Your Championship yardage is in the tiles above.

Green size: 26 yds deep × 26 yds wide

Mapbox Satellite composite · capture date not provided. Green at the top.

Where this map comes from

Satellite photo
Date not published
Mapbox satellite
Green contours
2017–2018 survey
USGS lidar survey
Report a map problem
100%
Hole 2 aerial at Philadelphia Cricket Club

The plan for No. 2

These notes were written before the current map. Where their distances differ, trust the map.

The play: The second hole at Philadelphia Cricket Club presents a deceptively challenging par 4 that demands both precision and power from the championship tees at 423 yards. This straight-away layout appears generous off the tee, but the small green complex becomes the focal point of strategy as golfers approach. With no significant hazards to navigate, players might assume this hole offers respite, yet the compact putting surface demands pinpoint accuracy on approach shots. The green's diminutive size punishes wayward iron play, making distance control paramount. What elevates this Philadelphia Cricket Club hole 2 beyond a simple par 4 is how it rewards aggressive play while severely penalizing overconfidence, creating a memorable risk-reward proposition that sets the tone for the round ahead.

Shot by shot

  1. Off the tee

    The key off the tee is finding the fairway center, setting up the optimal angle for your approach. With no significant hazards to navigate, focus on a smooth, controlled swing with your most reliable driver or 3-wood. Target the middle of the landing zone around 250 yards out, avoiding the temptation to bomb it and risk finding rough or an awkward lie. The straight layout means you can aim directly at your target without worrying about doglegs or forced carries.

  2. Approach & recovery

    The approach shot is where this hole shows its teeth. That small green demands pinpoint accuracy, typically requiring a mid-iron to long-iron depending on your tee shot distance and conditions. Aim for the center of the green regardless of pin position – the margin for error is minimal, and short-siding yourself will make getting up and down extremely difficult. Take one extra club if there's any doubt, as being long is often better than coming up short on a small target.

  3. On the green

    The small green means every putt matters significantly. Focus on lag putting to avoid three-putts, which can quickly turn a scoring opportunity into a bogey. Read the breaks carefully, as subtle slopes are magnified on smaller surfaces. When the pin is tucked to edges, don't chase it – putting to the fat part of the green and two-putting for par is often the smart play. ## RISK VS REWARD This hole offers minimal risk/reward opportunities, which is actually its strategic challenge. The temptation might be to attack pins or try to drive it closer for shorter approaches, but the small green punishes aggressive play. The reward for conservative, precise play is consistent pars with occasional birdie chances when everything clicks. ## DIFFERENT SKILL LEVELS **High Handicappers:** Focus entirely on finding the fairway with your most reliable club off the tee, even if it's a hybrid or long iron. For the approach, always aim for the center of the green and take enough club to ensure you reach the target. Don't worry about pin hunting – the green center is your friend. **Low Handicappers:** While you can be more aggressive with driver off the tee, the small green still demands respect. Consider the pin position when selecting your approach club and target, but remember that even scratch players benefit from conservative target selection here. This is a hole where course management and execution matter more than taking chances.

  4. Watch for

    • Course conditioning and mapped hazards may affect line selection; confirm from the aerial.

The green on No. 2

Mapped boundary
Wide × deepyards
26×26
Areasq ft
4,248

Gear for Hole 2

We may earn a commission when you buy through these links.

Golfer feedback

How did Hole 2 play?

⚡ Quick Golfer Pulse

How did this hole play today?

1-tap anonymous vote

Frequently asked questions

Yardage reference: Championship tees · 423 yards.

What's the best strategy off the tee?

↓

For this 423-yard par 4, most players will hit driver to set up a comfortable approach.

How difficult is hole 2?

↓

This hole is one of the tougher holes on the course for most golfers. Key challenges include: water in play, small green.

What hazards should I watch out for on hole 2?

↓

Key hazards include: 2 greenside bunkers; water at 303.5 yards. Plan your shots to avoid these trouble spots.

How big is the green on hole 2?

↓

The green is small and requires precision. Expect challenging pin positions with limited room for error.