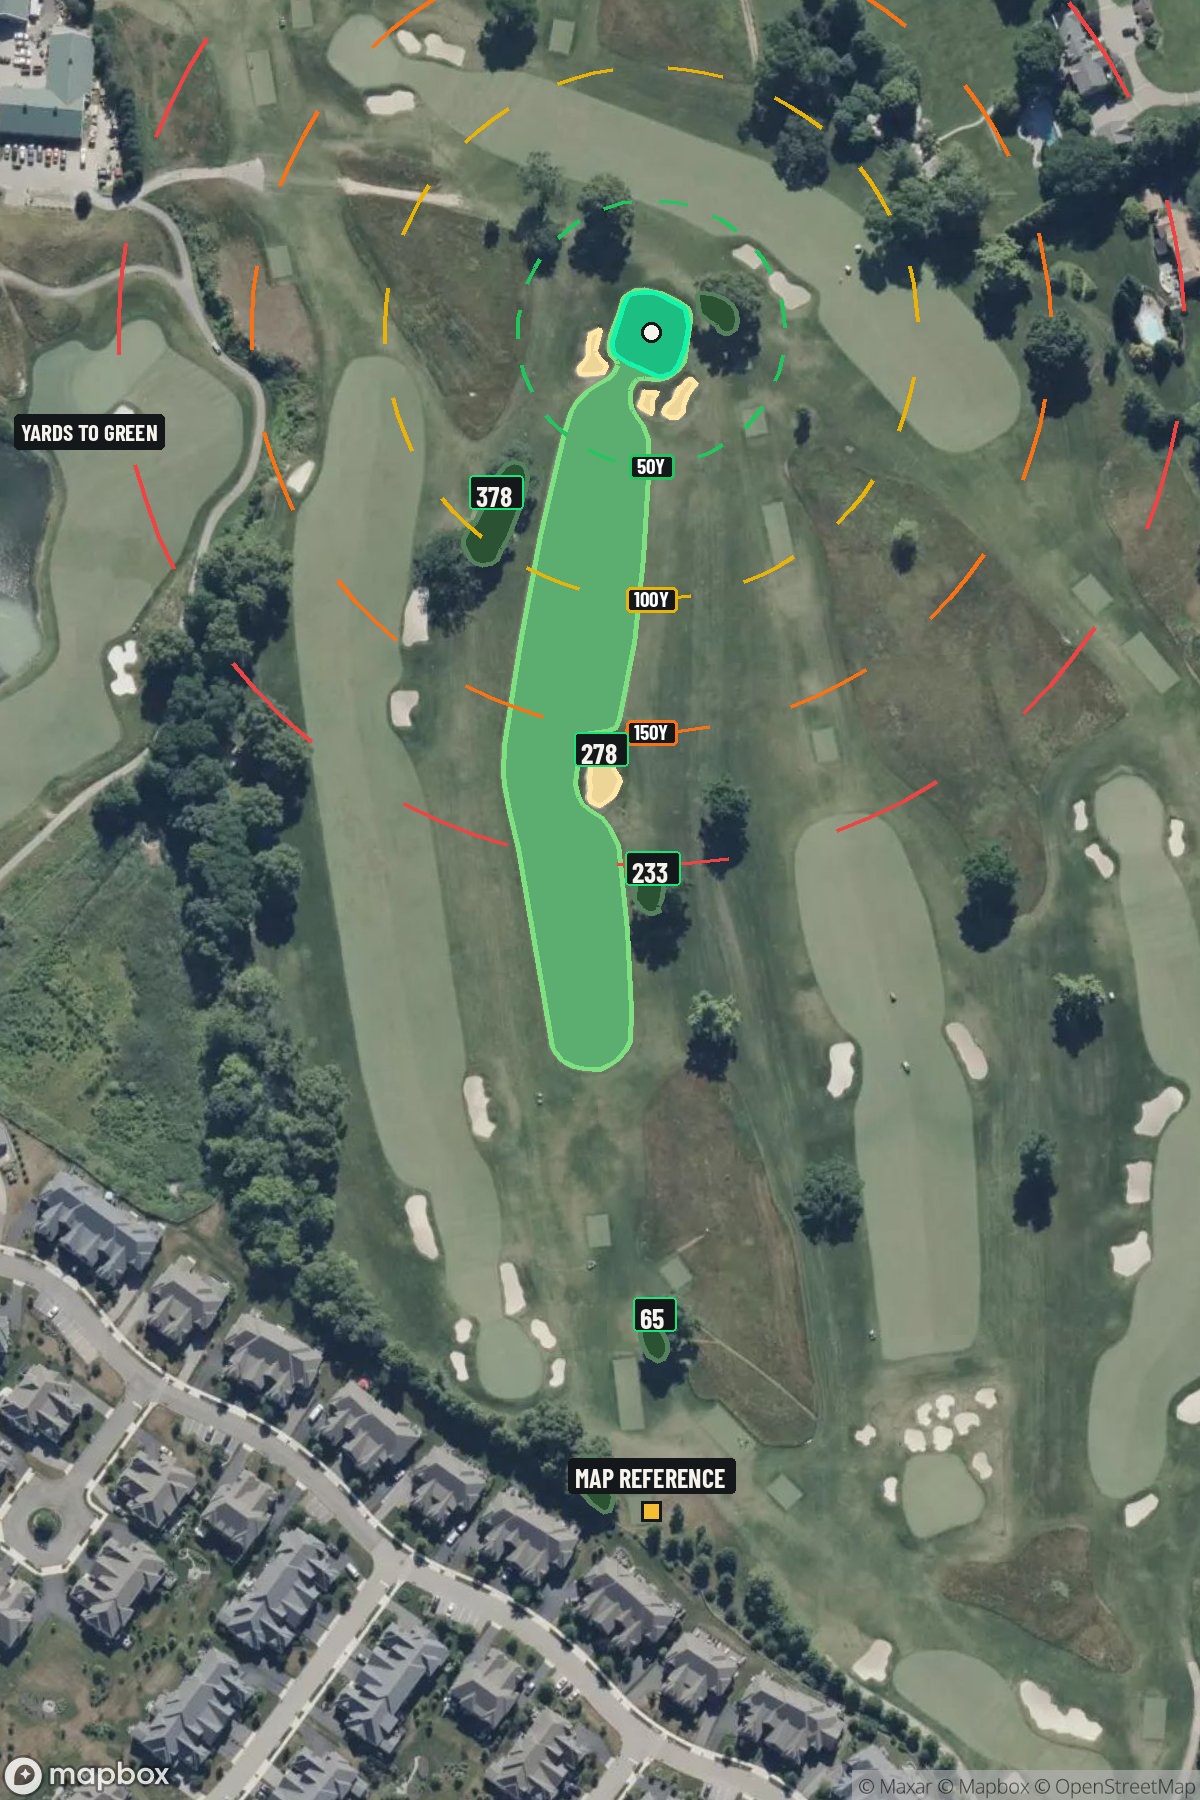
Hole 13 of 18 · Flourtown, Pennsylvania

Hole 13 at Philadelphia Cricket Club

Par
4
Yards
447
Handicap
10
Bunkers
4
Hole 13 aerial at Philadelphia Cricket Club
Map distances from Map reference tee

The map's printed distances are measured from the Map reference tee to the green; they do not move when you change tees. Your Championship yardage is in the tiles above.

Green size: 33 yds deep × 30 yds wide

Mapbox Satellite composite · capture date not provided. Green at the top.

Where this map comes from

Satellite photo
Date not published
Mapbox satellite
Green contours
2017–2018 survey
USGS lidar survey
Report a map problem
100%
Hole 13 aerial at Philadelphia Cricket Club

The plan for No. 13

These notes were written before the current map. Where their distances differ, trust the map.

The play: The 13th hole at Philadelphia Cricket Club presents a deceptively straightforward par 4 that demands precision over power. At 447 yards, this straight-away challenge appears generous from the tee, but the absence of major hazards makes accuracy paramount to scoring well. The tee shot requires finding the optimal position in the fairway to set up the most favorable approach angle to the small, subtly contoured green. What makes this hole particularly intriguing is how the green's compact size transforms what seems like a routine mid-length par 4 into a test of iron play precision. The approach shot becomes the defining moment, where club selection and pin-point accuracy separate good scores from great ones at this storied Flourtown layout.

Shot by shot

  1. Off the tee

    The key to this hole begins with an intelligent tee shot that prioritizes position over pure distance. Given the hole's straight layout, focus on finding the center of the fairway to provide the best angle and lie for your approach. A driver isn't always necessary here – consider a 3-wood or hybrid if it keeps you in the short grass and provides better control. The target line should favor the center of the fairway, avoiding any rough or uneven lies that could complicate the crucial approach shot. Pay attention to pin position when selecting your tee shot strategy, as this will influence your preferred approach angle.

  2. Approach & recovery

    The approach shot to this small green demands precision and smart club selection. With the green's compact size, accuracy trumps aggressive pin-hunting. Aim for the center of the green regardless of pin position, as the margin for error is limited. Club selection should account for the firm conditions typical of smaller greens – consider taking one less club and focusing on a controlled, three-quarter swing rather than a full aggressive shot. If the pin is tucked in a corner, resist the temptation to attack it directly; instead, play to the fat part of the green and rely on your putting to get close.

  3. On the green

    The small green size means every putt matters significantly on this hole. Focus on getting your first putt close rather than being overly aggressive, as three-putts can quickly turn a scoring opportunity into a bogey or worse. Pay careful attention to the green's subtle breaks and grain, as these factors become magnified on smaller surfaces. When the pin is positioned near the edges, lag putting becomes crucial – better to have a 4-footer for par than risk rolling off the putting surface with an aggressive attempt. ## RISK VS REWARD This hole offers a classic risk/reward scenario through club selection and target choice. The reward comes from aggressive play that leaves shorter approach shots, but the risk increases with longer, less accurate clubs off the tee. The small green amplifies both the reward of precise approach shots and the penalty for missing the target. Conservative players can still score well by playing to the center of both the fairway and green, while aggressive players can attack pins when conditions and their confidence level warrant it. ## DIFFERENT SKILL LEVELS **High-Handicap Players:** Focus on keeping the ball in play above all else. Use a fairway wood or hybrid off the tee if it improves your chances of finding the fairway. On the approach, always aim for the center of the green regardless of pin position, and select a club that ensures you reach the putting surface even with a less-than-perfect strike. Two-putt pars are excellent scores here. **Low-Handicap Players:** Can be more aggressive with driver selection and pin-hunting, but should still respect the small green size. Consider working the ball slightly to create better approach angles, and use precise distance control to attack pins when positioned favorably. The ability to consistently hit this small green in regulation makes this hole a legitimate birdie opportunity for skilled players who execute their game plan properly.

  4. Watch for

    • Course conditioning and mapped hazards may affect line selection; confirm from the aerial.

The green on No. 13

Mapped boundary
Wide × deepyards
30×33
Areasq ft
6,025

Gear for Hole 13

We may earn a commission when you buy through these links.

Golfer feedback

How did Hole 13 play?

⚡ Quick Golfer Pulse

How did this hole play today?

1-tap anonymous vote

Frequently asked questions

Yardage reference: Championship tees · 447 yards.

What's the best strategy off the tee?

↓

For this 447-yard par 4, most players will hit driver to set up a comfortable approach.

How difficult is hole 13?

↓

This hole is a moderate challenge for most golfers. Key challenges include: heavily bunkered.

How big is the green on hole 13?

↓

The green is fairly large with multiple pin positions. Lag putting becomes important on longer putts.

What's a good score on hole 13?

↓

This hole is a demanding hole where bogey is not unusual. This longer par 4 will test most golfers. Focus on position over distance.