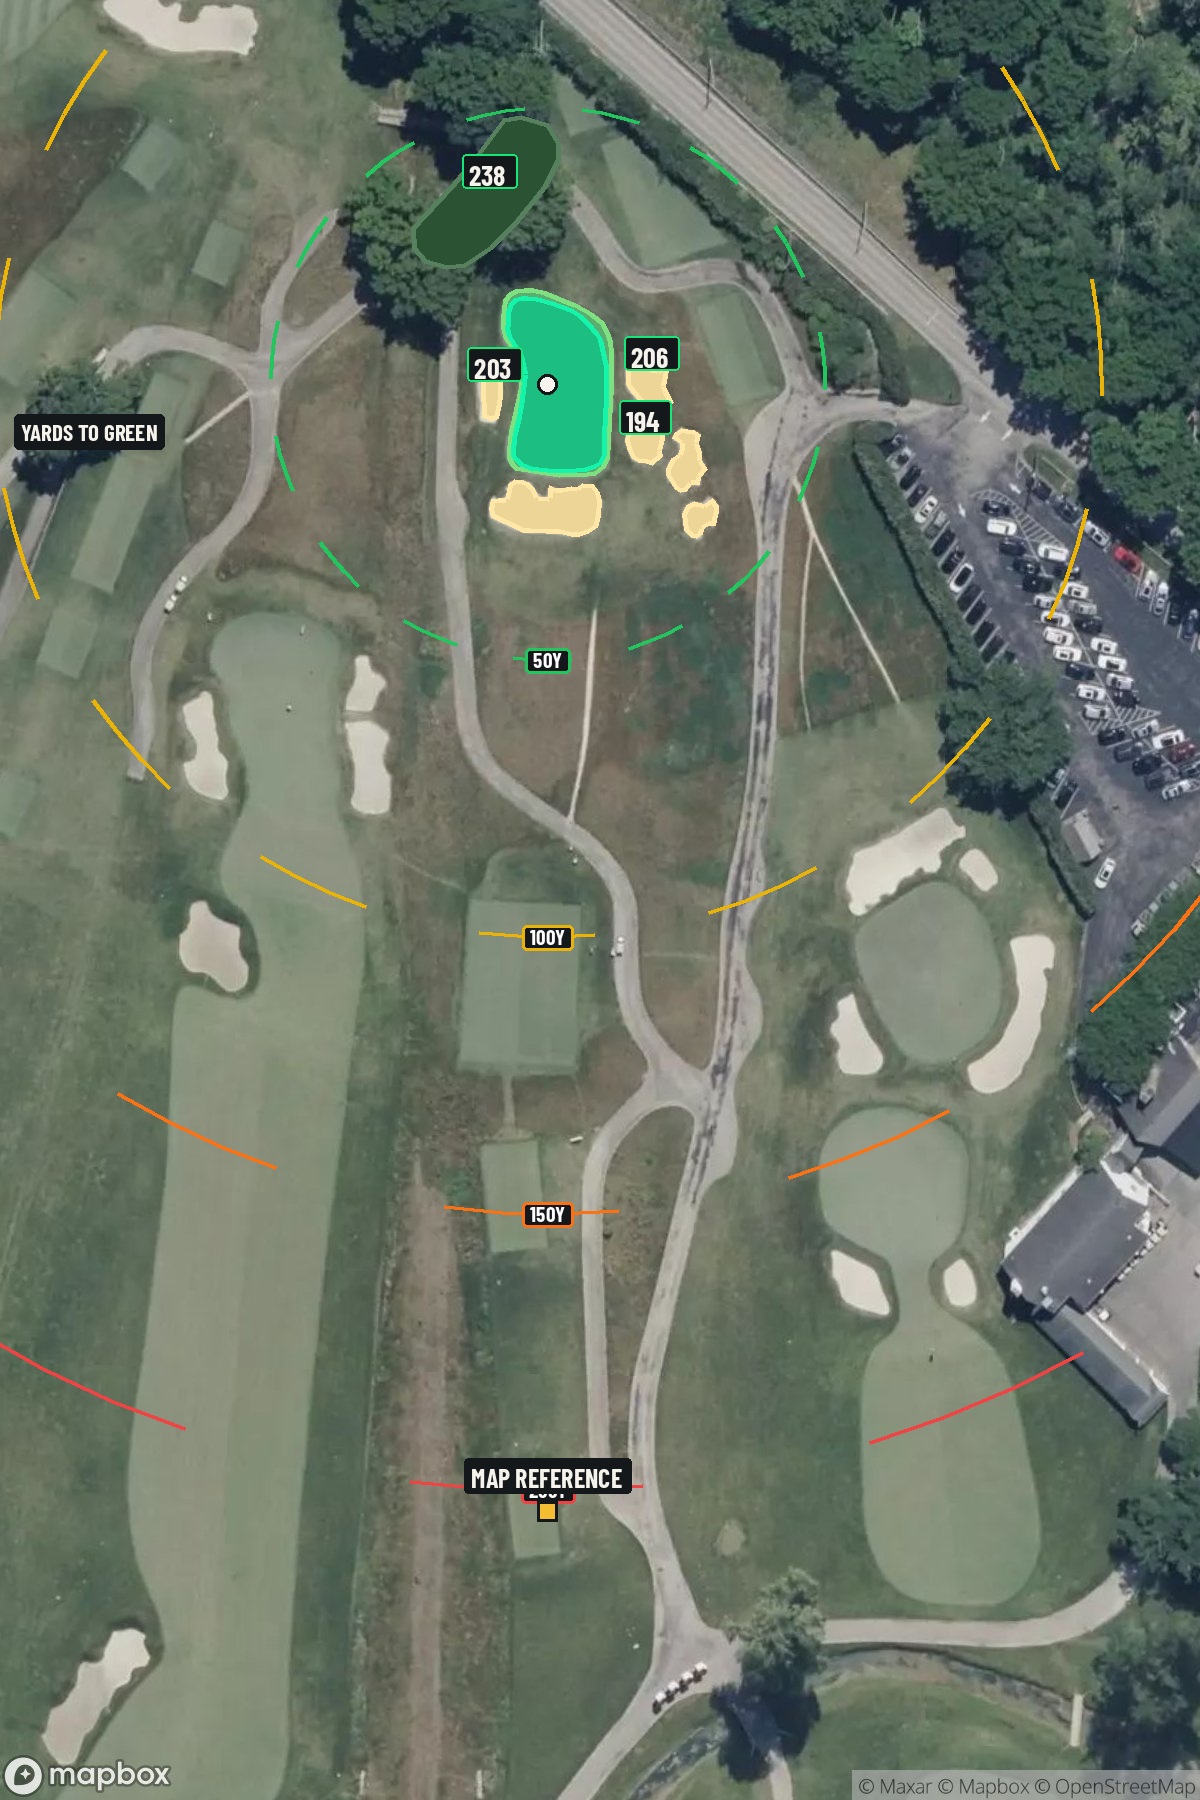
Hole 3 of 18 · Flourtown, Pennsylvania

Hole 3 at Philadelphia Cricket Club

Par
3
Yards
122
Handicap
17
Bunkers
6
Hole 3 aerial at Philadelphia Cricket Club
Map distances from Map reference tee

The map's printed distances are measured from the Map reference tee to the green; they do not move when you change tees. Your Championship yardage is in the tiles above.

Green size: 32 yds deep × 19 yds wide

Mapbox Satellite composite · capture date not provided. Green at the top.

Where this map comes from

Satellite photo
Date not published
Mapbox satellite
Green contours
2017–2018 survey
USGS lidar survey
Report a map problem
100%
Hole 3 aerial at Philadelphia Cricket Club

The plan for No. 3

These notes were written before the current map. Where their distances differ, trust the map.

The play: Philadelphia Cricket Club's third hole presents a deceptively challenging par 3 that demands precision over power. At 122 yards, this short iron test plays to a small, well-guarded green that punishes errant shots with unforgiving collection areas. The absence of major hazards might suggest an easy birdie opportunity, but the compact target and subtle green contours require careful club selection and committed execution. The elevated tee provides excellent visibility of the entire hole, allowing players to fully assess wind conditions and pin position. What makes this hole memorable is its ability to humble golfers who underestimate the challenge—accuracy trumps aggression on this strategic gem that rewards thoughtful course management over brute force.

Shot by shot

  1. Off the tee

    Club selection is critical on this short iron shot. Most players will be looking at anything from a pitching wedge to an 8-iron depending on pin position, wind conditions, and personal carry distances. The target line should focus on the center of the green initially, allowing you to adjust based on pin placement. Avoid the temptation to attack every pin position - with such a small green, the margin for error is minimal. Take one extra club if there's any doubt, as coming up short or flying the green are equally penal.

  2. Approach & recovery

    Since this is a par 3, your tee shot IS your approach shot. Focus on a smooth, controlled swing rather than trying to muscle a shorter club. The small green demands pinpoint accuracy, so commit to your line and trust your distance control. Pay careful attention to pin position - when the flag is tucked near an edge, aim for the fat part of the green and rely on putting rather than trying to get cute with your iron shot.

  3. On the green

    The small green size means you'll likely face relatively short putts, but don't let that breed complacency. Small greens often feature subtle breaks that can be tricky to read. Take time to study the overall slope and grain direction. With limited green space, speed control becomes even more critical - a putt that would normally run 3-4 feet past the hole could easily find trouble on a compact putting surface. ## RISK VS REWARD The primary risk/reward decision centers on pin position aggression. When the pin is in the center of the green, this becomes a legitimate birdie opportunity for players of all skill levels. However, when the flag is tucked near edges or corners, the smart play is aiming for the middle and accepting a potential 15-20 foot birdie putt rather than risking a missed green entirely. ## DIFFERENT SKILL LEVELS **High-Handicap Players:** Focus entirely on finding the green - any part of the green. Choose a club you're confident with and aim for the center regardless of pin position. A two-putt par on this hole is an excellent score that keeps momentum going. **Low-Handicap Players:** You can be more aggressive with pin hunting, but still respect the small target. Consider course conditions, wind, and your current round momentum when deciding how much risk to take. Even skilled players should view this as a par-save hole rather than an automatic birdie, given its handicap ranking. The beauty of this hole lies in its simplicity and the premium it places on course management and execution under pressure.

  4. Watch for

    • Course conditioning and mapped hazards may affect line selection; confirm from the aerial.

The green on No. 3

Mapped boundary
Wide × deepyards
19×32
Areasq ft
3,853

Gear for Hole 3

We may earn a commission when you buy through these links.

Golfer feedback

How did Hole 3 play?

⚡ Quick Golfer Pulse

How did this hole play today?

1-tap anonymous vote

Frequently asked questions

Yardage reference: Championship tees · 122 yards.

What club should I use on this par 3?

↓

At 122 yards, most golfers will need a short iron (9-iron to PW) to reach this green. Adjust for elevation, wind, and pin position.

How difficult is hole 3?

↓

This hole is a moderate challenge for most golfers. Key challenges include: heavily bunkered, small green.

What hazards should I watch out for on hole 3?

↓

Key hazards include: 6 greenside bunkers. Plan your shots to avoid these trouble spots.

How big is the green on hole 3?

↓

The green is small and requires precision. The green is wider than it is deep, rewarding shots that find the correct tier. Expect challenging pin positions with limited room for error.

What's a good score on hole 3?

↓

This hole is a legitimate birdie opportunity for accurate iron players. Most golfers should target par, with birdie chances if you hit the green in regulation.