Hole 15 of 18 · Flourtown, Pennsylvania

Hole 15 at Philadelphia Cricket Club

Par
3
Yards
240
Handicap
6
Bunkers
3
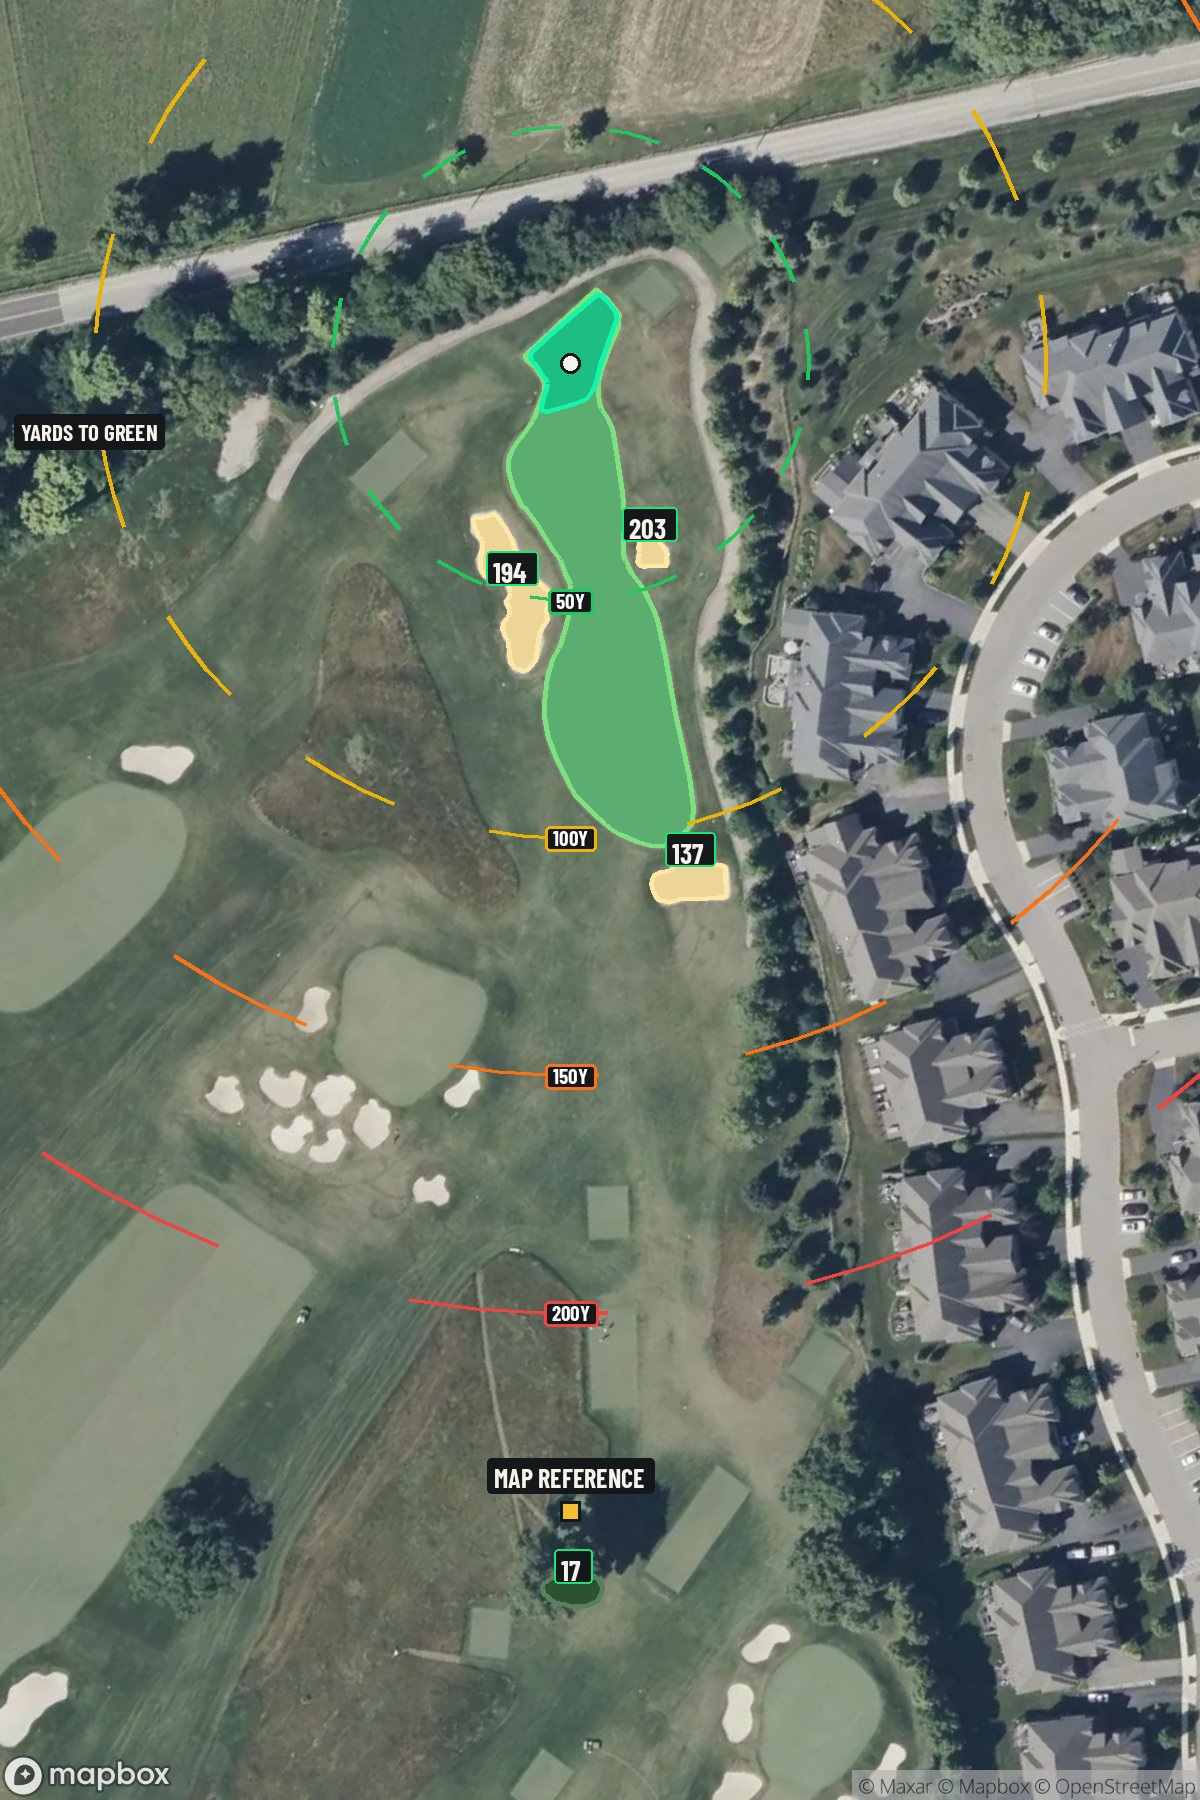
Hole 15 aerial at Philadelphia Cricket Club
Map distances from Map reference tee

The map's printed distances are measured from the Map reference tee to the green; they do not move when you change tees. Your Championship yardage is in the tiles above.

Green size: 26 yds deep × 19 yds wide

Mapbox Satellite composite · capture date not provided. Green at the top.

Where this map comes from

Satellite photo
Date not published
Mapbox satellite
Green contours
2017–2018 survey
USGS lidar survey
Report a map problem
100%
Hole 15 aerial at Philadelphia Cricket Club

The plan for No. 15

These notes were written before the current map. Where their distances differ, trust the map.

The play: The 15th hole at Philadelphia Cricket Club presents a demanding 240-yard par 3 that tests every aspect of a golfer's long iron game. This straight, no-nonsense test requires precision and power, with the tee shot playing to a small, well-protected green that demands respect. The hole's deceptive simplicity belies its true challenge – finding the right club selection and executing under pressure with limited margin for error on the compact putting surface. As the 6th handicap hole, it often becomes a pivotal moment in competitive rounds at this storied Flourtown layout. The clean sight lines offer no excuses, making Philadelphia Cricket Club hole 15 a pure examination of ball-striking ability that separates confident players from the field.

Shot by shot

  1. Off the tee

    Club selection is everything on this hole. Most players will need anywhere from a 4-iron to a hybrid or fairway wood, depending on conditions and individual distance capabilities. The key is choosing a club you can swing confidently and commit to fully - tentative swings rarely find small greens from this distance. Aim for the center of the green regardless of pin position. With a small target, trying to attack specific pin locations often leads to trouble. Focus on solid contact and trust your distance control. Take one extra club if there's any doubt, as coming up short on a long par 3 typically leaves a more difficult recovery than being slightly long.

  2. Approach & recovery

    Since this is a par 3, your tee shot IS your approach shot. The straight layout means you don't have to worry about dogleg positioning, allowing you to focus entirely on distance and accuracy. Check wind conditions carefully - at 240 yards, even a moderate breeze can significantly affect club selection. Consider the pin position in your target selection, but don't get too aggressive. If the pin is tucked to one side, still aim for center-green and let your natural shot shape work toward the flag if conditions allow.

  3. On the green

    Small greens typically feature subtle but important breaks that can be difficult to read from 240 yards away. Take time to study the green as you walk up to assess the overall slope and grain direction. Two-putting should be your primary goal here. Lag putting becomes crucial on what's likely a challenging green complex. Focus on getting your first putt within a comfortable range rather than trying to hole everything. ## RISK VS REWARD The main risk/reward decision centers on club selection and aggression level. Playing conservatively with an extra club reduces the chance of coming up short but increases the risk of flying the green. The reward for finding this green in regulation is significant - pars are valuable on long par 3s, and the occasional birdie opportunity makes the hole memorable. ## DIFFERENT SKILL LEVELS **High Handicappers**: Focus on making solid contact with a club you're confident in, even if it means coming up a bit short. A good chip shot and one putt can still yield par. Don't be afraid to aim for the front edge of the green to ensure you carry any trouble. **Low Handicappers**: This hole rewards precision and confidence. Trust your yardage and commit to your club selection. Consider how pin position affects your miss zones - you may be able to be slightly more aggressive when the pin allows for it. This is a hole where your ball-striking ability can really show, making it a potential scoring opportunity if you execute properly. The 6 handicap rating indicates this hole plays as one of the more challenging on the course, so respect it accordingly and play within your capabilities while staying committed to your strategy.

  4. Watch for

    • Course conditioning and mapped hazards may affect line selection; confirm from the aerial.

The green on No. 15

Mapped boundary
Wide × deepyards
19×26
Areasq ft
2,249

Gear for Hole 15

We may earn a commission when you buy through these links.

Golfer feedback

How did Hole 15 play?

⚡ Quick Golfer Pulse

How did this hole play today?

1-tap anonymous vote

Frequently asked questions

Yardage reference: Championship tees · 240 yards.

What club should I use on this par 3?

↓

At 240 yards, most golfers will need a fairway wood or hybrid to reach this green. Adjust for elevation, wind, and pin position.

How difficult is hole 15?

↓

This hole is a moderate challenge for most golfers. Key challenges include: long par 3, small green.

How big is the green on hole 15?

↓

The green is small and requires precision. The green is wider than it is deep, rewarding shots that find the correct tier. Expect challenging pin positions with limited room for error.

What's a good score on hole 15?

↓

This hole is a challenging par where bogey is acceptable. This longer par 3 will test your long iron or hybrid game. Par is a good score.