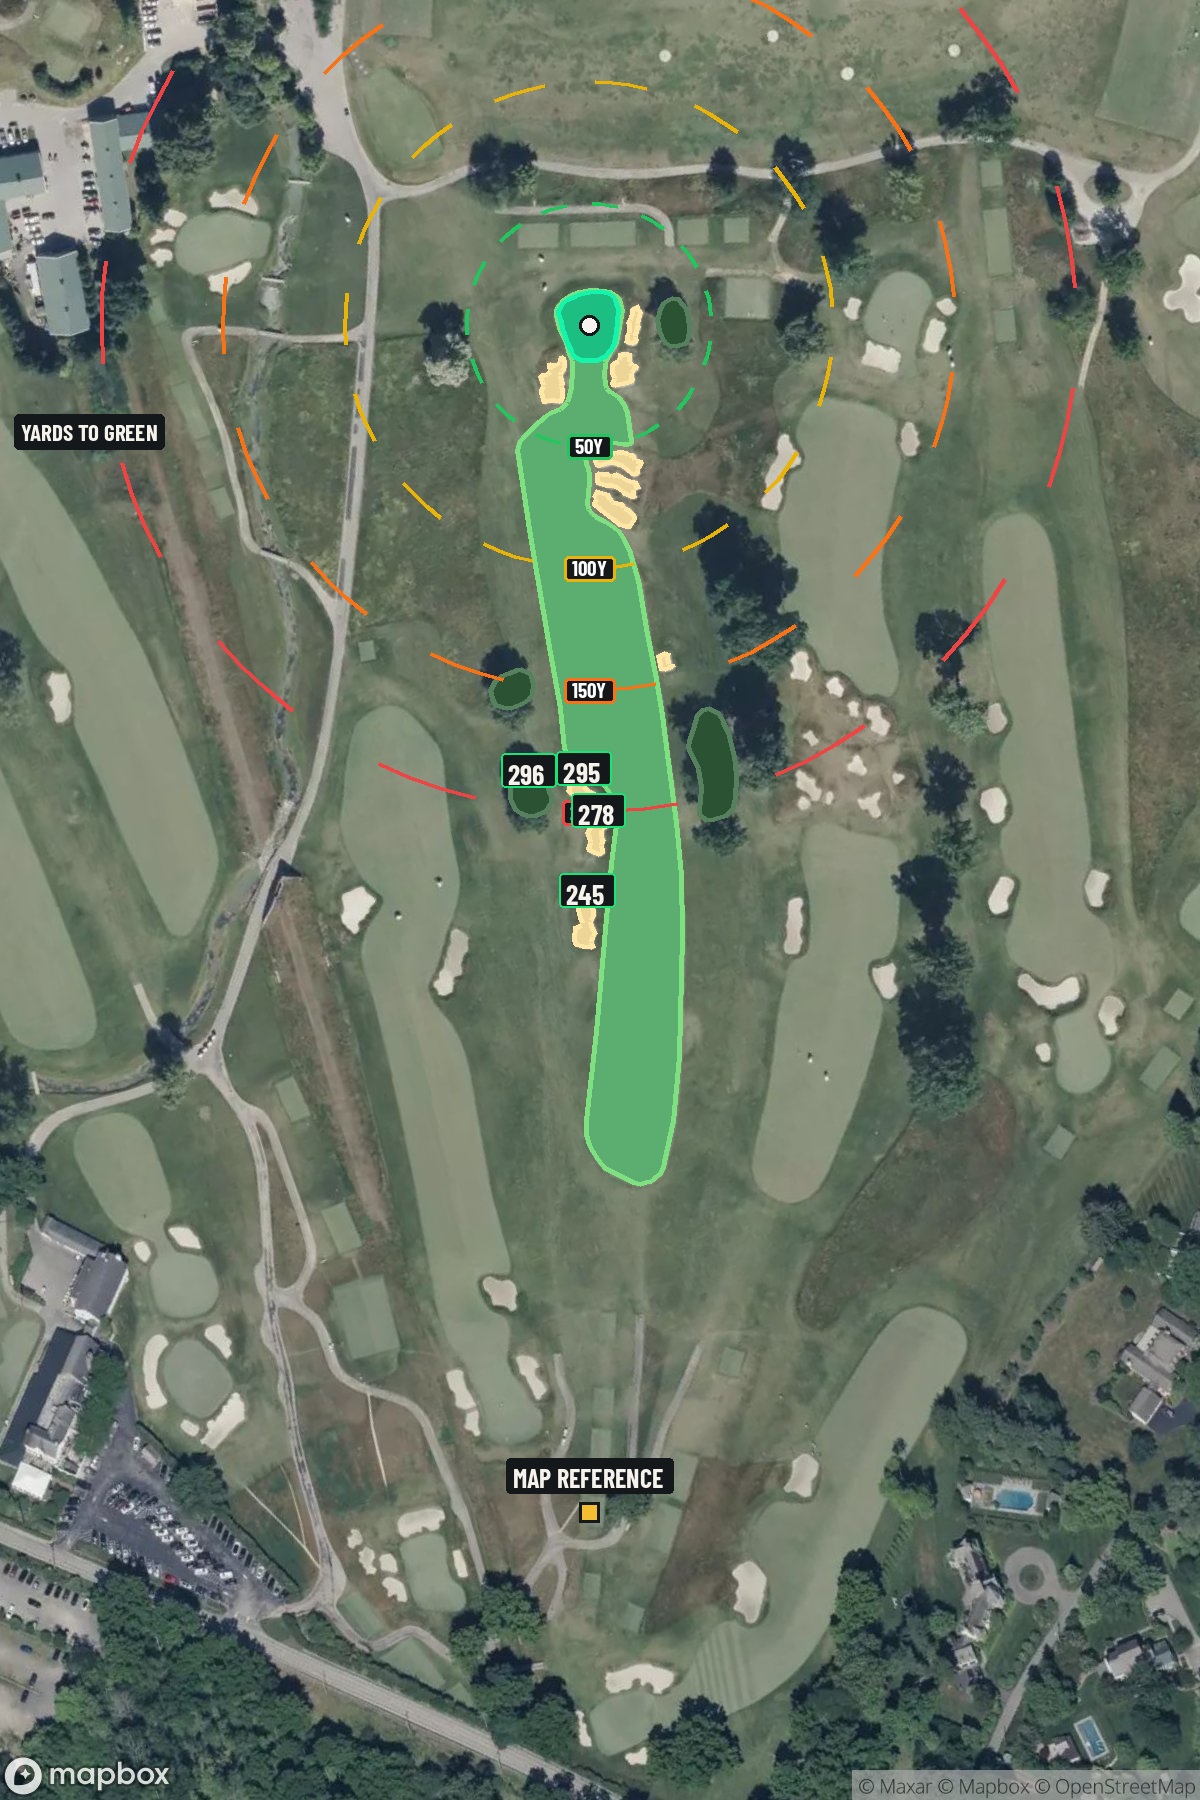
Hole 4 of 18 · Flourtown, Pennsylvania

Hole 4 at Philadelphia Cricket Club

Par
4
Yards
517
Handicap
15
Bunkers
10
Hole 4 aerial at Philadelphia Cricket Club
Map distances from Map reference tee

The map's printed distances are measured from the Map reference tee to the green; they do not move when you change tees. Your Championship yardage is in the tiles above.

Green size: 30 yds deep × 26 yds wide

Mapbox Satellite composite · capture date not provided. Green at the top.

Where this map comes from

Satellite photo
Date not published
Mapbox satellite
Green contours
2017–2018 survey
USGS lidar survey
Report a map problem
100%
Hole 4 aerial at Philadelphia Cricket Club

The plan for No. 4

These notes were written before the current map. Where their distances differ, trust the map.

The play: The fourth hole at Philadelphia Cricket Club presents a deceptive challenge that belies its mid-tier handicap ranking. At 517 yards, this par 4 demands both distance and precision from the championship tees, making it one of the longer two-shot holes on this storied Flourtown layout. The straight design offers no hiding places, requiring golfers to execute two quality strikes to reach the small, well-defended green in regulation. The tee shot must find the optimal position in the fairway to set up a manageable approach to the compact putting surface. With minimal hazards to distract, success depends purely on shot execution and course management. This hole rewards aggressive play from accomplished golfers while punishing wayward shots with difficult recovery positions.

Shot by shot

  1. Off the tee

    The tee shot strategy centers on maximizing distance while maintaining accuracy for your approach. Aim for the center-right portion of the fairway to set up the best angle into the small green. Driver is typically the right choice here given the length, but ensure you have confidence in your accuracy. The straight layout means you can be aggressive with your target line, but remember that even minor misses will leave you with a significantly longer approach to an already challenging target. For optimal positioning, focus on a smooth, controlled swing that prioritizes solid contact over maximum distance. A well-struck drive that finds the fairway center leaves you in prime position for your approach shot.

  2. Approach & recovery

    The approach shot represents the hole's primary scoring challenge. From the typical landing area, you'll face a mid to long-iron into a small green - demanding both distance control and accuracy. The green's compact size means there's little margin for error, making club selection critical. Study the pin position carefully and aim for the center of the green rather than attacking difficult pins. The small target rewards conservative approach play, as even a well-executed shot can easily miss a tucked pin. Focus on smooth tempo and solid contact to ensure proper distance control.

  3. On the green

    The small green size means most putts will be relatively short, but don't underestimate the importance of lag putting from longer distances. With limited green space, pace control becomes even more crucial to avoid three-putts. Read the green carefully from multiple angles, as subtle breaks can be magnified on a compact surface. Position yourself below the hole when possible, as uphill putts offer better distance control on smaller greens. The putting surface likely rewards aggressive putting given the shorter distances involved. ## RISK VS REWARD This hole offers a classic risk/reward scenario in club selection. Longer hitters might consider whether to lay up to a comfortable wedge distance or attempt to reach the green in regulation with a longer iron. The small green tilts the equation toward the conservative play for most golfers - a controlled approach from closer range often yields better scoring opportunities than a forced long iron. The reward for reaching the green in two is significant, but the risk of missing the small target and facing a difficult up-and-down should factor into your decision-making. ## DIFFERENT SKILL LEVELS **Low Handicappers**: Attack this hole aggressively with driver off the tee, then commit to your approach shot with confidence. Your superior ball-striking ability gives you the best chance to find the small green in regulation. Consider the pin position when selecting your approach club and target. **Mid Handicappers**: Play this as a three-shot hole strategically. Hit driver or 3-wood off the tee, then consider laying up to your most comfortable wedge distance rather than forcing a difficult long iron. This approach often leads to better scoring opportunities. **High Handicappers**: Treat this as a par 5 and play for bogey. Focus on keeping the ball in play with your tee shot, advance it as far as you comfortably can with your second shot, then rely on your short game skills around the small green. This conservative strategy often results in better scores than attempting to reach in two. The key for all skill levels is recognizing that the small green makes accuracy more important than distance on your approach shot.

  4. Watch for

    • Course conditioning and mapped hazards may affect line selection; confirm from the aerial.

The green on No. 4

Mapped boundary
Wide × deepyards
26×30
Areasq ft
4,937

Gear for Hole 4

We may earn a commission when you buy through these links.

Golfer feedback

How did Hole 4 play?

⚡ Quick Golfer Pulse

How did this hole play today?

1-tap anonymous vote

Frequently asked questions

Yardage reference: Championship tees · 517 yards.

What's the best strategy off the tee?

↓

For this 517-yard par 4, most players will hit driver to set up a comfortable approach.

How difficult is hole 4?

↓

This hole is a moderate challenge for most golfers. Key challenges include: long par 4, heavily bunkered.

How big is the green on hole 4?

↓

The green is medium-sized with moderate targets. Pay attention to pin placement when selecting your approach club.

What's a good score on hole 4?

↓

This hole is one of the tougher holes where par feels like birdie. A challenging par 4. Accept that bogey happens and avoid big numbers.