Hole 10 at Tobacco Road Golf Club
- Par
- 4
- Yardage
- 441 yds
- Stroke index
- 6
- Hazards
- 2 bunkers
Aerial source not provided
Green size: 33 yds deep × 43 yds wide
Scorecard yardage is for Pro tees. The aerial shows its labeled reference position; distance rings measure to the green.
Pro tees · Par 4 · 441 yards
The plan for No. 10
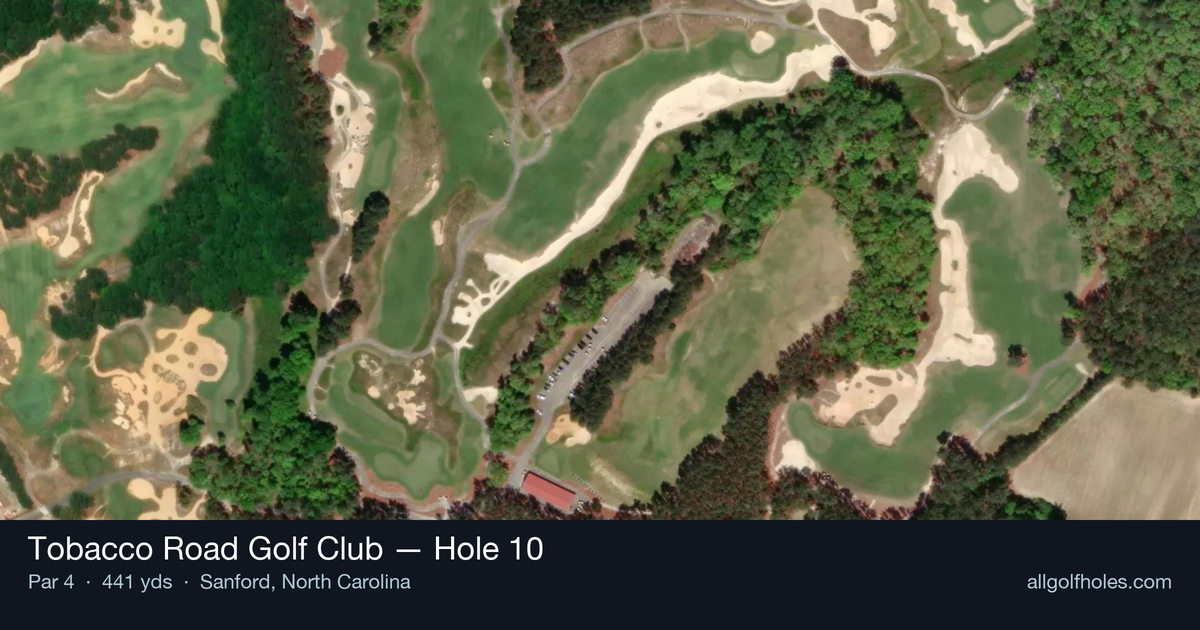
The 10th hole at Tobacco Road Golf Club serves as a perfect introduction to Mike Strantz's wild architectural imagination, presenting a sweeping downhill dogleg right that flows beautifully across the sandy Carolina landscape. This 441-yard par 4 tempts players with its generous downhill slope, making distance control crucial on the tee shot to find the optimal angle for the approach. The real challenge lies in the deceptively complex green complex, featuring a dramatic two-tiered putting surface that can turn routine pars into bogeys in a heartbeat. Players must carefully study the pin position, as finding the wrong tier transforms what appears to be a successful approach shot into a treacherous putting puzzle where three-putts lurk around every slope. The hole exemplifies Tobacco Road's philosophy that reaching the green is merely the beginning of the challenge.
Off the tee
The downhill nature of this dogleg right allows for aggressive play off the tee, as the elevation change will add significant distance to your drive. Target the left-center of the fairway to set up the optimal angle around the dogleg, giving you the best view of the green for your approach. Driver is typically the right play here, as the downhill slope will help you reach the corner of the dogleg and potentially gain 20-30 extra yards of roll. Avoid the temptation to cut too much of the corner early - patience off the tee pays dividends by keeping you in the short grass with a clear approach angle.
Approach & recovery
Your approach shot is where this hole's true character reveals itself. The green stretches nearly 60 yards deep with two distinct tiers, making club selection and target line absolutely critical. Study the pin position carefully before selecting your club - being on the wrong tier can easily lead to a three or four-putt disaster. If the pin is on the upper tier, be aggressive enough to reach it, as putting uphill is far more manageable than trying to navigate a downhill putt across the tier break. When the pin is on the lower tier, exercise extreme caution to avoid flying it onto the back tier, which creates one of golf's most challenging putting scenarios.
On the green
This massive two-tiered putting surface demands respect and conservative strategy. If you find yourself on the wrong tier from the pin, immediately shift into damage control mode - your primary goal should be avoiding a four-putt rather than attempting a heroic shot at birdie. The tier break is severe enough that aggressive putts can easily roll 20-30 feet past the hole. When putting across tiers, focus on speed control above all else, aiming to leave yourself with a manageable second putt rather than trying to hole the first one. ## RISK VS REWARD The primary risk/reward decision comes on the approach shot, where aggressive play toward a challenging pin position can yield birdie opportunities but also threatens disaster. The reward for precise approach play is significant - finding the correct tier sets up legitimate birdie chances on this par 4. However, the penalty for missing your target is severe, as recovery from the wrong tier often results in bogey or worse. Conservative players should always aim for the center of the correct tier rather than attacking tight pin positions. ## DIFFERENT SKILL LEVELS **High Handicappers:** Play conservatively throughout, focusing on two-putt pars rather than birdie attempts. Off the tee, prioritize finding the fairway over maximum distance. On approach shots, always aim for the center of whichever tier contains the pin, giving yourself the largest possible margin for error. Accept that some pins are simply not worth attacking. **Low Handicappers:** Use the downhill slope to your advantage with aggressive driving, but maintain precision on approach shots. You have the skill to attack most pin positions, but still respect the tier break - even scratch golfers struggle with cross-tier putts here. This hole offers a legitimate birdie opportunity for players who can execute precise iron shots and read the green's subtle breaks within each tier. The 10th hole at Tobacco Road exemplifies the course's philosophy that reaching the green is just the beginning of the challenge - smart course management and respect for the putting surface's demands separate good scores from disappointing ones.
Watch for
- Course conditioning and mapped hazards may affect line selection; confirm from the aerial.
Hole 10 Green Complex
Mapped green boundary
Green size: 6,176 sq ft
Course coverage
Tournament and creator videos about Tobacco Road Golf Club — shared course coverage, not hole-specific clips.
Featured by these creators
Creator videos about this course
YouTube creators who filmed or featured Tobacco Road Golf Club. · Stats as of Oct 12, 2026 · 5d ago
A first look at all 12 holes of Tobacco Road’s brand new Par 3 course, The Matchbox. @Chevrolet #Ad
D.J. Pie gets rich at Tobacco Road
How did Hole 10 play?
How did this hole play today?
Frequently asked questions
Yardage reference: Pro tees · 441 yards.
What's the best strategy off the tee?
↓
For this 441-yard par 4, most players will hit driver to set up a comfortable approach.
How difficult is hole 10?
↓
This hole is a good scoring opportunity for most golfers.
How big is the green on hole 10?
↓
The green is fairly large with multiple pin positions. The green is wider than it is deep, rewarding shots that find the correct tier. Lag putting becomes important on longer putts.
What's a good score on hole 10?
↓
This hole is a demanding hole where bogey is not unusual. This longer par 4 will test most golfers. Focus on position over distance.