Hole 10 at Southern Highlands Golf Club
- Par
- 4
- Yardage
- 455 yds
- Stroke index
- 1
- Hazards
- 3 bunkers
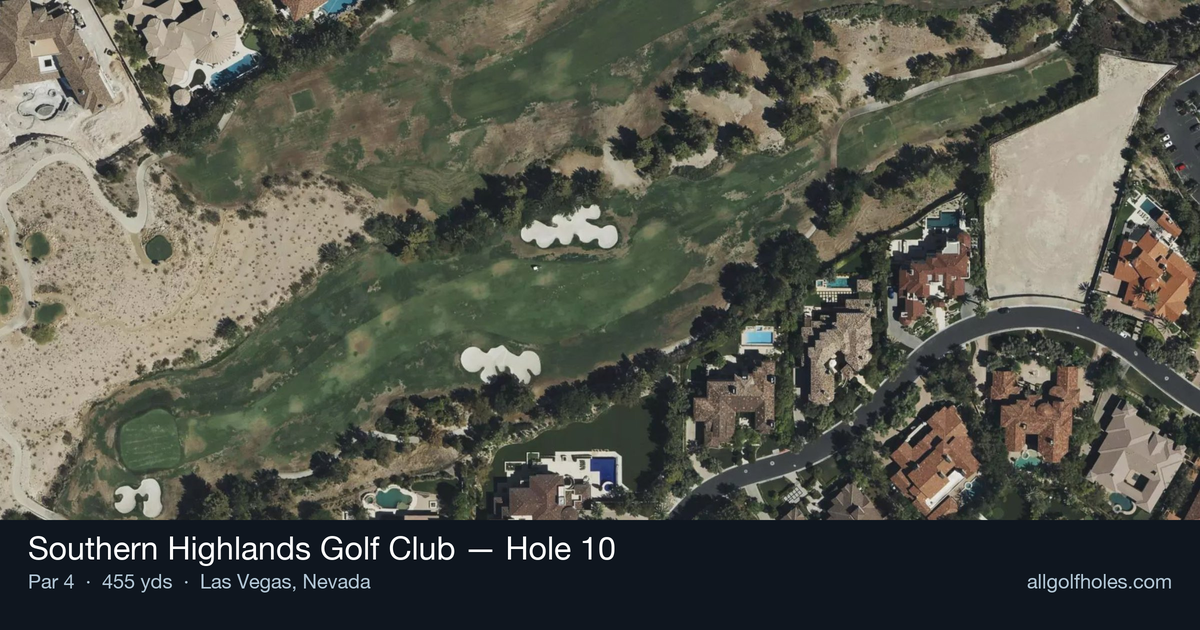
Aerial source not provided
Green size: 28 yds deep × 27 yds wide
Scorecard yardage is for Championship tees. The aerial shows its labeled reference position; distance rings measure to the green.
Championship tees · Par 4 · 455 yards
The plan for No. 10
The #1 handicap hole at Southern Highlands Golf Club, this 455-yard par 4 demands precision from the championship tees. As the most challenging hole on the course, it presents a deceptively straightforward test that separates skilled players from the field. The straight layout may appear forgiving, but the combination of length and a compact green complex creates strategic complexity that defines great golf holes. From the tee, golfers face a generous fairway that invites an aggressive tee shot, yet the real challenge emerges on the approach. The small green demands pinpoint accuracy with mid to long irons, leaving little margin for error. Without significant hazards to distract, this Southern Highlands Golf Club hole 10 relies on pure shot-making ability, rewarding those who can execute under pressure while punishing wayward approaches with difficult recovery shots.
Off the tee
The tee shot strategy centers on finding the optimal position for your approach yardage rather than maximum distance. Focus on the center-left portion of the fairway, which typically provides the best angle into the small green. Driver is the obvious choice for most players given the hole's length, but ensure your swing stays controlled and balanced. The straight layout means you can be aggressive with your target line down the center, but avoid the tendency to overswing that often accompanies the pressure of playing the #1 handicap hole. For players who struggle with driver accuracy, consider a strong 3-wood or hybrid that still provides adequate distance while keeping the ball in play. Position is more valuable than raw distance on this demanding hole.
Approach & recovery
The approach shot into the small green requires your full attention and best execution. With the green's compact size, precision trumps power in club selection. Take one extra club to ensure you reach the putting surface, as coming up short leaves a much more difficult recovery than being slightly long. Study the pin position carefully - with a small green, there's limited room for error. Aim for the center of the green unless you're completely confident in your distance control and the pin position allows for aggressive targeting. The straight hole layout means wind direction will play a crucial role in club selection, so factor conditions into your decision-making process.
On the green
The small green demands respect with your putter selection and read. Shorter putts may break more than expected due to the green's intimate size concentrating subtle slopes. Focus on lag putting from longer distances, as three-putting from the fringe or back of the green can quickly turn a good hole into a disappointing one. Pay attention to grain direction, which can be more pronounced on smaller putting surfaces. Take extra time with your pre-shot routine, as the pressure of the #1 handicap hole can rush decision-making when putting precision is most critical. ## RISK VS REWARD This hole offers limited risk/reward opportunities, instead demanding consistent, strategic play. The reward comes from executing two solid shots rather than attempting heroic recovery shots. The absence of major hazards means the primary risk lies in overplaying your abilities - attempting shots beyond your skill level in pursuit of birdie often leads to bogey or worse. The straight layout eliminates the temptation to cut corners or take aggressive lines, focusing the strategic challenge purely on execution and club selection. ## DIFFERENT SKILL LEVELS **High-Handicap Players:** Focus entirely on keeping the ball in play and advancing it toward the green in regulation. Consider laying up to your favorite wedge distance if driver leaves you with an uncomfortable approach yardage. Two controlled shots beat one great shot followed by one poor shot every time on this demanding hole. **Low-Handicap Players:** This hole rewards your ability to execute under pressure with precise iron play into the small green. Consider the pin position when planning your tee shot - some pins may favor approaching from specific areas of the fairway. Your short game skills become crucial here, as getting up and down from around the small green requires touch and precision. The #1 handicap rating means even skilled players should respect this hole's challenge and avoid forcing shots that aren't there.
Watch for
- Course conditioning and mapped hazards may affect line selection; confirm from the aerial.
Hole 10 Green Complex
Mapped green boundary
Green size: 4,477 sq ft
How did Hole 10 play?
How did this hole play today?
Frequently asked questions
Yardage reference: Championship tees · 455 yards.
What's the best strategy off the tee?
↓
For this 455-yard par 4, most players will hit driver to set up a comfortable approach.
How difficult is hole 10?
↓
This hole is a moderate challenge for most golfers. Key challenges include: long par 4, small green.
How big is the green on hole 10?
↓
The green is small and requires precision. Expect challenging pin positions with limited room for error.
What's a good score on hole 10?
↓
This hole is one of the tougher holes where par feels like birdie. A challenging par 4. Accept that bogey happens and avoid big numbers.