Hole 12 at Southern Highlands Golf Club
- Par
- 3
- Yardage
- 177 yds
- Stroke index
- 17
- Hazards
- 1 bunker · Water
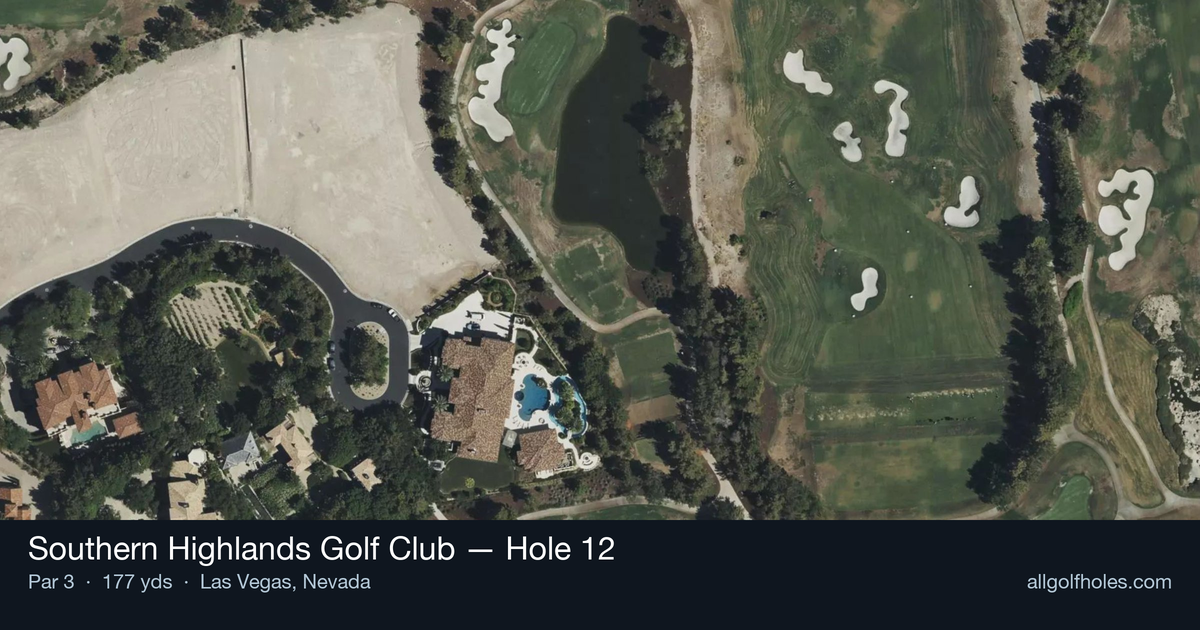
Aerial source not provided
Green size: 33 yds deep × 36 yds wide
Scorecard yardage is for Championship tees. The aerial shows its labeled reference position; distance rings measure to the green.
Championship tees · Par 3 · 177 yards
The plan for No. 12
Southern Highlands Golf Club hole 12 presents a deceptively challenging par 3 that demands precision over power. At 177 yards, this straight shot requires golfers to navigate to a small, well-protected green that punishes anything less than accurate club selection. The elevated tee provides stunning views of the Las Vegas valley, but don't let the scenery distract from the task at hand. With minimal hazards flanking the target, the primary challenge lies in judging distance and wind conditions in the desert climate. The compact green offers little margin for error, making this mid-handicap hole a true test of iron play accuracy that can quickly turn a routine par into a frustrating bogey.
Off the tee
Club selection is critical on this hole - most players will need anything from a 6-iron to a 9-iron depending on wind conditions and pin position. Focus on smooth tempo rather than aggressive swing speed, as the small green requires precision over distance. Aim for the center of the green unless you're confident in your distance control and the pin is accessible. The straight layout means you can commit fully to your target line without worrying about doglegs or hidden trouble.
Approach & recovery
Since this is a par 3, your tee shot IS your approach shot. The key is selecting enough club to ensure you reach the green while maintaining control. With no hazards guarding the green, missing short is often the safer play than flying long, especially if there are collection areas or rough behind the green. Pay attention to wind direction and green firmness - desert conditions can make greens play faster and harder than they appear.
On the green
The small green size means every putt is potentially makeable, but also that precision is required on longer attempts. Focus on speed control above all else, as running putts well past the hole on a small green leaves difficult comeback attempts. Without knowing the specific green contours, play conservatively by aiming for the fat part of the hole and ensuring your first putt finishes below the cup when possible. ## RISK VS REWARD This hole offers a classic risk/reward scenario disguised as a simple par 3. The reward is clear - a makeable birdie putt with no major hazards to navigate. The risk lies in the small margin for error that the compact green provides. Aggressive pin-hunting can lead to birdie opportunities, but conservative center-green play virtually guarantees par while keeping bogey at bay. ## DIFFERENT SKILL LEVELS **High-Handicap Players:** Focus on hitting the green anywhere rather than chasing pins. Take one extra club to ensure you reach the putting surface, and aim for the center regardless of pin position. A stress-free two-putt par is an excellent result here. **Low-Handicap Players:** This is a birdie hole where course management becomes crucial. Study the pin position carefully and only attack tucked pins if you're confident in your distance control. Consider how this hole fits into your overall round strategy - sometimes a safe par here sets up aggressive play on the next hole. The absence of major hazards makes this hole more about execution than navigation, rewarding players who can dial in their iron play and maintain composure under scoring pressure.
Watch for
- Course conditioning and mapped hazards may affect line selection; confirm from the aerial.
Hole 12 Green Complex
Mapped green boundary
Green size: 4,772 sq ft
How did Hole 12 play?
How did this hole play today?
Frequently asked questions
Yardage reference: Championship tees · 177 yards.
What club should I use on this par 3?
↓
At 177 yards, most golfers will need a mid-iron (7-iron to 8-iron) to reach this green. Adjust for elevation, wind, and pin position.
How difficult is hole 12?
↓
This hole is a moderate challenge for most golfers. Key challenges include: water in play.
What hazards should I watch out for on hole 12?
↓
Key hazards include: 1 greenside bunker; water at 124.9 yards. Plan your shots to avoid these trouble spots.
How big is the green on hole 12?
↓
The green is medium-sized with moderate targets. Pay attention to pin placement when selecting your approach club.
What's a good score on hole 12?
↓
This hole is a solid par with birdie chances for precise approach shots. Making par is a good result here. Focus on hitting the green and avoiding three-putts.