Hole 7 at Seminole Golf Club
- Par
- 4
- Yardage
- 432 yds
- Hazards
- 10 bunkers · Water
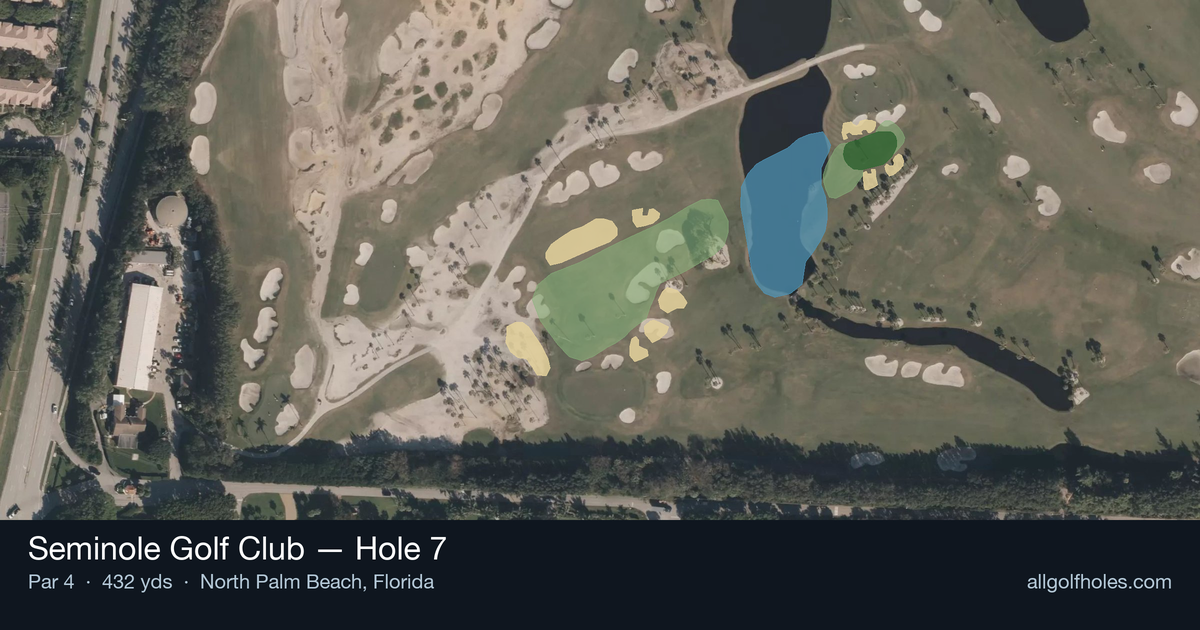
Aerial source not provided
Green size: 36 yds deep × 23 yds wide
Scorecard yardage is for Championship tees. The aerial shows its labeled reference position; distance rings measure to the green.
Championship tees · Par 4 · 432 yards
The plan for No. 7
The seventh hole at Seminole Golf Club presents a deceptively challenging par 4 that epitomizes the strategic brilliance of Donald Ross's design philosophy. This 432-yard test plays straight toward the Atlantic Ocean, where coastal winds add complexity to club selection and ball flight. The generous fairway invites an aggressive tee shot, but the real challenge emerges on the approach to a small, subtly contoured green that demands precision over power. Without bunkers or water to intimidate, this hole relies on Ross's masterful use of natural terrain and green slopes to test every aspect of your short game. The putting surface's modest size leaves little margin for error, making accurate iron play essential. At Seminole Golf Club hole 7, success depends on course management and touch rather than raw distance.
Off the tee
The tee shot strategy centers on finding the fairway at all costs. With no significant hazards to navigate, focus on selecting a club that ensures you'll be in the short grass - even if that means leaving a longer approach shot. For most players, this means a driver or strong 3-wood aimed down the center of the fairway. The key target line runs straight down the middle, allowing for natural shot shape while maintaining maximum margin for error on both sides. Higher handicap players should consider a fairway wood or hybrid off the tee to prioritize accuracy over distance. The penalty for missing the fairway is severe enough that sacrificing 20-30 yards for improved accuracy often leads to better scores.
Approach & recovery
The approach shot to Seminole's 7th green requires precise distance control and careful club selection. The small green size means there's little room for error, making it crucial to take enough club to ensure you reach the putting surface. Depending on your tee shot distance, expect to hit anything from a mid-iron to a long-iron for your approach. Focus on the center of the green regardless of pin position - the small target makes going for flags a high-risk proposition except for the most skilled players. Take one extra club and make a smooth, controlled swing rather than forcing a shot that might come up short.
On the green
The small green at the 7th hole means putting strategy revolves around two-putting from anywhere on the surface. Without detailed green contour information, the safest approach is to focus on speed control and leave putts below the hole when possible. The compact size means even longer putts won't be overly challenging for distance, but precise speed becomes crucial. Pay attention to the overall slope and grain direction during your practice round, as these subtle factors become magnified on smaller greens where every foot matters. ## RISK VS REWARD This hole offers limited risk/reward opportunities, which actually makes it more challenging mentally. The straightforward nature can lead to overconfidence or poor decision-making. The main risk/reward decision comes with tee shot club selection - taking driver for a shorter approach versus playing it safe with a fairway wood. The reward for finding the fairway and hitting a quality approach shot is significant, as this hole should yield birdies for skilled players and pars for everyone else when played intelligently. ## DIFFERENT SKILL LEVELS **Low Handicap Players:** Attack this hole aggressively with driver off the tee, then focus on sticking approach shots close to create birdie opportunities. Your superior ball-striking should allow you to take advantage of the lack of hazards while still respecting the small green. **High Handicap Players:** Play conservatively with fairway wood or hybrid off the tee, prioritizing accuracy over distance. Aim for the center of the green on your approach shot and focus on making solid contact. A bogey here isn't disastrous, but double bogey can be avoided with smart course management. **Mid Handicap Players:** Find the balance between aggression and caution. Use driver if you're confident in your accuracy that day, but don't hesitate to club down if you're struggling with control. Take plenty of club on the approach and commit to the center of the green strategy.
Watch for
- Mapped sand (greenside) roughly 429 yards from the tee reference.
- Mapped sand (greenside) roughly 436 yards from the tee reference.
- Mapped sand (greenside) roughly 418 yards from the tee reference.
- Mapped sand (crossing) roughly 288 yards from the tee reference.
- Mapped sand (crossing) roughly 248 yards from the tee reference.
Hole 7 Green Complex
Mapped green boundary
Green size: 4,049 sq ft
Course coverage
Tournament and creator videos about Seminole Golf Club — shared course coverage, not hole-specific clips.
Featured by these creators
Creator videos about this course
YouTube creators who filmed or featured Seminole Golf Club. · Stats as of Oct 12, 2026 · 6d ago
Restoring Donald Ross's Seminole Golf Club
How did Hole 7 play?
How did this hole play today?
Frequently asked questions
Yardage reference: Championship tees · 432 yards.
What's the best strategy off the tee?
↓
For this 432-yard par 4, most players will hit driver to set up a comfortable approach.
How difficult is hole 7?
↓
This hole is one of the tougher holes on the course for most golfers. Key challenges include: water in play, small green.
What hazards should I watch out for on hole 7?
↓
Key hazards include: water at 369.6 yards. Plan your shots to avoid these trouble spots.
How big is the green on hole 7?
↓
The green is small and requires precision. Expect challenging pin positions with limited room for error.
What's a good score on hole 7?
↓
This hole is a demanding hole where bogey is not unusual. This longer par 4 will test most golfers. Focus on position over distance.