Hole 6 at Seminole Golf Club
- Par
- 4
- Yardage
- 383 yds
- Hazards
- 11 bunkers
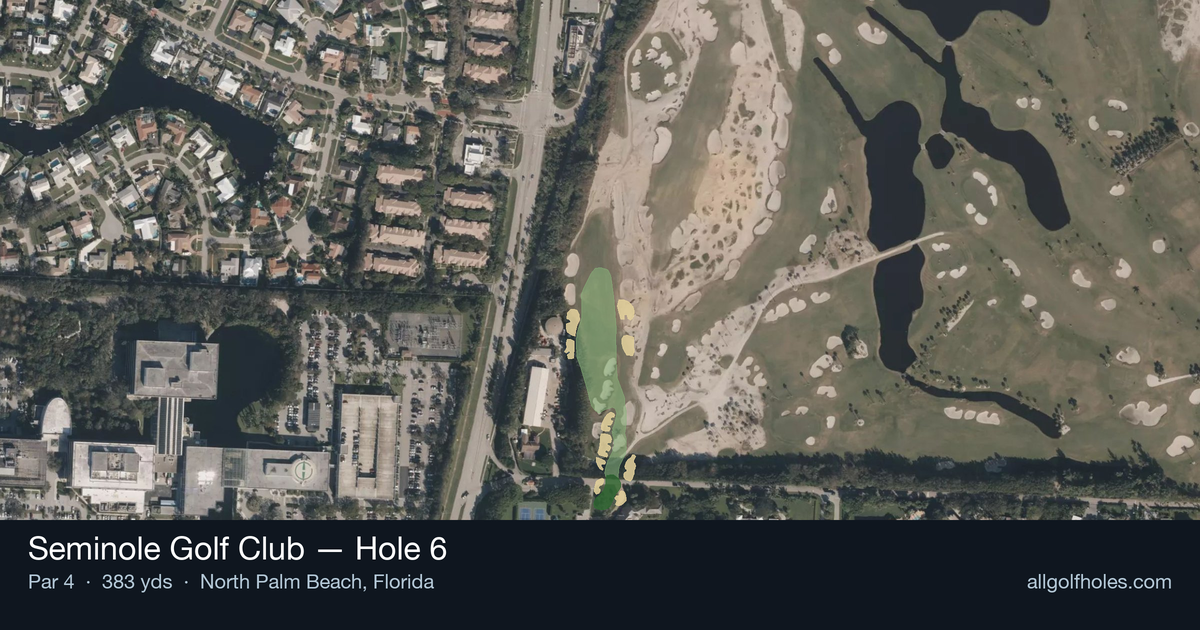
Aerial source not provided
Green size: 40 yds deep × 30 yds wide
Scorecard yardage is for Championship tees. The aerial shows its labeled reference position; distance rings measure to the green.
Championship tees · Par 4 · 383 yards
The plan for No. 6
Seminole Golf Club hole 6 presents a deceptively straightforward par 4 that embodies the strategic brilliance of this legendary North Palm Beach layout. At 383 yards, this straight hole demands precision over power, with its small green serving as the primary defense against scoring. The absence of major hazards might suggest an easy birdie opportunity, but seasoned players know better at Donald Ross's masterpiece. The compact putting surface requires a perfectly struck approach shot, as any miss will test your short game skills. With generous fairway positioning off the tee, golfers can focus entirely on dialing in the correct distance and trajectory for their approach. This hole exemplifies Seminole's reputation for rewarding thoughtful course management over aggressive play.
Off the tee
The tee shot strategy centers on positioning for the best approach angle to the small green. With no hazards to dictate club selection, focus on finding your most comfortable distance for the approach shot. Most players will benefit from a controlled drive that leaves a mid-iron to short-iron into the green. Consider taking less than driver if that ensures better accuracy and distance control. The target line should favor the side that provides the most forgiving angle to typical pin positions, though without specific green contours visible, aim for the center-left portion of the fairway to allow for a straight-in approach.
Approach & recovery
The approach shot is where this hole shows its teeth. The small green demands pinpoint accuracy, making club selection absolutely critical. Take one extra club and swing smoothly rather than forcing a shot. Aim for the center of the green unless you're certain of the pin position and have a comfortable yardage. The compact putting surface leaves little room for error, so prioritize finding the green over attacking pins. Pay attention to wind conditions, as they'll have an exaggerated effect on approach shots to such a small target.
On the green
With a small green, putting becomes a premium skill on this hole. Expect subtle breaks and slopes that can be difficult to read from a distance. Focus on speed control above all else, as three-putts can quickly turn a scoring opportunity into a bogey. Most putts will be relatively short, so concentrate on starting the ball on your intended line. If you're above the hole, be especially cautious with your speed, as running putts past the pin on a small green often leaves difficult comeback attempts. ## RISK VS REWARD The primary risk/reward decision comes in tee shot aggression versus approach positioning. While the hole's length might tempt longer hitters to be aggressive off the tee, the small green actually rewards conservative positioning that ensures a comfortable approach yardage. The reward for finding the green in regulation is significant, as the short length makes birdie very achievable. However, missing the small green can lead to challenging up-and-down situations that quickly turn into bogeys or worse. ## DIFFERENT SKILL LEVELS **High Handicappers:** Focus entirely on finding the fairway with your most reliable club off the tee, even if it's a hybrid or long iron. Aim for the center of the green with your approach, taking an extra club to ensure you reach the putting surface. Don't get greedy with pin hunting – the small green makes any part of it a good result. **Low Handicappers:** Use this hole as a scoring opportunity by optimizing your approach distance. Consider the pin position when selecting your tee shot strategy, and be aggressive with approach shots only when you have a comfortable yardage and clear sight lines. This is a hole where course management and execution should yield birdies with proper strategy. The beauty of Seminole's 6th hole lies in its demand for precision golf. Success comes not from power, but from thoughtful club selection and committed execution to small targets.
Watch for
- Mapped sand (greenside) roughly 373 yards from the tee reference.
- Mapped sand (crossing forced carry) roughly 177 yards from the tee reference.
- Mapped sand (greenside) roughly 387 yards from the tee reference.
- Mapped sand (greenside) roughly 352 yards from the tee reference.
- Mapped sand (greenside) roughly 348 yards from the tee reference.
Hole 6 Green Complex
Mapped green boundary
Green size: 4,440 sq ft
Course coverage
Tournament and creator videos about Seminole Golf Club — shared course coverage, not hole-specific clips.
Featured by these creators
Creator videos about this course
YouTube creators who filmed or featured Seminole Golf Club. · Stats as of Oct 12, 2026 · 5d ago
Restoring Donald Ross's Seminole Golf Club
How did Hole 6 play?
How did this hole play today?
Frequently asked questions
Yardage reference: Championship tees · 383 yards.
What's the best strategy off the tee?
↓
For this 383-yard par 4, most players will hit driver to set up a comfortable approach.
How difficult is hole 6?
↓
This hole is a good scoring opportunity for most golfers. Key challenges include: small green.
How big is the green on hole 6?
↓
The green is small and requires precision. The green is deeper than wide, so club selection is crucial. Expect challenging pin positions with limited room for error.
What's a good score on hole 6?
↓
This hole is a medium-length test where par is a solid result. A straightforward par 4 where course management pays off.