Hole 2 at Seminole Golf Club
- Par
- 4
- Yardage
- 387 yds
- Hazards
- 7 bunkers · Water
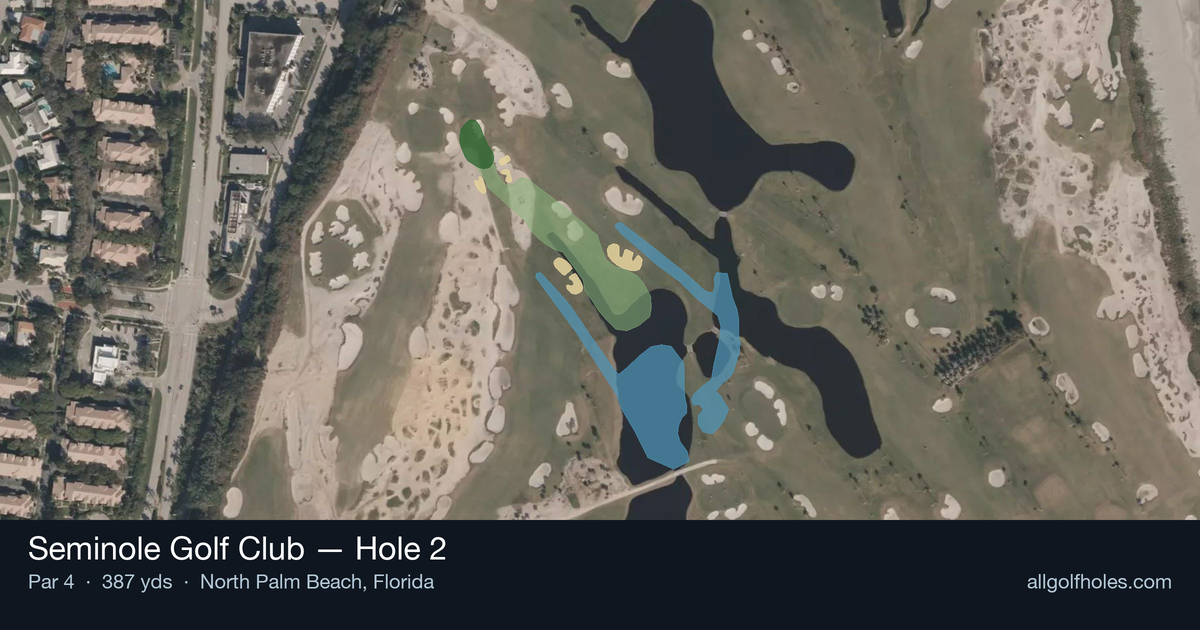
Aerial source not provided
Green size: 44 yds deep × 26 yds wide
Scorecard yardage is for Championship tees. The aerial shows its labeled reference position; distance rings measure to the green.
Championship tees · Par 4 · 387 yards
The plan for No. 2
The second hole at Seminole Golf Club presents a deceptively straightforward par 4 that embodies the strategic brilliance Donald Ross envisioned for this legendary North Palm Beach layout. At 387 yards, this straight hole appears generous from the elevated tee, but the small, subtly contoured green demands precision on the approach shot. The absence of major hazards shifts focus to positioning, as finding the optimal angle into the compact putting surface becomes paramount. Wind conditions off the Atlantic can dramatically alter club selection, making course management essential. What makes Seminole Golf Club hole 2 memorable is how it rewards thoughtful play over power, setting the tone for the strategic challenges that define this storied venue where golf's greatest names have tested their skills for nearly a century.
Off the tee
The tee shot strategy centers on positioning for the optimal approach distance. Most players should favor a controlled driver or strong 3-wood, aiming for the center of the fairway to leave a comfortable mid-iron into the green. Longer hitters might consider throttling back to ensure they don't run through the ideal landing zone, while shorter players should maximize distance without sacrificing accuracy. The key target line runs straight down the middle, as the lack of hazards allows for aggressive fairway positioning.
Approach & recovery
The approach shot is where this hole reveals its teeth. The small green demands pinpoint accuracy, making club selection critical. From the typical landing zone, expect to hit anywhere from a 7-iron to a pitching wedge, depending on pin position and conditions. Favor the center of the green on most pins, as the compact target leaves little margin for error. When the pin is tucked, resist the urge to get too aggressive – the middle of the green is always your friend on such a small target.
On the green
Putting strategy on this small green requires reading the subtle breaks carefully. With limited real estate, even seemingly straight putts can have more movement than expected. Focus on speed control above all else, as running putts past the hole on a small green often leaves difficult comeback attempts. When facing longer putts, prioritize getting within easy two-putt range rather than being aggressive to the hole. ## RISK VS REWARD The primary risk/reward decision comes with pin hunting on the approach. While the small green tempts players to aim directly at every flag, the smart play often involves targeting the fat part of the green and relying on putting. Aggressive approaches that miss the target can leave challenging recovery shots, turning a potential birdie into a scrambling situation. ## DIFFERENT SKILL LEVELS **High-Handicap Players:** Focus on two-putt strategy by aiming for the center of the green regardless of pin position. Use whatever club gives you the most confidence from your approach distance, even if it means laying up to a more comfortable yardage. The goal is avoiding big numbers rather than chasing birdies. **Low-Handicap Players:** This hole rewards precision and course management skills. Consider the pin position when selecting your tee shot target – certain approach angles may be more favorable. Don't hesitate to be aggressive when you have a good lie and favorable conditions, as this represents one of the better scoring opportunities on the course. The absence of major hazards makes this hole about execution rather than navigation, rewarding players who can consistently hit their targets and manage the small green effectively.
Watch for
- Mapped sand (crossing) roughly 235 yards from the tee reference.
- Mapped sand (greenside) roughly 357 yards from the tee reference.
- Mapped sand (greenside) roughly 346 yards from the tee reference.
- Mapped sand (greenside) roughly 352 yards from the tee reference.
- Mapped sand (crossing) roughly 235 yards from the tee reference.
Hole 2 Green Complex
Mapped green boundary
Green size: 5,551 sq ft
Course coverage
Tournament and creator videos about Seminole Golf Club — shared course coverage, not hole-specific clips.
Featured by these creators
Creator videos about this course
YouTube creators who filmed or featured Seminole Golf Club. · Stats as of Oct 12, 2026 · 6d ago
Restoring Donald Ross's Seminole Golf Club
How did Hole 2 play?
How did this hole play today?
Frequently asked questions
Yardage reference: Championship tees · 387 yards.
What's the best strategy off the tee?
↓
For this 387-yard par 4, most players will hit driver to set up a comfortable approach.
How difficult is hole 2?
↓
This hole is a moderate challenge for most golfers. Key challenges include: water in play.
What hazards should I watch out for on hole 2?
↓
Key hazards include: water at 147.0 yards. Plan your shots to avoid these trouble spots.
How big is the green on hole 2?
↓
The green is medium-sized with moderate targets. The green is deeper than wide, so club selection is crucial. Pay attention to pin placement when selecting your approach club.
What's a good score on hole 2?
↓
This hole is a medium-length test where par is a solid result. A straightforward par 4 where course management pays off.