Hole 9 at PGA National Resort & Spa (Champion)
- Par
- 4
- Yardage
- 404 yds
- Stroke index
- 5
- Hazards
- 5 bunkers · Water
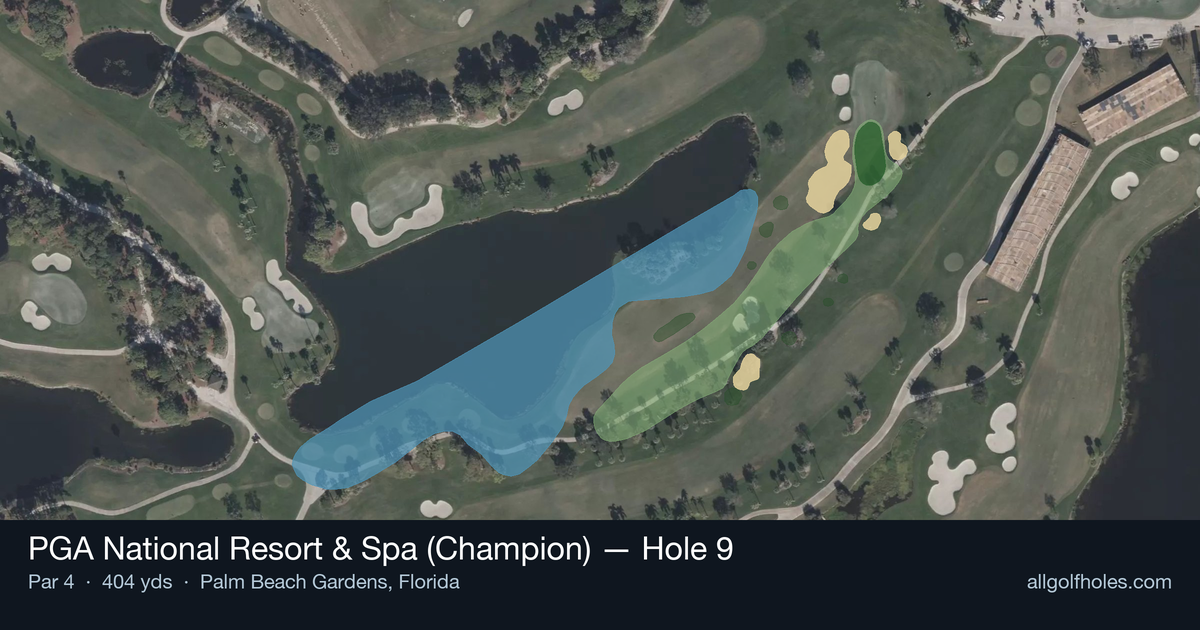
Aerial source not provided
Green size: 26 yds deep × 33 yds wide
Scorecard yardage is for Championship tees. The aerial shows its labeled reference position; distance rings measure to the green.
Championship tees · Par 4 · 404 yards
The plan for No. 9
The ninth hole at PGA National Resort & Spa (Champion) presents a deceptively challenging finish to the front nine, demanding precision over power on this 404-yard par 4. This straight-forward layout may appear benign from the tee, but the small green becomes the focal point of strategy, requiring golfers to dial in their approach shots with surgical accuracy. The absence of major hazards shifts the emphasis to course management and green-reading skills, as the compact putting surface offers little margin for error on approach shots. What makes this hole memorable is its ability to punish overly aggressive play while rewarding those who respect the premium placed on accuracy over distance, setting up a crucial scoring opportunity before the turn.
Off the tee
The tee shot strategy centers on finding the optimal position in the fairway for your approach distance. With 404 yards to work with, most players will want to hit driver to leave themselves with a manageable mid-iron into the green. Focus on the center-left portion of the fairway as your target line, which should provide the best angle for your approach shot. For longer hitters, the temptation might be to bomb driver, but course management suggests hitting a controlled tee shot that finds the fairway first and foremost. The small green will punish any approach from the rough, making fairway position critical. Consider a 3-wood or hybrid if accuracy has been an issue with driver during your round. ## APPROACH The approach shot is where this hole reveals its true challenge. With a small green as your target, club selection becomes paramount. The key is taking enough club to ensure you reach the putting surface while maintaining the control needed to hold the small green. Most players will be hitting anywhere from a 6-iron to 9-iron depending on their tee shot distance and conditions. Focus on the center of the green regardless of pin position – with limited real estate to work with, going flag-hunting can lead to short-sided situations or missed greens entirely. The small green size means even a center-green approach will leave you with a reasonable putt. ## ON THE GREEN The small green demands respect with your putter. While specific break information isn't available, small greens typically feature subtle slopes that can be tricky to read. Focus on speed control above all else – with limited green to work with, pace becomes more critical than perfect line reading. Pay attention to pin positions throughout your round, as the small surface area means some pins will be more accessible than others. When the pin is tucked, aim for the fat part of the green and rely on your putting rather than trying to get too close with your approach. ## RISK VS REWARD This hole presents a classic risk/reward scenario disguised as a straightforward par 4. The reward for aggressive play – driver followed by a shorter iron – is offset by the precision required into the small green. The safer play involves ensuring you're in the fairway and then taking enough club to comfortably reach the green center. The biggest risk comes from being overly aggressive with pin-seeking approach shots. The small green punishes misses severely, and recovery shots around the green can be challenging given the tight target you're trying to hit.
Approach & recovery
The approach shot is where this hole reveals its true challenge. With a small green as your target, club selection becomes paramount. The key is taking enough club to ensure you reach the putting surface while maintaining the control needed to hold the small green. Most players will be hitting anywhere from a 6-iron to 9-iron depending on their tee shot distance and conditions. Focus on the center of the green regardless of pin position – with limited real estate to work with, going flag-hunting can lead to short-sided situations or missed greens entirely. The small green size means even a center-green approach will leave you with a reasonable putt. ## ON THE GREEN The small green demands respect with your putter. While specific break information isn't available, small greens typically feature subtle slopes that can be tricky to read. Focus on speed control above all else – with limited green to work with, pace becomes more critical than perfect line reading. Pay attention to pin positions throughout your round, as the small surface area means some pins will be more accessible than others. When the pin is tucked, aim for the fat part of the green and rely on your putting rather than trying to get too close with your approach. ## RISK VS REWARD This hole presents a classic risk/reward scenario disguised as a straightforward par 4. The reward for aggressive play – driver followed by a shorter iron – is offset by the precision required into the small green. The safer play involves ensuring you're in the fairway and then taking enough club to comfortably reach the green center. The biggest risk comes from being overly aggressive with pin-seeking approach shots. The small green punishes misses severely, and recovery shots around the green can be challenging given the tight target you're trying to hit.
On the green
The small green demands respect with your putter. While specific break information isn't available, small greens typically feature subtle slopes that can be tricky to read. Focus on speed control above all else – with limited green to work with, pace becomes more critical than perfect line reading. Pay attention to pin positions throughout your round, as the small surface area means some pins will be more accessible than others. When the pin is tucked, aim for the fat part of the green and rely on your putting rather than trying to get too close with your approach. ## RISK VS REWARD This hole presents a classic risk/reward scenario disguised as a straightforward par 4. The reward for aggressive play – driver followed by a shorter iron – is offset by the precision required into the small green. The safer play involves ensuring you're in the fairway and then taking enough club to comfortably reach the green center. The biggest risk comes from being overly aggressive with pin-seeking approach shots. The small green punishes misses severely, and recovery shots around the green can be challenging given the tight target you're trying to hit.
Watch for
- Water influences line selection and recovery options on this hole.
Hole 9 Green Complex
Mapped green boundary
Green size: 3,667 sq ft
Course coverage
Tournament and creator videos about PGA National Resort & Spa (Champion) — shared course coverage, not hole-specific clips.
Tournament coverage
Cognizant Classic highlights
Cognizant Classic | Final Round Highlights
2025
Featured by these creators
Creator videos about this course
YouTube creators who filmed or featured PGA National Resort & Spa (Champion). · Stats as of Oct 12, 2026 · 5d ago
Has the PGA Tour wrecked PGA National? & FBF to Steve Pate's win in Palm Beach | The Shotgun Start
TGL's future & Todd Watch returns at PGA National for Cognizant Classic | The Shotgun Start
PGA National - Hole 5 - 238 yard par 3
How did Hole 9 play?
How did this hole play today?
Frequently asked questions
Yardage reference: Championship tees · 404 yards.
What's the best strategy off the tee?
↓
For this 404-yard par 4, most players will hit driver to set up a comfortable approach.
How difficult is hole 9?
↓
This hole is one of the tougher holes on the course for most golfers. Key challenges include: water in play, small green.
What hazards should I watch out for on hole 9?
↓
Key hazards include: water at 148.3 yards. Plan your shots to avoid these trouble spots.
How big is the green on hole 9?
↓
The green is small and requires precision. The green is deeper than wide, so club selection is crucial. Expect challenging pin positions with limited room for error.