Hole 3 at Black Desert Resort Golf Course
- Par
- 3
- Yardage
- 196 yds
- Stroke index
- 15
- Hazards
- 2 bunkers
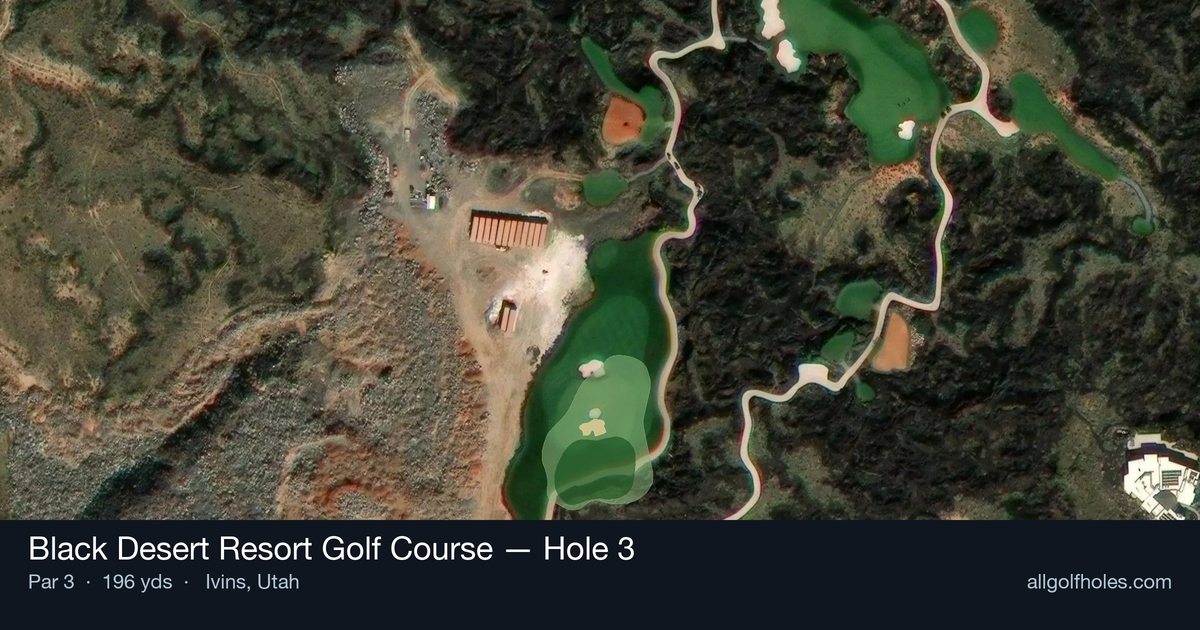
Aerial source not provided
Green size: 36 yds deep × 42 yds wide
Scorecard yardage is for Championship tees. The aerial shows its labeled reference position; distance rings measure to the green.
Championship tees · Par 3 · 196 yards
The plan for No. 3
The signature par 3 at Black Desert Resort Golf Course demands precision over Utah's dramatic desert landscape. At 196 yards, this straight-forward test requires golfers to navigate the elevated tee shot to a small, well-protected green nestled against the stunning red rock formations that define this Tom Weiskopf masterpiece. While hazards are minimal, the real challenge lies in club selection and distance control, as the desert winds can dramatically affect ball flight. The compact green offers little margin for error, rewarding accurate iron play while punishing wayward shots that find the surrounding desert floor. Black Desert Resort Golf Course hole 3 epitomizes the course's philosophy of strategic golf amid breathtaking scenery, making it a memorable test that combines natural beauty with demanding shot-making requirements.
Off the tee
**Club Selection and Tee Strategy** On this par 3, take one extra club than you think you need and aim for the center of the green. Desert courses play firmer and faster, so your ball will release more upon landing. If it's a 150-yard shot and you normally hit 7-iron, grab the 6-iron and swing smoothly at 80% power. This approach helps you avoid short-siding yourself and gives you the best angle for your next shot. **Wind and Elevation Considerations** Desert courses are notorious for swirling winds that can be deceptive from the tee box. Take time to feel the wind on your face and watch the flag movement carefully. If there's any elevation change, factor in roughly one club for every 15 feet of elevation. When in doubt between clubs, always take the longer iron and focus on solid contact rather than forcing a shorter club. **Avoid the Big Miss** Study the green complex before selecting your target. Most par 3s have a "safe" side and a "trouble" side. Identify where the bunkers, water, or severe slopes are located, then aim away from them. A 30-foot putt from the wrong side of the green is infinitely better than a difficult recovery shot. If you do miss the green, focus on getting your chip shot to the fat part of the putting surface rather than attacking tight pin positions.
Approach & recovery
Since this is a par 3, your tee shot IS your approach shot. Focus on tempo and balance rather than trying to muscle the ball. The desert environment can create firm conditions, so consider how the ball will react upon landing. A higher trajectory shot will typically hold the green better than a lower, running approach. Pay attention to the wind direction and strength, which can be particularly tricky in desert settings with surrounding terrain features. Don't be afraid to club up and make a smooth swing rather than forcing a shorter iron.
On the green
The small green size means precision putting is essential. Expect subtle breaks and potentially firm, fast conditions typical of desert courses. Take time to read the green from multiple angles, as slopes may be more pronounced than they appear. Focus on getting your first putt close rather than being overly aggressive. Two-putting from anywhere on this small green should be your primary goal, with birdies coming from exceptional approach shots rather than heroic putting. ## RISK VS REWARD This hole offers limited risk/reward scenarios due to the lack of significant hazards. The main decision point is club selection - being conservative with an extra club versus trying to dial in the exact yardage. Given the small green, the reward for perfect execution is high, but the penalty for slight misses can be costly in terms of up-and-down difficulty. ## DIFFERENT SKILL LEVELS **High-handicap players** should prioritize finding the green over pin-hunting. Aim for the center regardless of flag position, take an extra club to ensure you reach the green, and focus on a smooth, controlled swing. Accept bogey as a reasonable score if you miss the green. **Low-handicap players** can be more aggressive with pin positions, especially when the flag is in the center of the green. Consider the risk of short-siding yourself with pins near edges of the small green. This is a legitimate birdie opportunity with precise execution, making it crucial to capitalize when conditions are favorable. The key for all skill levels is respecting the small target while not being overly cautious. Commit to your club selection and target line, then execute with confidence.
Watch for
- Course conditioning and mapped hazards may affect line selection; confirm from the aerial.
Hole 3 Green Complex
Mapped green boundary
Green size: 9,196 sq ft
Course coverage
Tournament and creator videos about Black Desert Resort Golf Course — shared course coverage, not hole-specific clips.
Featured by these creators
Creator videos about this course
YouTube creators who filmed or featured Black Desert Resort Golf Course. · Stats as of Oct 12, 2026 · 6d ago
Is golf vulnerable to a gambling scandal, Kapalua's out, & Black Desert delights | The Shotgun Start
First 3 holes of the back nine at Black Desert ⛳️ #golf #shorts
Black Desert Open Round 1 | SGT Tour | Ep 4
How did Hole 3 play?
How did this hole play today?
Frequently asked questions
Yardage reference: Championship tees · 196 yards.
What club should I use on this par 3?
↓
At 196 yards, most golfers will need a long iron or hybrid (5-iron to 6-iron) to reach this green. Adjust for elevation, wind, and pin position.
How difficult is hole 3?
↓
This hole is a good scoring opportunity for most golfers. Key challenges include: large green requiring good lag putting.
What hazards should I watch out for on hole 3?
↓
Key hazards include: 2 greenside bunkers. Plan your shots to avoid these trouble spots.
How big is the green on hole 3?
↓
The green is large and can play quite long. Three-putt territory if you don't manage your approach distance well.