Hole 2 at TPC Craig Ranch
- Par
- 4
- Yardage
- 466 yds
- Stroke index
- 1
- Hazards
- 3 bunkers
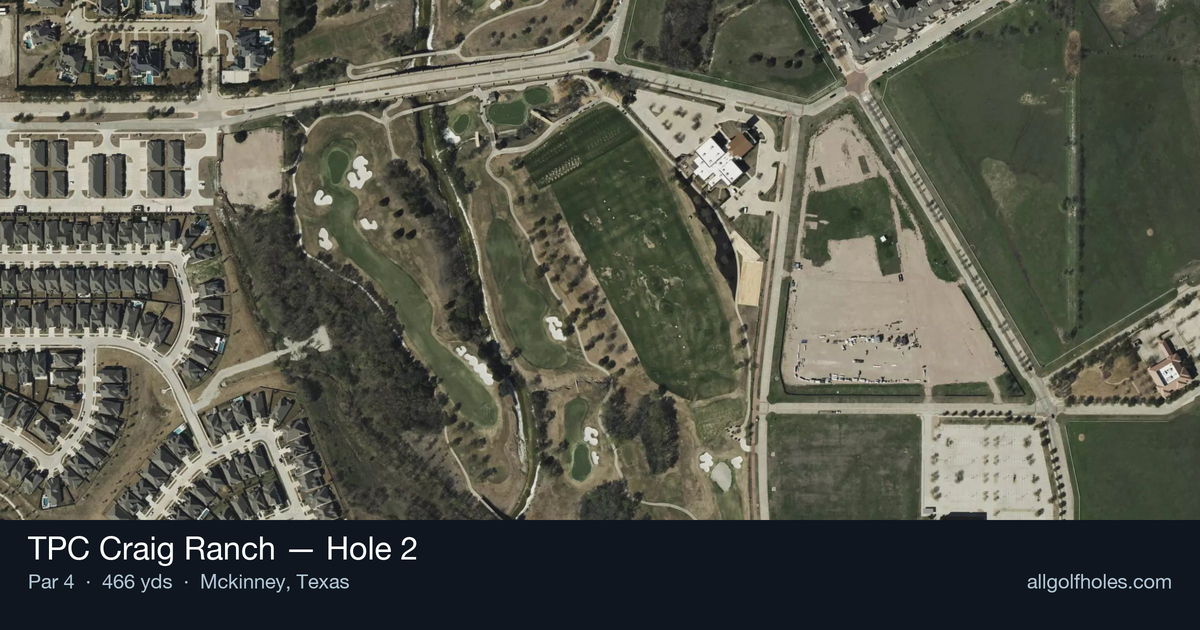
Aerial source not provided
Green size: 31 yds deep × 37 yds wide
Scorecard yardage is for Championship tees. The aerial shows its labeled reference position; distance rings measure to the green.
Championship tees · Par 4 · 466 yards
The plan for No. 2
The toughest hole at TPC Craig Ranch demands respect from the opening tee shot. This 466-yard par 4 carries the course's number one handicap rating for good reason, testing every aspect of your game on Tom Weiskopf's masterfully designed layout. The straight trajectory may appear forgiving, but the hole's length combined with a compact green complex creates a formidable challenge that separates champions from weekend warriors. Precision is paramount on both the tee shot and approach, as the small green offers little margin for error. This hole exemplifies why TPC Craig Ranch has earned admiration from world-class players, demanding strategic thinking and flawless execution to secure par on this unforgiving opener to the back nine.
Off the tee
The tee shot strategy centers on finding the optimal position for your approach angle. With the hole playing straight and relatively hazard-free off the tee, focus on hitting your most reliable driver or fairway wood down the center of the fairway. The key is leaving yourself with the shortest possible approach shot to that small green target. Aim for the center-left portion of the fairway to open up the best angle to the green. Most players will need driver to have a reasonable approach shot remaining, but if you're struggling with accuracy, consider a 3-wood or hybrid to ensure you stay in play. The landing zone appears generous, but precision will pay dividends on your second shot.
Approach & recovery
The approach shot is where this hole shows its teeth. With a small green as your target, club selection and accuracy become critical. Expect to hit anywhere from a mid-iron to hybrid depending on your tee shot distance and pin position. Focus on hitting the center of the green rather than attacking pins, especially when the flag is tucked. The small target means that missing the green will likely leave you with a difficult up-and-down. Take one extra club if you're between selections - being long is typically better than coming up short on a hole of this caliber.
On the green
The small green demands respect with your putter. Expect subtle breaks and quick conditions typical of Tom Weiskopf designs. Focus on lag putting to avoid three-putts, as two-putting from anywhere on this green should be considered a victory. Pay attention to grain direction and any elevation changes, as these can significantly affect ball roll on smaller surfaces. Conservative putting strategy - aiming for the fat part of the hole rather than trying to pour putts in - will serve you well here. ## RISK VS REWARD This hole offers limited risk/reward opportunities, which is part of its strategic challenge. The main decision point comes with tee shot club selection - taking driver for a shorter approach versus playing conservatively with a fairway wood for better accuracy. The reward for aggressive play is minimal given the small green target, making this more about solid execution than bold strategic choices. The best approach is steady, conservative golf that prioritizes keeping your ball in play and giving yourself makeable pars. ## DIFFERENT SKILL LEVELS **High Handicappers:** Focus entirely on keeping the ball in the fairway off the tee, even if it means using a fairway wood or hybrid. Accept that you'll likely have a longer approach shot and aim for the center of the green. Two-putting for par should be your goal, and bogey is certainly acceptable on the #1 handicap hole. **Low Handicappers:** This hole demands your A-game from tee to green. Use driver confidently but with precision, targeting specific areas of the fairway for optimal approach angles. Be aggressive enough to give yourself birdie opportunities but smart enough to avoid the big numbers that can derail a round early. The key to success on this demanding par 4 is recognizing that it's designed to test your complete game - driving accuracy, approach shot precision, and putting touch all come into play on what many consider the course's most challenging hole.
Watch for
- Course conditioning and mapped hazards may affect line selection; confirm from the aerial.
Hole 2 Green Complex
Mapped green boundary
Green size: 4,374 sq ft
Course coverage
Tournament and creator videos about TPC Craig Ranch — shared course coverage, not hole-specific clips.
Tournament coverage
CJ CUP Byron Nelson highlights
THE CJ CUP Byron Nelson | Final Round Highlights
2025
Featured by these creators
Creator videos about this course
YouTube creators who filmed or featured TPC Craig Ranch. · Stats as of Oct 12, 2026 · 6d ago
A new-look TPC Craig Ranch, LIV’s cost cutting, & U.S. Open qualifying starts | The Shotgun Start
How did Hole 2 play?
How did this hole play today?
Frequently asked questions
Yardage reference: Championship tees · 466 yards.
What's the best strategy off the tee?
↓
For this 466-yard par 4, most players will hit driver to set up a comfortable approach.
How difficult is hole 2?
↓
This hole is a moderate challenge for most golfers. Key challenges include: long par 4, small green.
What hazards should I watch out for on hole 2?
↓
Key hazards include: 3 greenside bunkers. Plan your shots to avoid these trouble spots.
How big is the green on hole 2?
↓
The green is small and requires precision. Expect challenging pin positions with limited room for error.
What's a good score on hole 2?
↓
This hole is one of the tougher holes where par feels like birdie. A challenging par 4. Accept that bogey happens and avoid big numbers.