Hole 1 at Sedgefield Country Club
- Par
- 4
- Yardage
- 420 yds
- Stroke index
- 11
- Hazards
- 2 bunkers
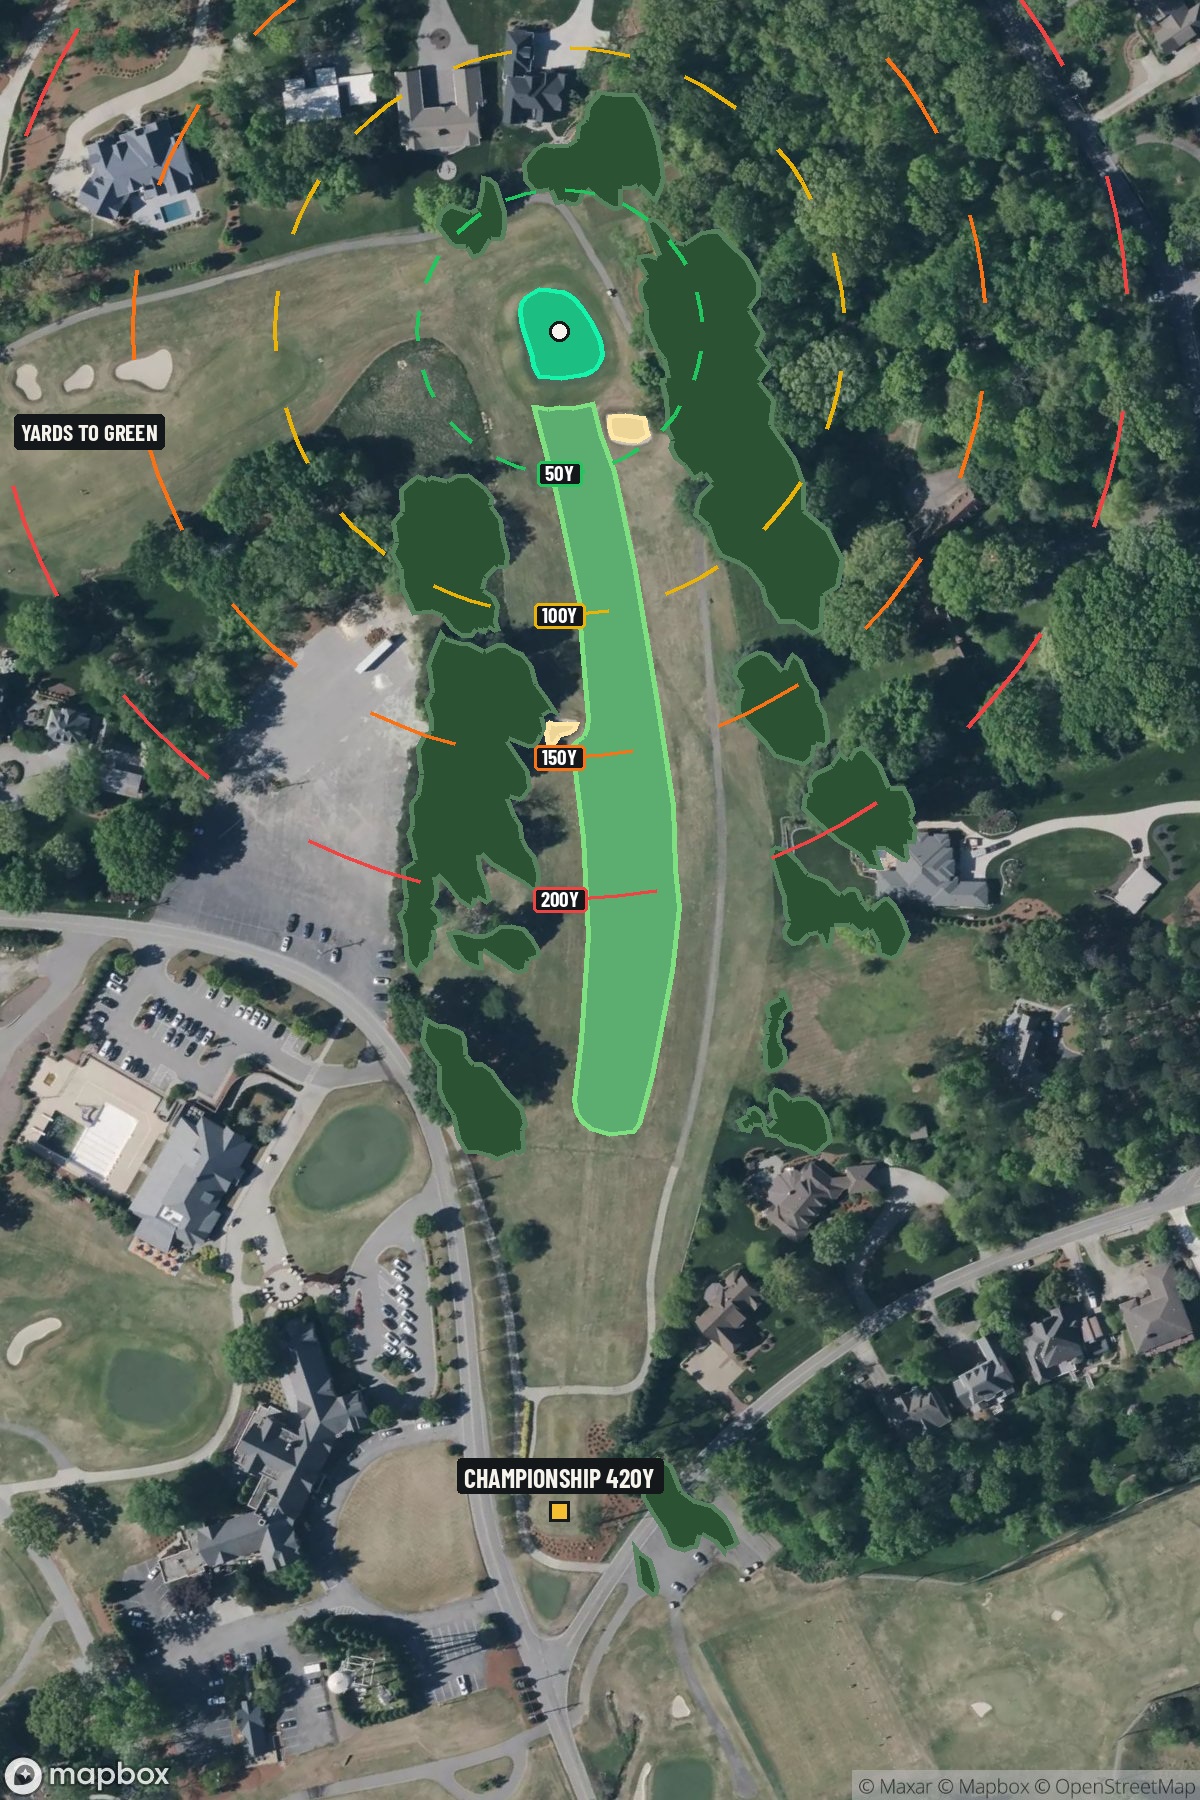 Hole 1 map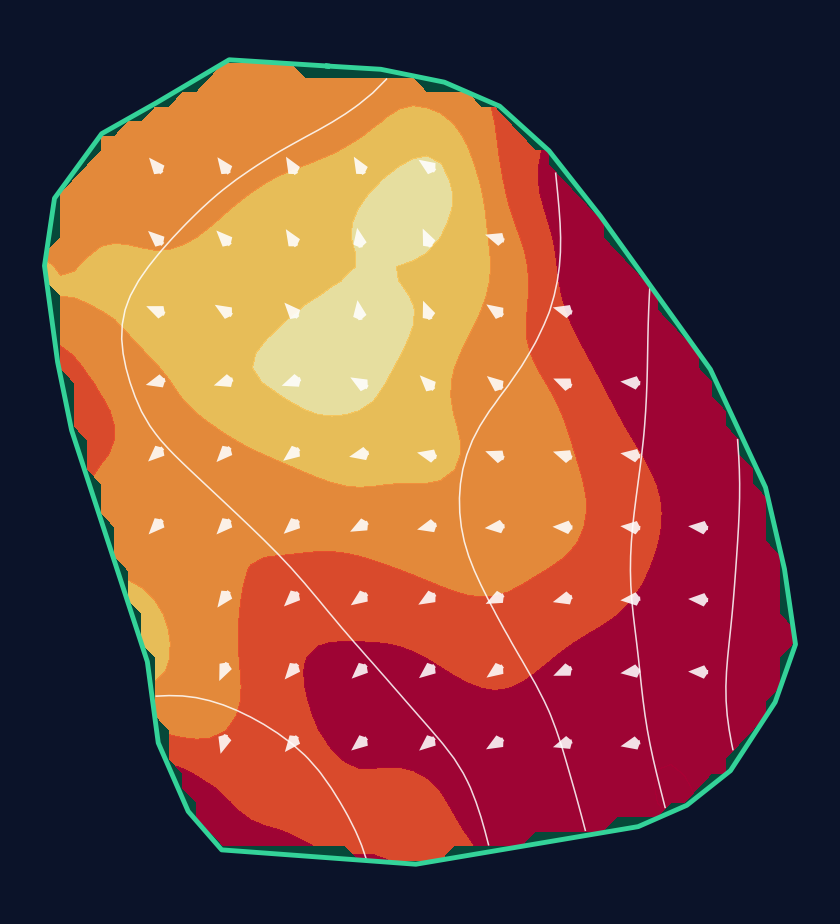
30 yd wide × 33 yd deep · 5.7 ft total elevation range
Light = gentler slope · Red = steeper slope
White lines: 1 foot of elevation. Arrows: downhill. General terrain, not a pin read.
Approach from bottom
Contour source
USGS NED ned19_n36x25_w080x00_nc_statewide_2003 1/9 arc-second 2012 15 x 15 minute IMG · collection 1970
Map source & reference
Mapbox Satellite composite · capture date not provided. Green at the top; the labeled map reference is below.
Scorecard yardage is for Championship tees. The aerial shows its labeled reference position; distance rings measure to the green.
Championship tees · Par 4 · 420 yards
The plan for No. 1
Sedgefield Country Club's opening hole sets the tone for Donald Ross's masterful design philosophy, presenting a strategic par 4 that rewards precision over power. This 420-yard opener features a generous fairway that gradually narrows toward the landing area, where a well-placed fairway bunker demands careful consideration off the tee. The key lies in positioning the drive near this strategic hazard, which provides the optimal angle for the approach shot to the small, subtly contoured green. Players who challenge the bunker with their tee shot are rewarded with a middle iron approach, while those who play conservatively face a longer, more demanding second shot. The compact green complex requires accuracy and proper club selection, making this an ideal introduction to the course's emphasis on strategic thinking and shot placement that defines classic Ross architecture.
Off the tee
Your tee shot strategy should center around positioning for the optimal approach angle. Based on the hole's design, a drive that carries around 280-290 yards will put you in the ideal position, near but not past the fairway bunker mentioned in tournament notes. This leaves you with a comfortable middle iron into the green - exactly what Donald Ross intended when designing this opener. For most players, a controlled driver or strong 3-wood off the tee provides the best balance of distance and accuracy. The target line should favor the center of the fairway, as the straight layout doesn't present significant directional challenges. Focus on a smooth, controlled swing that prioritizes finding the short grass over maximum distance.
Approach & recovery
With the green's small size being the primary defensive feature, your approach shot becomes the scoring determinant on this hole. From the optimal driving position, you'll typically face a middle iron (6-7 iron for most players) to the green. The key is committing to your club selection and swinging with confidence. Since there are no significant hazards protecting the green, you can be aggressive with your target line toward the pin. However, respect the green's compact dimensions by ensuring you take enough club - coming up short of a small green is often more costly than being slightly long. Focus on a controlled, committed swing that prioritizes accuracy over trying to get the ball close to every pin position.
On the green
The small green size means most putts will be relatively short, making this an excellent birdie opportunity if you've executed the previous shots well. However, small greens often feature subtle breaks that can be deceptive. Take time to read the green carefully, as even short putts can be tricky on Donald Ross designs. Pay particular attention to the slope of your approach - small greens tend to have more pronounced undulations relative to their size. Position yourself below the hole when possible, as uphill putts on small greens are generally more manageable than downhill attempts. ## RISK VS REWARD This hole presents a clear risk/reward scenario with your tee shot distance. The reward for reaching that optimal 290-yard position is a comfortable middle iron approach, while laying back significantly leaves you with a longer iron or hybrid into the small target. However, the risk of trying to bomb a driver and missing the fairway isn't worth the marginal gain. The conservative play is a 3-wood or controlled driver to about 260-270 yards, which still leaves a very manageable approach. The aggressive play is pushing your drive to that 290-yard mark for the ideal angle, but only if you're confident in your driving accuracy. ## DIFFERENT SKILL LEVELS **Higher Handicap Players:** Focus on finding the fairway with your most reliable tee shot, even if it means hitting 3-wood or hybrid off the tee. From there, take one extra club on your approach and aim for the center of the green. Don't get greedy with pin hunting - the small green rewards players who hit the putting surface. **Lower Handicap Players:** You can be more aggressive with both your tee shot positioning and approach shot targets. Work to reach that optimal driving position around 290 yards, then be precise with your middle iron approach. You have the skills to attack pins, but still respect the green's size by ensuring solid contact and distance control. The first hole at Sedgefield rewards smart course management and sets up players who think their way around the course rather than trying to overpower it - a perfect introduction to Donald Ross's strategic design philosophy.
Watch for
- Course conditioning and mapped hazards may affect line selection; confirm from the aerial.
Hole 1 Green Complex & Slope
USGS 3DEP terrain analysis
Green size: 5,594 sq ft
Course coverage
Tournament and creator videos about Sedgefield Country Club — shared course coverage, not hole-specific clips.
Tournament coverage
Wyndham Championship highlights
Wyndham Championship | Final Round Highlights
2025
How did Hole 1 play?
How did this hole play today?
Frequently asked questions
Yardage reference: Championship tees · 420 yards.
What's the best strategy off the tee?
↓
For this 420-yard par 4, most players will hit driver to set up a comfortable approach.
How difficult is hole 1?
↓
This hole is a good scoring opportunity for most golfers.
How big is the green on hole 1?
↓
The green is medium-sized with moderate targets. Pay attention to pin placement when selecting your approach club.