Hole 2 at Sedgefield Country Club
- Par
- 4
- Yardage
- 448 yds
- Stroke index
- 3
- Hazards
- 4 bunkers · Water
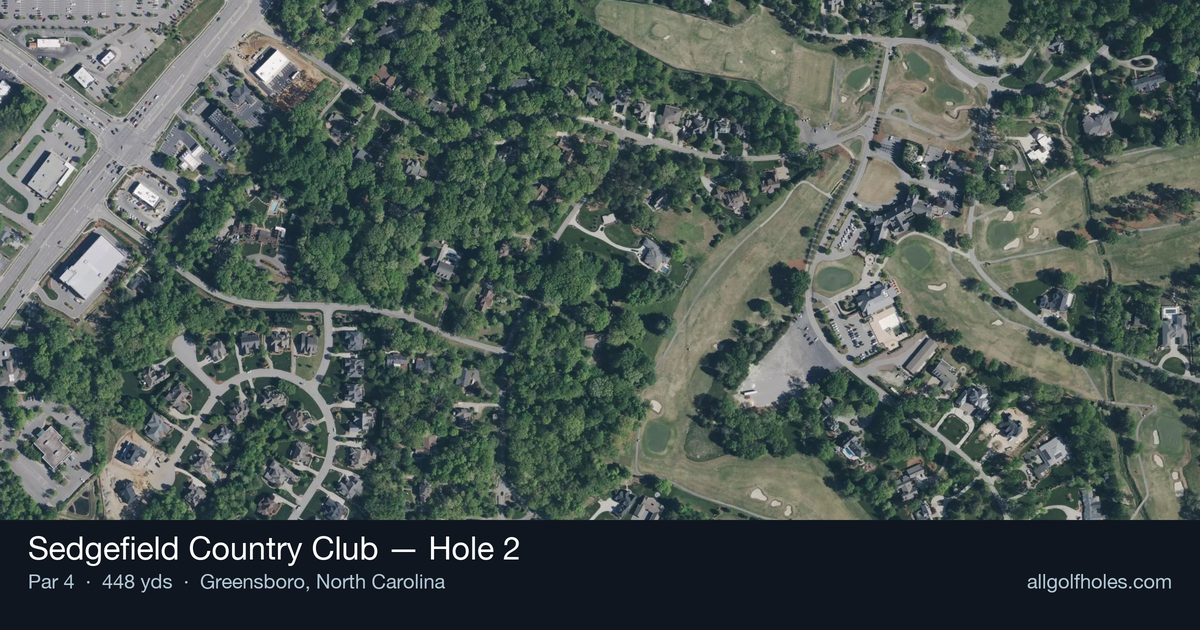
Aerial source not provided
Green size: 46 yds deep × 28 yds wide
Scorecard yardage is for Championship tees. The aerial shows its labeled reference position; distance rings measure to the green.
Championship tees · Par 4 · 448 yards
The plan for No. 2
The second hole at Sedgefield Country Club presents a demanding par 4 that tests precision from tee to green across its 448-yard layout. This straight, no-nonsense design demands a well-struck tee shot down a generous fairway, setting up a challenging approach to one of Sedgefield's characteristically small, undulating greens. The putting surface slopes forward in typical Sedgefield fashion, creating treacherous pin positions that can send wayward approach shots tumbling off the edges. With minimal hazards to distract, this hole relies purely on length and green complexity to challenge players. The elevated handicap rating of 3 reflects the premium placed on accuracy with the approach shot, where club selection and distance control become paramount. Success here requires respecting the green's subtle contours and avoiding the aggressive pin hunting that has derailed many rounds at this PGA Tour venue.
Off the tee
Your tee shot strategy should prioritize finding the fairway over maximum distance. The straight layout allows for an aggressive target line down the center, but course management suggests favoring accuracy. Most players will benefit from a controlled driver or strong 3-wood, aiming for the heart of the landing zone. The key is avoiding any trouble areas and setting up the ideal approach angle. Given the hole's length, you'll need sufficient distance to leave a manageable approach shot, but don't sacrifice accuracy for those extra yards.
Approach & recovery
The approach shot is where this hole reveals its true character. With Sedgefield's notoriously small, undulating greens that slope forward and can fall off at the edges, your club selection and target line become critical. Plan for a mid-iron to long-iron depending on your tee shot position and conditions. Aim for the center of the green regardless of pin position – the small target and forward slopes make aggressive pin-hunting extremely risky. Focus on distance control above all else, as coming up short or flying the green can lead to difficult recovery shots from challenging lies.
On the green
Sedgefield's putting surfaces are renowned for their subtle breaks and forward slopes, and the second green exemplifies these characteristics. Expect the ball to release toward the front of the green, and pay close attention to how putts break as they lose speed. Pin positions near the edges can be particularly treacherous given the green's tendency to fall away. Read putts conservatively and focus on solid lag putting to avoid three-putts, which can quickly turn a scoring opportunity into a bogey or worse. ## RISK VS REWARD This hole offers limited risk/reward opportunities, instead rewarding conservative, strategic play. The primary decision point comes with club selection on the approach – taking enough club to ensure you reach the putting surface versus trying to dial in the exact distance for pin-high positioning. Given the small target and forward-sloping green, the smart play is taking one extra club and focusing on solid contact rather than trying to manufacture the perfect distance. ## DIFFERENT SKILL LEVELS **High-handicap players** should treat this as a two-shot par 4, focusing entirely on finding the fairway with their tee shot and then getting their approach shot safely onto the green. Aim for the center of the green regardless of pin position, and take enough club to ensure you clear any front hazards or slopes. **Low-handicap players** can be more aggressive with their tee shots to set up shorter approach shots, but should still respect the small green complex. Consider the pin position when selecting your approach club, but remember that Sedgefield's greens punish overly aggressive shots. Even skilled players benefit from conservative target selection on this demanding test of precision and course management.
Watch for
- Course conditioning and mapped hazards may affect line selection; confirm from the aerial.
Hole 2 Green Complex
Mapped green boundary
Green size: 6,626 sq ft
Course coverage
Tournament and creator videos about Sedgefield Country Club — shared course coverage, not hole-specific clips.
Tournament coverage
Wyndham Championship highlights
Wyndham Championship | Final Round Highlights
2025
How did Hole 2 play?
How did this hole play today?
Frequently asked questions
Yardage reference: Championship tees · 448 yards.
What's the best strategy off the tee?
↓
For this 448-yard par 4, most players will hit driver to set up a comfortable approach.
How difficult is hole 2?
↓
This hole is one of the tougher holes on the course for most golfers. Key challenges include: water in play, heavily bunkered.
How big is the green on hole 2?
↓
The green is fairly large with multiple pin positions. Lag putting becomes important on longer putts.
What's a good score on hole 2?
↓
This hole is a demanding hole where bogey is not unusual. This longer par 4 will test most golfers. Focus on position over distance.